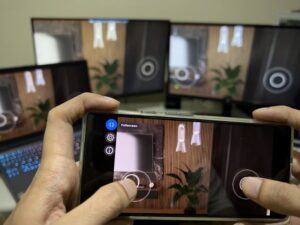
With all the buzz surrounding OpenClaw, I couldn’t resist the urge to check it out myself. I set up OpenClaw on an Ubuntu virtual machine on my home computer, used zrok to expose an endpoint, and made a simple Meta Quest app with a robot avatar to communicate with it.
OpenClaw, from the GitHub page, is a personal AI assistant that you run on your own devices. It answers you on the channels you already use such as WhatsApp, Telegram, Slack, Discord, etc. On the other hand, it is a risky tool to use because you have to give it access to your credentials to maximize its capabilities. It’s not as revolutionary as many developers claim, it is certainly an interesting glimpse of how we imagine what the future of AI agents look like. And is open-source!
Here’s a summary of my pipeline. WARNING: The approach I used below is easy to set up but is insecure. I’m using the gateway token. Definitely implement a more secure setup for production.
- Spin an Ubuntu virtual machine. Install OpenClaw.
- Enable the OpenResponses endpoint
/v1/responsesin openclaw.json. - Install zrok to expose endpoint to the public internet.
- Player speaks. Speech is converted to text via Meta Quest Voice SDK’s dictation feature.
- Input text with OpenClaw gateway token is sent as POST request to zrok public endpoint.
- Request is tunneled to Ubuntu virtual machine.
- OpenClaw processes request. JSON response is sent back to Quest.
- Quest parses the text message from the JSON response via Unity’s JSON utility.
- Send text to Meta Quest Voice SDK’s Text-to-Speech feature and output via AudioSource.
Install OpenClaw in Ubuntu
From the docs:
curl -fsSL https://openclaw.ai/install.sh | bashEnable OpenResponses endpoint
Use the OpenResponses endpoint /v1/responses (disabled by default) by adding this in openclaw.json:
{
  gateway: {
    http: {
      endpoints: {
        responses: { enabled: true }
      }
    }
  }
}
Install zrok
zrok is an open-source sharing solution. I use it to expose the OpenClaw agent to the public internet.
Follow the docs. On Linux, install zrok:
curl -sSf https://get.openziti.io/install.bash | sudo bash -s zrokSign up for an account to get your zrok environment. After that, enable zrok environment:
zrok enable <ENVIRONMENT>share OpenClaw endpoint via zrok public share.
zrok share public http://127.0.0.1:18789You will then receive an api endpoint from zrok. Example: https://mtvh3hxh8ydn.share.zrok.io
Test API endpoint
Try testing the endpoint first by using the gateway token from openclaw.json. I use Bruno API client, an open-source alternative to Postman, for testing. Example request below:
POST https://mtvh3hxh8ydn.share.zrok.io/v1/responses

Headers
Authorization: Bearer <BEARER_TOKEN>
Content-Type: application/json

JSON Body:
{
  "model": "openclaw:main",
  "user": "meta-quest",
  "input": "Tell me a lobster joke."
}
It’s a good idea to include a “user” in the body so that succeeding messages will be included in the same session. If you don’t do this, each message will create a new session with the agent. Response will look something like this:
{
  "id": "resp_167f4fff-d609-4920-a41d-b8bf4e81aab3",
  "object": "response",
  "created_at": 1771893483,
  "status": "completed",
  "model": "openclaw:main",
  "output": [
    {
      "type": "message",
      "id": "msg_0266ccea-e46d-4753-abaa-48b6b3aa462d",
      "role": "assistant",
      "content": [
        {
          "type": "output_text",
          "text": "Why don’t lobsters share?  \nBecause they’re a little shellfish."
        }
      ],
      "status": "completed"
    }
  ],
  "usage": {
    "input_tokens": 119,
    "output_tokens": 32,
    "total_tokens": 10775
  }
}
Open Unity Project
First, test the Unity-to-OpenClaw pipeline. Start a new Unity project. Integrate the Meta Quest Voice SDK and create a new scene with the following setup.
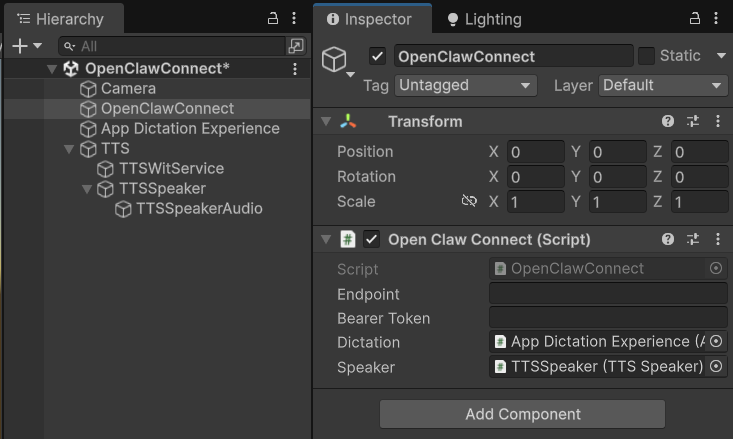
Below is a sample script that you can attach an empty game object. Input your zrok endpoint and OpenClaw gateway token:
using System.Collections;
using System.Text;
using UnityEngine;
using UnityEngine.Networking;
using Oculus.Voice.Dictation;
using Meta.WitAi.TTS.Utilities;

public class OpenClawConnect : MonoBehaviour
{
    [SerializeField] string _endpoint;
    [SerializeField] string _bearerToken;
    [SerializeField] AppDictationExperience _dictation;
    [SerializeField] TTSSpeaker _speaker;

    bool _isListening;

    void OnEnable()
    {
        _dictation.DictationEvents.OnFullTranscription.AddListener(OnFullTranscription);
    }

    void OnDisable()
    {
        _dictation.DictationEvents.OnFullTranscription.RemoveListener(OnFullTranscription);
    }

    void OnGUI()
    {
        string label = _isListening ? "Stop Listening" : "Start Listening";

        if (GUI.Button(new Rect(10, 10, 150, 50), label))
        {
            _isListening = !_isListening;

            if (_isListening)
                _dictation.Activate();
            else
                _dictation.Deactivate();
        }
    }

    void OnFullTranscription(string transcription)
    {
        Debug.Log($"[STT] {transcription}");
        StartCoroutine(SendRequest(transcription));
    }

    IEnumerator SendRequest(string message)
    {
        var requestBody = new RequestBody
        {
            model = "openclaw:main",
            user = "meta-quest",
            input = message
        };

        string json = JsonUtility.ToJson(requestBody);
        byte[] bodyRaw = Encoding.UTF8.GetBytes(json);

        using var request = new UnityWebRequest(_endpoint, "POST");
        request.uploadHandler = new UploadHandlerRaw(bodyRaw);
        request.downloadHandler = new DownloadHandlerBuffer();
        request.SetRequestHeader("Authorization", "Bearer " + _bearerToken);
        request.SetRequestHeader("Content-Type", "application/json");

        request.SendWebRequest();

        float elapsed = 0f;
        float nextLog = 1f;

        while (!request.isDone)
        {
            elapsed += Time.deltaTime;
            if (elapsed >= nextLog)
            {
                Debug.Log($"Waiting for response... {elapsed:F1}s elapsed");
                nextLog += 1f;
            }
            yield return null;
        }

        if (request.result == UnityWebRequest.Result.Success)
        {
            string responseJson = request.downloadHandler.text;
            var response = JsonUtility.FromJson<ResponseBody>(responseJson);
            string outputText = response.output[0].content[0].text;
            Debug.Log(outputText);
            _speaker.Speak(outputText);
        }
        else
        {
            Debug.LogError($"Request failed: {request.error}");
        }
    }

    [System.Serializable]
    class RequestBody
    {
        public string model;
        public string user;
        public string input;
    }

    [System.Serializable]
    class ResponseBody
    {
        public string id;
        public string status;
        public string model;
        public OutputItem[] output;
    }

    [System.Serializable]
    class OutputItem
    {
        public string type;
        public string id;
        public string role;
        public ContentItem[] content;
        public string status;
    }

    [System.Serializable]
    class ContentItem
    {
        public string type;
        public string text;
    }
}
The script above does the following:
- On play, add a button on the screen to toggle the Voice SDK’s dictation feature and convert your voice to text.
- Send a POST request to the zrok endpoint, tunneled to the OpenClaw agent. Wait several seconds for response.
- Parse the response via Unity JSON utility and send the message through Voice SDK’s Text-to-Speech feature.
And that’s it! You should be able to take it from here.
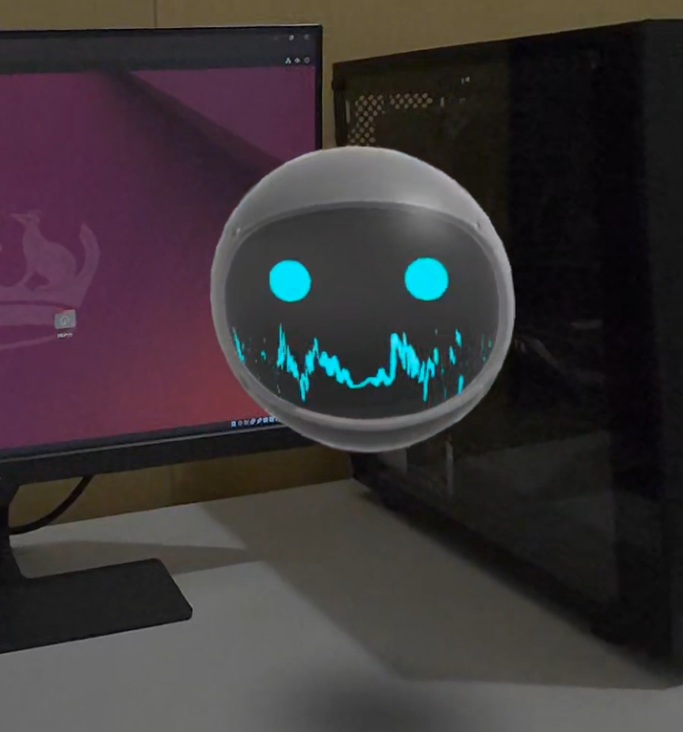
Robot avatar
The 3D model is from the Unity Asset Store here.
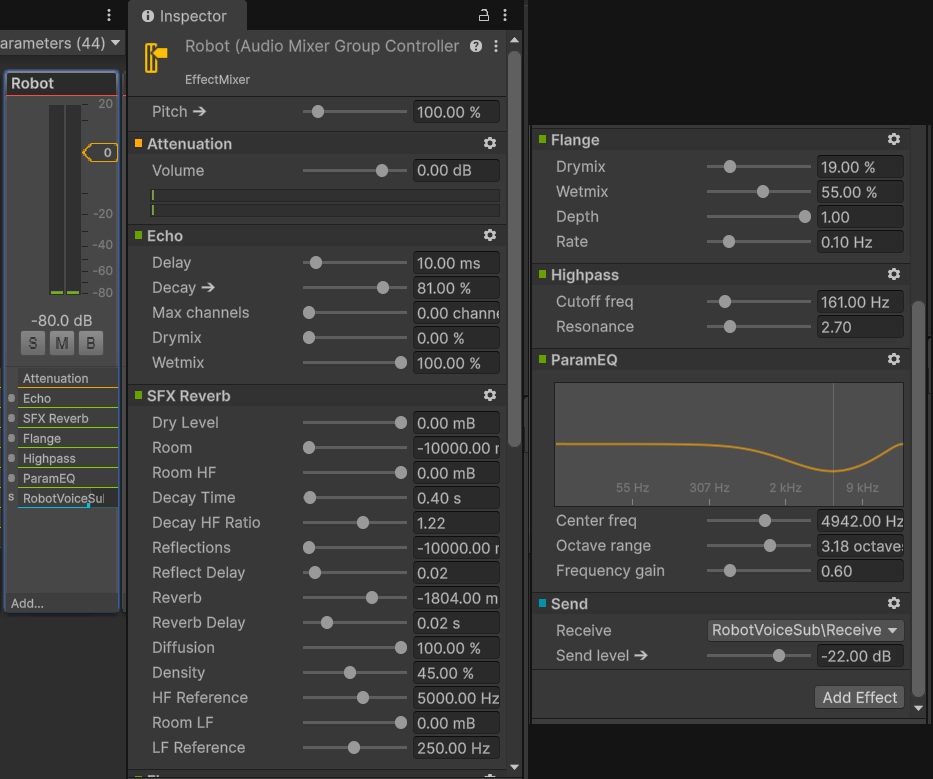
Robot voice
The robot is using the voice preset WIT$PROSPECTOR from the Voice SDK. I am using Magic Voice Effector to make the voice sound robotic.
Outline
My first plan was to make the mouth move like a waveform to indicate speaking. But that would take more time, so I just added an outline an indicator.
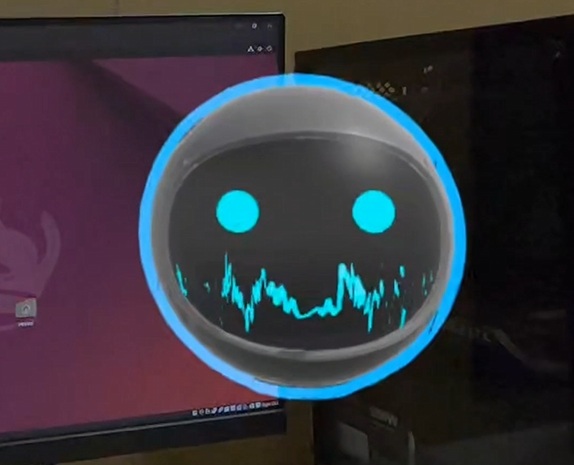
This is the script that controls the outline’s visibility based on the voice:
using UnityEngine;

public class OutlineController : MonoBehaviour
{
    [SerializeField] Outline _outline;
    [SerializeField] AudioSource _audioSource;
    [SerializeField, Range(0f, 1f)] float _threshold = 0.1f;
    [SerializeField] int _sampleSize = 256;

    private float[] _samples;

    void Start()
    {
        _samples = new float[_sampleSize];
        _outline.enabled = false;
    }

    void Update()
    {
        _audioSource.GetOutputData(_samples, 0);

        float sum = 0f;
        foreach (float sample in _samples)
            sum += sample * sample;

        float rms = Mathf.Sqrt(sum / _samples.Length);
        _outline.enabled = rms > _threshold;
    }
}
Lighting
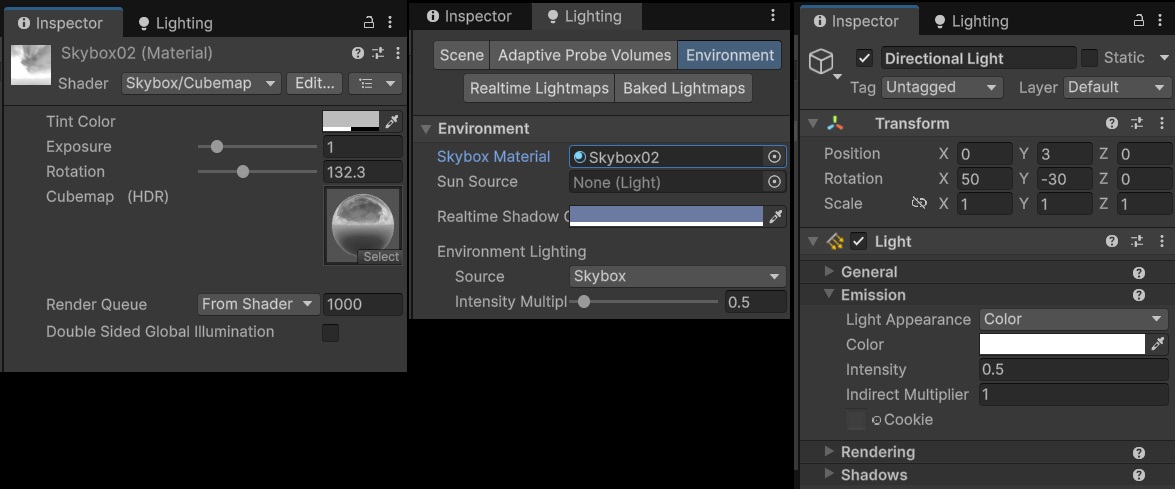
To make the robot avatar feel more grounded in the scene, it’s lighting needs to be as close as possible to the visible environment. I’m using a custom skybox and some tweaks to the environment and directional lighting settings. Also, I added a blob shadow beneath the robot. It’s basically a quad with a grayscale transparency texture.
Shader "Custom/UnlitTransparency"
{
    Properties
    {
        [MainColor] _BaseColor("Base Color", Color) = (1, 1, 1, 1)
        [MainTexture] _TransparencyMap("Transparency Map (Grayscale)", 2D) = "white" {}
        _TransparencyMultiplier("Transparency Multiplier", Range(0, 1)) = 1
    }

    SubShader
    {
        Tags { "RenderType" = "Transparent" "RenderPipeline" = "UniversalPipeline" "Queue" = "Transparent" }

        Blend SrcAlpha OneMinusSrcAlpha
        ZWrite Off

        Pass
        {
            HLSLPROGRAM

            #pragma vertex vert
            #pragma fragment frag

            #include "Packages/com.unity.render-pipelines.universal/ShaderLibrary/Core.hlsl"

            struct Attributes
            {
                float4 positionOS : POSITION;
                float2 uv : TEXCOORD0;
            };

            struct Varyings
            {
                float4 positionHCS : SV_POSITION;
                float2 uv : TEXCOORD0;
            };

            TEXTURE2D(_TransparencyMap);
            SAMPLER(sampler_TransparencyMap);

            CBUFFER_START(UnityPerMaterial)
                half4 _BaseColor;
                float4 _TransparencyMap_ST;
                half _TransparencyMultiplier;
            CBUFFER_END

            Varyings vert(Attributes IN)
            {
                Varyings OUT;
                OUT.positionHCS = TransformObjectToHClip(IN.positionOS.xyz);
                OUT.uv = IN.uv;
                return OUT;
            }

            half4 frag(Varyings IN) : SV_Target
            {
                half4 color = _BaseColor;
                float2 transparencyUV = TRANSFORM_TEX(IN.uv, _TransparencyMap);
                half alpha = SAMPLE_TEXTURE2D(_TransparencyMap, sampler_TransparencyMap, transparencyUV).r;
                color.a *= alpha * _TransparencyMultiplier;
                return color;
            }
            ENDHLSL
        }
    }
}