Constantly generating builds can be time consuming. You’ll want to automate your Unreal Engine build process by setting up a Jenkins server that generates a build every time you push an update into your source control. The server then zips and uploads these builds for distribution. This server can be a local machine or a cloud server such as an Amazon EC2 instance.
[Updated June 4, 2024]
This guide is a modified version of Patrice Vignola’s post Automation with Unreal Engine and Jenkins-CI. I replaced the section about Perforce with Plastic SCM (Unity Version Control) since this is what I use most of the time. Moreover, I added bits of information that I find important. There is also an old guide Jenkins, CI and Test-Driven Development – UnrealWiki. Might be outdated, but is worth checking out.
Prerequisites
Install the following in your Windows 11 workstation:
- Unreal Engine Source Build (I’m using UE 5.2.1) from GitHub (download guide) (build guide)
- Visual Studio Community 2022 with Unreal Engine workloads (setup guide)
- Plastic SCM Cloud Edition. Login using an account that has access to the repository.
- Jenkins (installation guide). Install as local or domain user.
What is Jenkins?
Beginner videos:
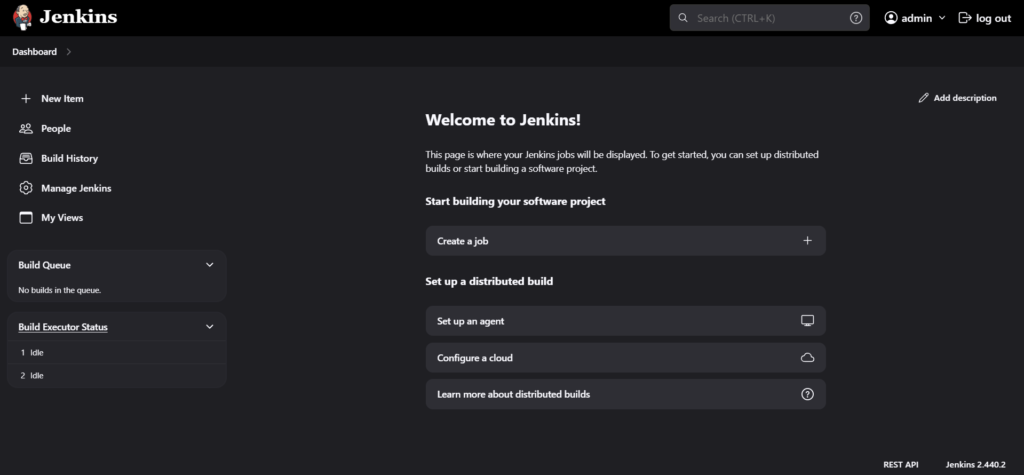
I recommend getting familiar with Jenkins first by setting up a simple Freestyle Project. Your Dashboard should look something like mine below. I have the Dark Theme installed.
Below is the step-by-step guide on how to automate Unreal Engine 5 builds using Jenkins.
I. Configure Jenkins
Change workspace directory to somewhere closer to your C: or any other drive to prevent UE from complaining that the commands are too long. The default workspace location is something like:
C:\ProgramData\Jenkins\.jenkins\workspace\<JENKINS_PROJECT_NAME>which at first glance looks short. However, after downloading the UE5 repository from Plastic SCM, the .uproject location will be:
C:\ProgramData\Jenkins\.jenkins\workspace\<JENKINS_PROJECT_NAME>\<UE5_PROJECT_NAME>\<UE5_PROJECT_NAME>.uprojectwhich will cause COMMAND TOO LONG errors when executing certain UE5 batch commands. What I suggest is changing the default workspace to something like
C:\Jenkinsby following this guide. Open the file
C:\Users\<USERNAME>\AppData\Local\Jenkins\.jenkins\config.xmland change these lines:
<workspaceDir>${JENKINS_HOME}/workspace/${ITEM_FULL_NAME}</workspaceDir>
<buildsDir>${ITEM_ROOTDIR}/builds</buildsDir>
In my setup, I’d like to move the workspace and builds to my E:\Jenkins directory. Here is what it will look like:
- Workspace Root Directory:
E:/Jenkins/${ITEM_FULL_NAME}/workspace - Build Record Root Directory:
E:/Jenkins/${ITEM_FULL_NAME}/builds
After that, restart Jenkins via URL http://localhost:8080/restart or other means. Your fresh projects should now use the new directory.
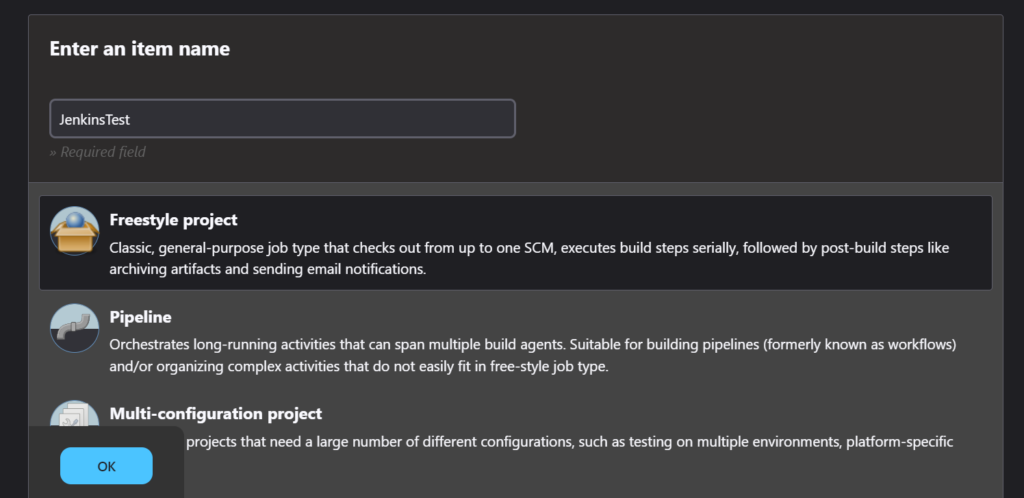
II. Create a Jenkins Freestyle Project
III. Source Code Management
Like I mentioned, I’m using Plastic SCM for version control. You can skip this step if you’re using something else. Look here for a Perforce guide.
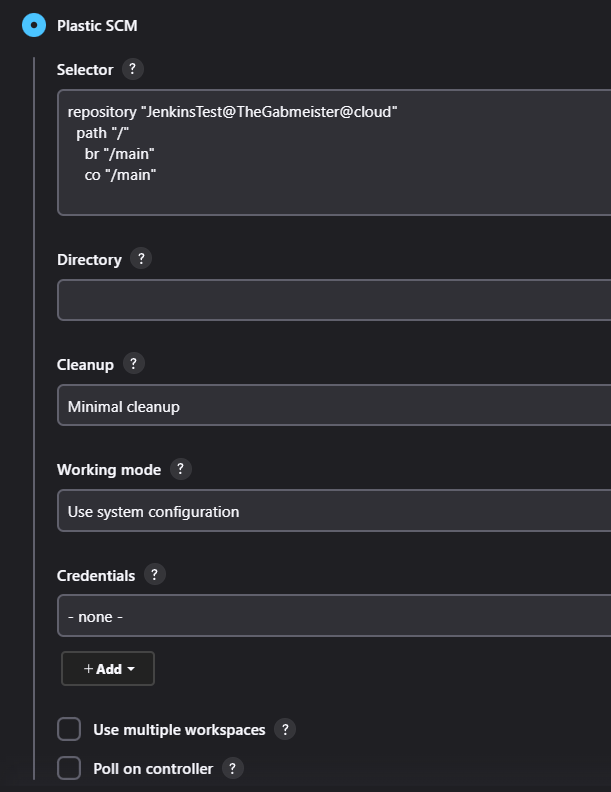
Install the Plastic SCM plugin following this guide. Below are the settings I use which you can set in Dashboard > Manage Jenkins > Tools.

Here is the official guide on integrating Plastic SCM with Jenkins. Ignore the part about integrating MSBuild since we will handle that differently later. When a build sequence is triggered, we want to download the latest changeset in the main branch. Below are sample settings I have where JenkinsTest is the name of the repository, TheGabmeister is my organization name, and MyProject is the name of the folder in the Jenkins workspace where I want to download the repository:
IV. Build Triggers
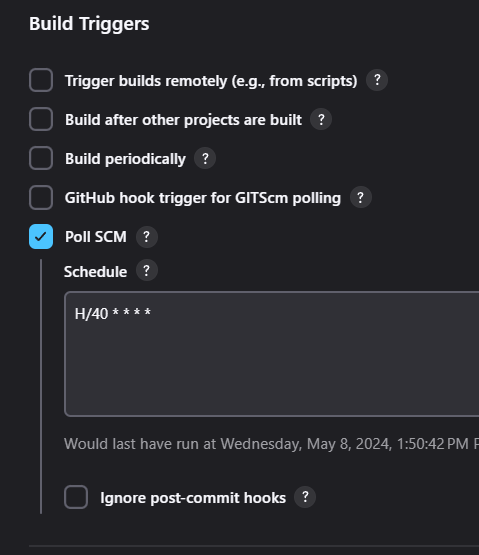
There are many ways to trigger the build sequence depending on your preference. In this example, I set the Build Trigger to Poll SCM with schedule H/40 * * * * which means that Jenkins will check the main branch in Plastic SCM for the latest changeset every 40 mins. The ideal number will depend on your project and the frequency of pushes to the main branch. Some projects might take more than 1 hour to package both client and server builds.
Depending on your cadence, you’ll want to use a combination of configurations and plugins to optimize the build triggers.
- Throttle Concurrent Builds – prevent multiple builds from running at the same time for the same job
- Quiet Period – add delay before the job actually starts after being triggered
- Parameterized Trigger Plugin – trigger new builds when your build has completed, with various ways of specifying parameters for the new build.
V. Build Steps
Below are examples of Windows batch commands that you can use as template for packaging Development builds. A very useful reference is this Unreal AutomationTool wiki by botman99 that explains the command line arguments. Be sure to check them out if you’re wondering what each argument means.
1. Delete temp folder.
Start fresh and delete remnants from previous build attempts.
rd /s /q temp2. Delete project and plugin temporary files.
rmdir /q /s %WORKSPACE%\<PROJECT_NAME>\Binaries
rmdir /q /s %WORKSPACE%\<PROJECT_NAME>\Build
rmdir /q /s %WORKSPACE%\<PROJECT_NAME>\DerivedDataCache
rmdir /q /s %WORKSPACE%\<PROJECT_NAME>\Intermediate
rmdir /q /s %WORKSPACE%\<PROJECT_NAME>\Saved
rmdir /q /s %WORKSPACE%\<PROJECT_NAME>\.vs
FOR /D %%D IN (%WORKSPACE%\<PROJECT_NAME>\Plugins\*) DO (IF EXIST "%%D\Binaries" (rmdir /s /q "%%D\Binaries"))
FOR /D %%D IN (%WORKSPACE%\<PROJECT_NAME>\Plugins\*) DO (IF EXIST "%%D\Intermediate" (rmdir /s /q "%%D\Intermediate"))
del %WORKSPACE%\<PROJECT NAME>\*.sln
This step adds a lot to the build time because deleting these files means you’re rebuilding the project from scratch. I have added this step here because there have been multiple times when I’ve encountered the Could not be compiled. Try rebuilding from source manually error. It happens when editing C++ code, especially adding, removing, renaming classes, and pushing the changes to the repository. From what I’ve read, this is caused by outdated project files, and can be fixed by regenerating project files as explained here. You can skip this step if you’re not getting any errors. Also, you can just remove the line that deletes the Plugin Binaries and Intermediate folders since you’ll rarely modify your plugins.
Note: Jenkins uses batch commands within a Windows batch script step, not directly in the pipeline script. In batch scripts, percent signs used for variables need to be doubled (%%D) to be recognized correctly when executed in Jenkins. This is because a single percent sign is treated as a Jenkins variable (%WORKSPACE%).
3. Generate project files
"<UE5_SOURCE_FOLDER>\Engine\Binaries\DotNET\UnrealBuildTool\UnrealBuildTool.exe" -projectfiles -project="%WORKSPACE%\<PROJECT_NAME>\<PROJECT_NAME>.uproject" -game -rocket -progress4. Build project. According to Patrice, “this command will make sure that the .dll is always up to date… a crucial step in order to successfully build the game.” I believe this represents the part where you execute the Build command in Visual Studio.
"C:\Program Files\Microsoft Visual Studio\2022\Community\MSBuild\Current\Bin\MSBuild.exe" "%WORKSPACE%\<PROJECT_NAME>\<PROJECT_NAME>.sln" /t:build /p:Configuration="Development Editor";Platform=Win64;verbosity=diagnostic5. Package client. and archive it in a folder %WORKSPACE%\temp\Development
"<UE5_SOURCE_FOLDER>\Engine\Build\BatchFiles\RunUAT.bat" -ScriptsForProject="%WORKSPACE%\<PROJECT_NAME>\<PROJECT_NAME>.uproject" BuildCookRun -nop4 -utf8output -nocompileeditor -skipbuildeditor -cook -project="%WORKSPACE%\<PROJECT_NAME>\<PROJECT_NAME>.uproject" -target=<PROJECT_NAME> -unrealexe="<UE5_SOURCE_FOLDER>\Engine\Binaries\Win64\UnrealEditor-Cmd.exe" -platform=Win64 -stage -archive -package -build -pak -iostore -compressed -prereqs -archivedirectory="%WORKSPACE%\temp\Development" -clientconfig=Development -nocompile -nocompileuat -cleanRunUAT.bat executes the Unreal Automation Tool. Unfortunately, the officially documentation does not explain what the command arguments mean. They’re hidden in the -help argument. Instead, look at this GitHub guide for reference. Some are self explanatory. Here are some of the noteworthy flags:
- BuildCookRun – Builds/Cooks/Runs a project.
- -nop4 – disables Perforce functionality {default if not run on a build machine}
- -utf8output – ensures that all the output from the command is encoded in UTF-8
- -nocompileeditor – don’t compile the Unreal Editor or any of its modules.
- -skipbuildeditor – skip building the Unreal Editor
- -cook – Determines if the build is going to use cooked data
- -stage – put this build in a stage directory
- -archive – put this build in an archive directory
- -package – package the project for the target platform
- -build – True if build step should be executed
- -pak – generate a pak file
- -iostore – generate I/O store container file(s)
- -compressed – packaged game should use compressed asset packages
- -prereqs – stage prerequisites along with the project
- -clientconfig=Development – use the Development build configuration
- -nocompile – do not attempt to compile any script modules – attempts to run with whatever is up to date
- -nocompileuat – Unreal Automation Tool (UAT) should not be compiled as part of the build process.
- -clean – wipe intermediate folders before building
Patrice mentioned that you can remove the -clean flag to make faster builds. However, this might cause some issues because of files generated by previous builds. I always use the -clean flag just to be safe.
6. Rename folder to include Plastic SCM changeset number. The default folder name for the packaged build is Windows. We want to use something more descriptive.
ren "%WORKSPACE%\temp\Development\Windows" <PROJECT_NAME>Client_Development_c%PLASTICSCM_CHANGESET_ID%7. Package server. Archive it in a folder %WORKSPACE%\temp\Development
"<UE5_SOURCE_FOLDER>\Engine\Build\BatchFiles\RunUAT.bat" -ScriptsForProject="%WORKSPACE%\<PROJECT_NAME>\<PROJECT_NAME>.uproject" BuildCookRun -nop4 -utf8output -nocompileeditor -skipbuildeditor -cook -project="%WORKSPACE%\<PROJECT_NAME>\<PROJECT_NAME>.uproject" -target=<PROJECT_NAME>Server -unrealexe="<UE5_SOURCE_FOLDER>\Engine\Binaries\Win64\UnrealEditor-Cmd.exe" -platform=Win64 -stage -archive -package -build -pak -iostore -compressed -prereqs -archivedirectory="%WORKSPACE%\temp\Development" -server -noclient -serverconfig=Development -nocompile -nocompileuatAlmost exactly the same as the previous step except you add the -server and -noclient flags and replace -clientconfig with -serverconfig. and -target=<PROJECT_NAME> with -target=<PROJECT_NAME>Server.
8. Rename folder to include Plastic SCM changeset number
ren "%WORKSPACE%\temp\Development\WindowsServer" <PROJECT_NAME>Server_Development_c%PLASTICSCM_CHANGESET_ID%Optional: There might be cases when you want to package multiple builds, each with different DefaultEngine.ini settings. An example of this is packaging server builds that start at different maps. A tool I found useful is Find and Replace Text. This lets you replace a specific line of text in a file. Below is an example command. Don’t forget the exit 0.
"%WORKSPACE%\Utils\fart.exe" "%WORKSPACE%\MyProject\Config\DefaultEngine.ini" "ServerDefaultMap=/Game/Maps/ThirdPersonMap.ThirdPersonMap" "ServerDefaultMap=/Game/Maps/TestMap.TestMap"
exit 0
It’s also possible to change the server map by passing a command line argument in the .exe file instead of packaging a separate server build.
9. Zip and move the builds to a specific folder. In this example, I placed them inside a Google Drive, and the naming scheme arranges the builds from newest to oldest.
tar -a -c -f C:\GoogleDrive\Builds\Development\c%PLASTICSCM_CHANGESET_ID%_<PROJECT_NAME>Client_Development.zip -C "%WORKSPACE%\temp\Development" <PROJECT_NAME>Client_Development_c%PLASTICSCM_CHANGESET_ID%
tar -a -c -f C:\GoogleDrive\Builds\Development\c%PLASTICSCM_CHANGESET_ID%_<PROJECT_NAME>Server_Development.zip -C "%WORKSPACE%\temp\Development" <PROJECT_NAME>Server_Development_c%PLASTICSCM_CHANGESET_ID%
VI. Post-build Actions
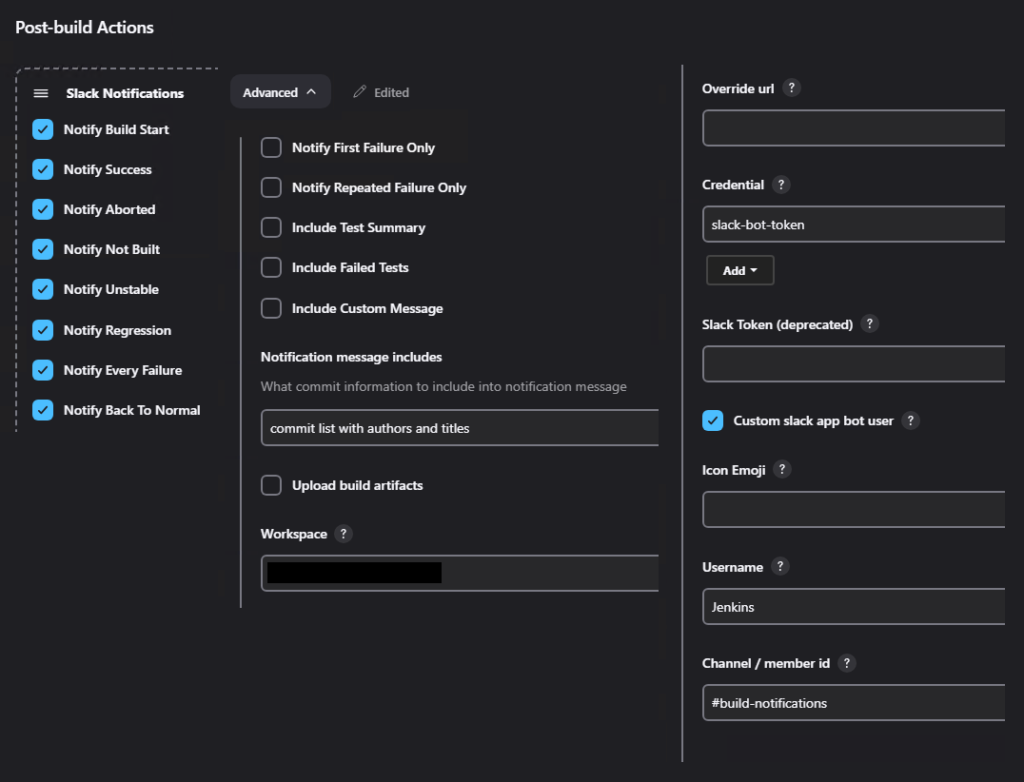
You’ll want to know the status of an ongoing build. You can set up a Slack Notification that will notify the team when a build starts, finishes, or fails. Watch this video and this instruction on how to integrate Slack notifications with Jenkins. Below is an example of my configuration. I want the slack bot to post the notification in a specific channel and include details such as the author and a summary of the changes:

You can also set it to a Discord Notifier or just a simple email message.
Troubleshooting
Here are a couple of solutions to issues I’ve experienced in the process:
- In the Windows commands, use backslash for directory separator and forward slash for command-line options.
- When you have an AWS EC2 instance with Jenkins running a build, using RDP will sometimes not work and the interface will freeze.
- Plastic might have trouble finding
client.conf. Copy and paste it. It is originally located in the following directory:C:\Users\<username>\AppData\Local\plastic4\client.conf
- Because we’re using UE5, the engine’s code references to UE4 have been updated by replacing
ue4exewithunrealexe. Below is an error you might encounter if you forgot to change this:
Running AutomationTool...
Using bundled DotNet SDK version: 6.0.302
Using bundled DotNet SDK version: 6.0.302
Building AutomationTool...

...
...
...

Starting AutomationTool...
...
...
...
Initializing script modules...
Building 20 projects (see Log 'Engine/Programs/AutomationTool/Saved/Logs/Log.txt' for more details)
 Restore...
 Build...
Build projects time: 25.07 s
Total script module initialization time: 27.96 s.
Executing commands...
Setting up ProjectParams for %WORKSPACE%\<PROJECT_NAME>\<PROJECT_NAME>.uproject
WARNING: Obsolete argument "ue4exe" on command line - use "unrealexe" instead
More references:
- Jenkins User Documentation
- Learn Jenkins! Complete Jenkins Course – Zero to Hero
- Complete Jenkins Pipeline Tutorial | Jenkinsfile explained
- How to package your game with commands – UnrealWiki
Further reading:
- Running Faster, Cost-Effective UE5 Builds on The Cloud (2023) by Incredibuild [link]
- Game DevOps: Elevating Your Unity and Unreal Build Pipelines With TeamCity (2023 )by Daniel Gallo [link]