This is a short guide on how to deploy an Unreal Engine dedicated game server on an Amazon EC2 instance. Sometimes you want to create a quick multiplayer experience for prototyping or client demonstrations, but you don’t want to host a server on your own machine. The alternative is to host a game server in the cloud which has the following advantages:
- Stability and security. You don’t run the risk of losing internet connection or power.
- You don’t need to purchase extra hardware.
- You don’t need to get a static IP address or do things like NAT traversal.
- It’s free (or very inexpensive) for small projects. Great for prototyping.
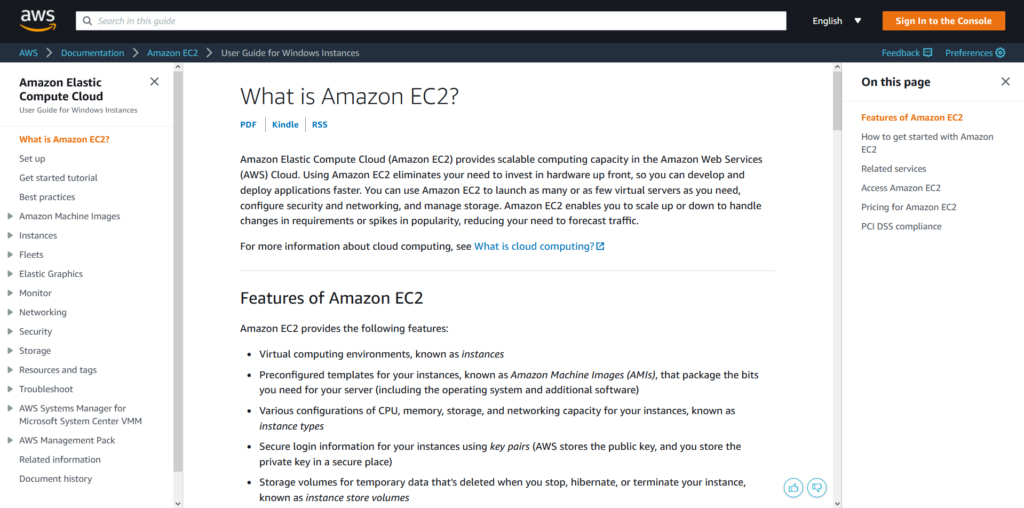
We’ll be taking a look at Amazon Elactic Cloud Compute (EC2) which allows you to run a virtual machine on Amazon Web Services (AWS). There are other popular options out there such as Amazon GameLift and Azure Playfab, but these are full-blown backend infrastructure for multiplayer games with features like user authentication, matchmaking, leaderboards, database management, etc. You don’t need these features if, say, you’re only creating an ArchViz demo or a 3D product demonstration with 2-3 simultaneous users max.
Prerequisite: You must have a basic understanding of networking and multiplayer in Unreal Engine. Get started here before moving forward.
Setting Up and Packaging a Dedicated Server
As of this writing, I’m using Unreal Engine 5.1.1 and Visual Studio 2022. We’ll use the sample Third Person Template.
If you’re new to multiplayer in UE, be aware that you cannot package a dedicated server using the binary version of UE from the Epic Games launcher. You need to download the Unreal Engine source code from GitHub. The documentation has detailed explanation of the steps:
- Set up Visual Studio
- Download Unreal Engine Source Code from GitHub – Make sure to extract the .zip file in a location that has a short path name (Ex. C:\dev) to avoid the PathTooLongException error.
- Build Unreal Engine from Source
- Set up Dedicated Server
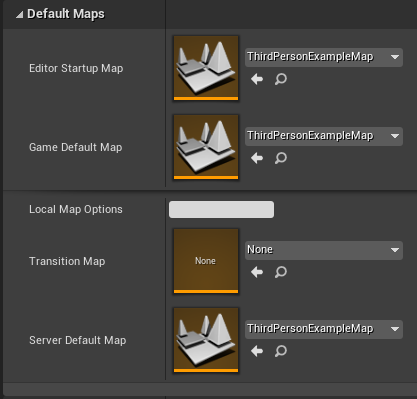
The above steps might take several hours to a whole day to finish depending on your hardware and download speed. Once you’re finished packaging a server build, compress the folder to a .zip file and upload it to your Google Drive or any other file sharing site. We will get back to this later. Also, don’t forget to set the Server Default Map to ThirdPersonExampleMap. This is found under Project Settings > Maps & Modes > Default Maps.
If this is your first time setting up a dedicated server, my advice is to first try deploying your server on your local machine so that you have a grasp of the pipeline. Follow the steps above. Once you have a server running, run multiple instances of your client build on the same machine and connect them to the server. You can do this by running Open 127.0.0.1 in the command line (open command line with the tilde key “~”). Make sure that both the server and client builds are allowed through Windows Firewall.
Launching a Virtual Machine with Amazon EC2
We’ll be launching our own Windows instance with Amazon EC2. Documentation here. If you’re totally new to cloud computing, learn more about it here. Amazon Web Services can be quite intimidating because of the sheer amount of services they offer. The jam-packed console interface also does not help. Take your time and perhaps watch some tutorials online as well.
- Sign up for AWS – note that an AWS account is different from an Amazon online store account. You also need a credit card for billing purposes. In terms of pricing, the the Amazon EC2 Free Tier offers 12-month free usage from the date the account was created. However, it has a limit of “750 hours per month of Windows t2.micro or t3.micro instance dependent on region” which is enough if you have only 1 virtual machine running all the time (1 machine x 24 hours x 30 days = 720 hours).
- Create a key pair – we use a private key to decrypt the administrator password which we use to connect to the Windows instance using Remote Desktop Protocol (RDP).
- Create a security group – The default port an Unreal Engine dedicated server uses for replication is 7777 UDP (References: 1, 2, 3, 4). Once you’ve created a security group, add the following inbound rules under EC2 > Security Groups > [Security Group ID] > Edit inbound rules.
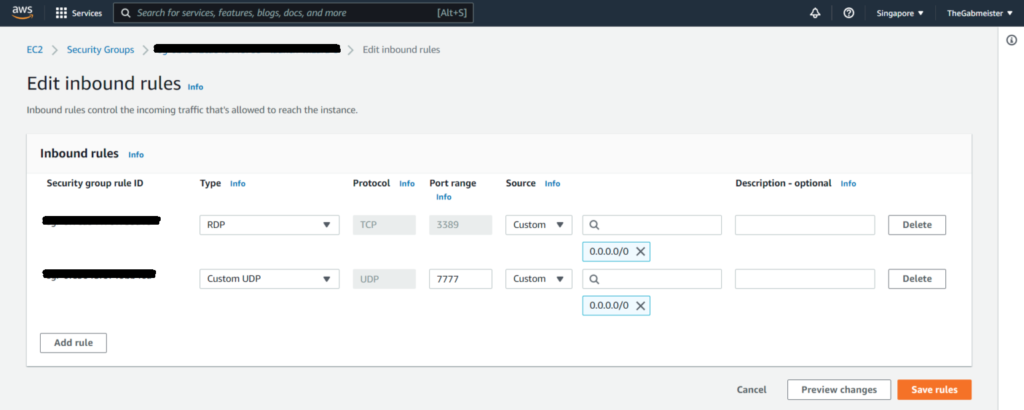
Double check that the Outbound rules have All traffic in it. By default, this is included when creating a new Security Group. You might accidentally delete it though.

We are now ready to launch an instance through your Amazon EC2 console. Follow the steps bellow:
- Launch an instance. Choose the AMI for Windows Server 2016 Base or later since this is covered by the Free Tier. I use Windows Server 2022 Base. Take not of your instance’ Public IP Address.
- Connect to your instance. Always save your password in a safe place. If you receive an error while attempting to connect to your instance, see Remote Desktop can’t connect to the remote computer.
Once you’ve connected, it should look something like this:

Configuring Your Windows Instance
Add inbound rule in Windows Defender Firewall with Advanced Security
Previously we added an inbound rule for port 7777 in our Amazon EC2 Security Group settings. We now have to add the same rule in the Windows Defender Firewall with Advanced Security window. Learn more here.
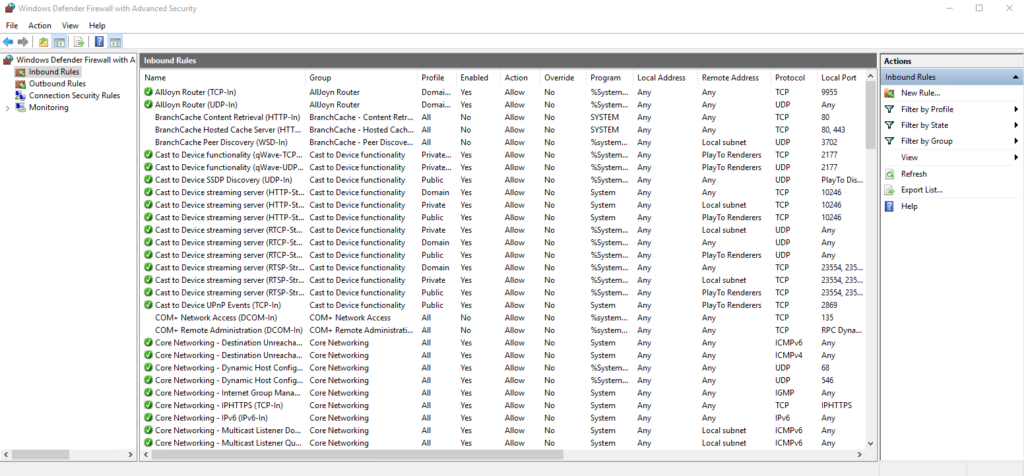
Under Inbound Rules, on the right panel, click on New Rule. Choose the following options:
- Rule Type: Port
- Protocol: UDP
- Port: 7777
- Action: Allow the connection
- Profile: Check all Domain, Private, and Public
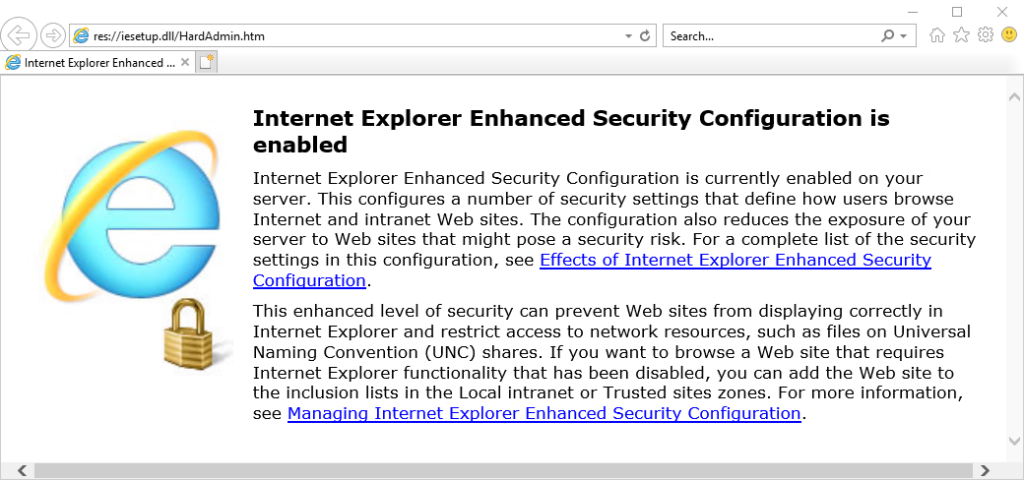
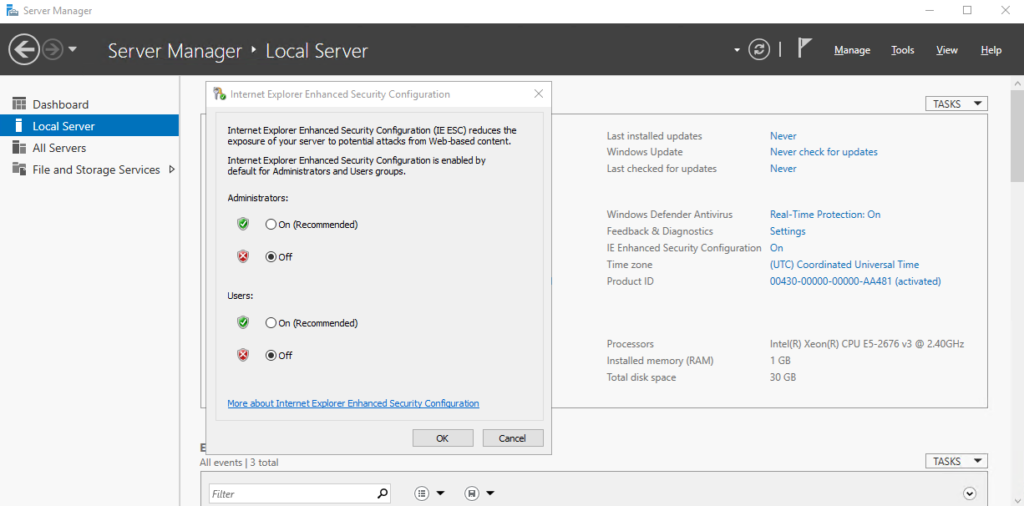
Disable Internet Explorer Enhance Security Configuration
The first thing I usually do is I download Google Chrome because I don’t like Internet Explorer. However, you have to turn off Internet Explorer Enhance Security Configuration for you to be able to download files. Follow the steps in this guide.
You can now download and install Google Chrome after the steps above.
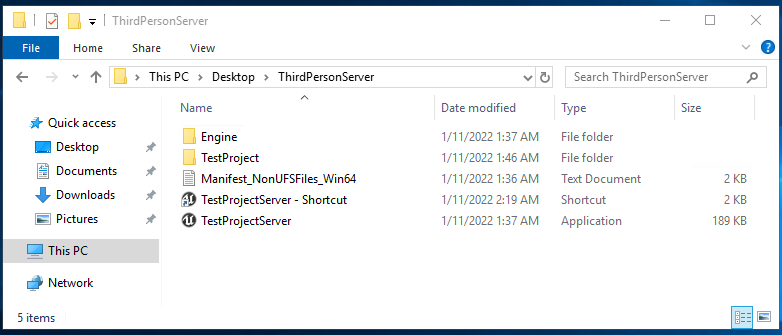
Download and extract your Unreal Engine server build
Next, download your dedicated server build from your Google Drive (or any of your preferred file sharing site) and extract it to the desktop. You might want to download WinRAR as well which makes .zip extraction much smoother. This will help a lot when you’re going to uploading / download UE server builds several times.
Running and testing the Unreal Engine server
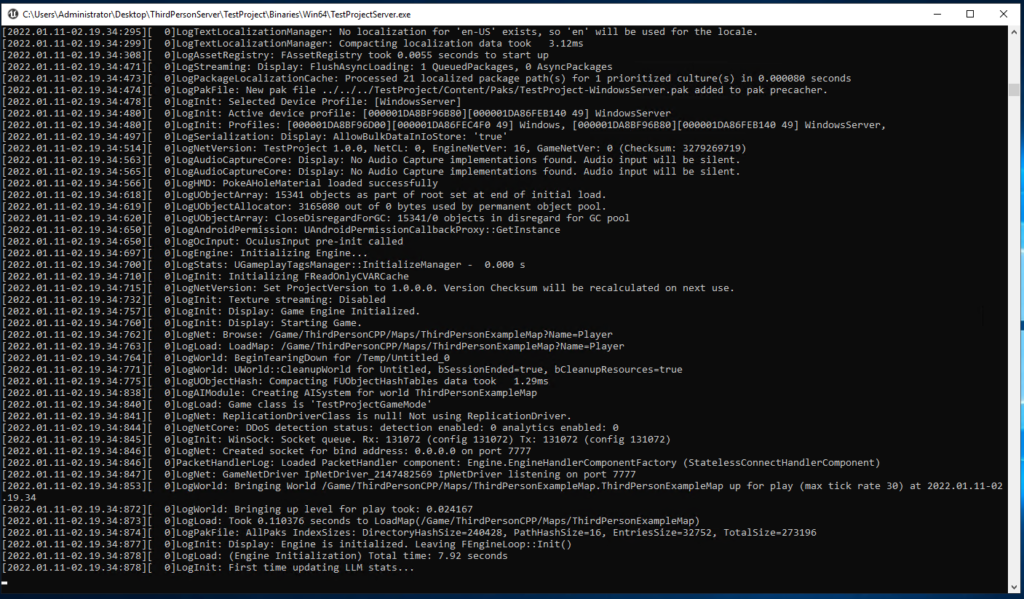
Assuming you’ve read through the documentation here, you should already know how to run the server while displaying the log in command prompt.
The first time you try to run the server, you will be greeted by an error message.
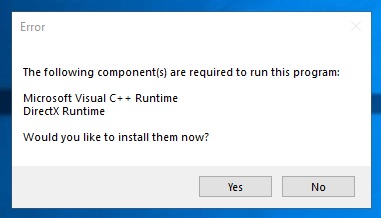
Follow the instructions and choose to install the prerequisites:

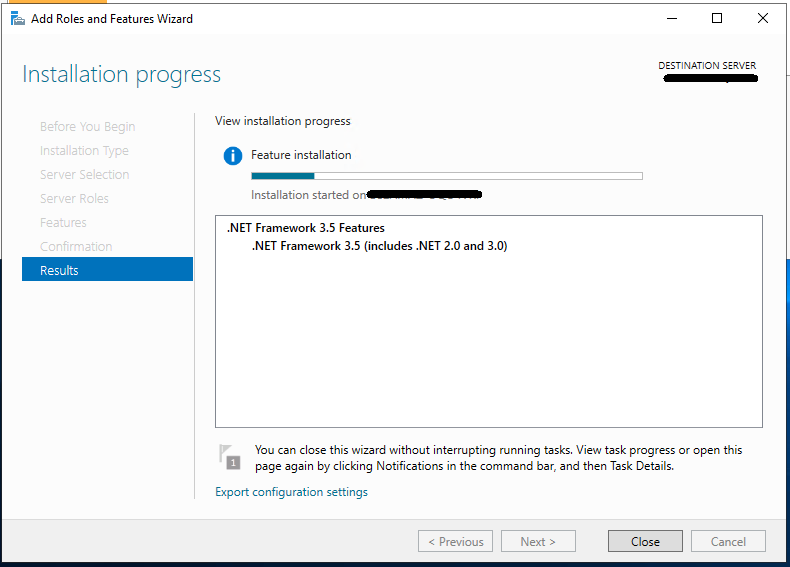
However, it will tell you that .NET Framework 3.5 couldn’t be installed.

Follow the instructions here or here on how to install .NET Framework 3.5 on an EC2 Windows instance:
- Go to Server Manager > Manage > Add roles and features
- On the Select installation type screen, select Role-based or feature-based installation.
- Select your own server from the server pool. You’ll know it’s your server based on the Hostname and IP Address.
- On the Select features screen, check the box next to .Net Framework 3.5 Features.
- On the Confirm installation selections window, ignore the warning and click Install.
You should now be able to run the server and see the log in the command prompt window
To test connection, open two instances of the Third Person client build on your local machine. Run the command open [Server Public IP Address] in the command line on each instance (open command line with the tilde key “~”). You should be able to connect and see each other.
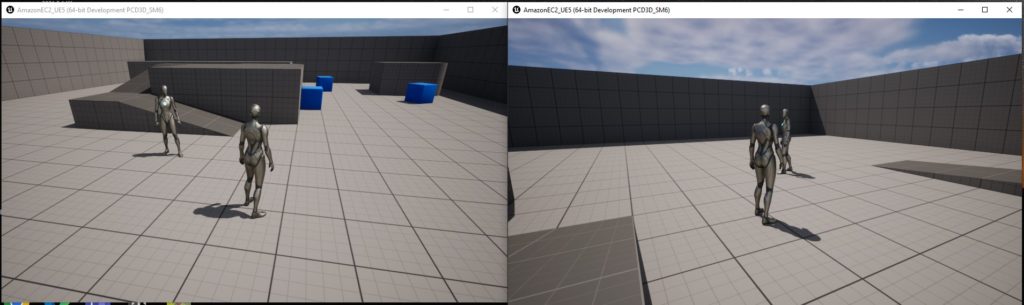
Great! You now have a dedicated server running in the cloud.
Terminating your instance
You can terminate your instance to avoid consuming the number of hours provided by the AWS Free Tier. Learn more here: How to clean up your instance. As I mentioned previously, the free tier covers “750 hours per month of Windows t2.micro or t3.micro instance dependent on region” which is enough if you have only 1 virtual machine running all the time (1 machine x 24 hours x 30 days = 720 hours).
Setting up a VR server on AWS
Developers from Amazon prepared this blog post for those who use the Meta Quest 2 and want to deploy an Unreal Engine VR Server on an EC2 instance. Check it out!
Hosting a Dedicated Server in your home
What if you just want to do a quick multiplayer test but don’t want to host a dedicated server in the cloud? You can use playit.gg, a global proxy that uses tunneling and allows anyone to host a server without port forwarding. Only the server needs to run the program, not every player. To use it:
- Install the app in your host machine,
- Open a tunnel to 127.0.0.1:7777,
- Get a shareable public address from playit.gg.
- Run your dedicated server. You can now connect to the server from a separate machine using the custom address.
Be aware that this is not a replacement to hosting servers in AWS. You won’t get the same scalability and reliability. Alternatives to playit.gg are ZeroTier, zrok, and Hamachi.