If you’re currently working on a project which involves porting an ArchViz scene into Unreal Engine and deploying on Meta Quest, then this guide is for you. We see architecture, engineering, and construction (AEC) firms adopt VR in their design pipeline. Architectural Visualization (ArchViz) in particular is a lucrative industry for VR. Displaying realistic 3D models using VR and game engines are one of the best and cost effective way for designers to convey their ideas to clients before actual construction. However, importing 3D scenes into VR requires a meticulous process of graphics optimization due to hardware performance limitations. This prompted me to make this guide.
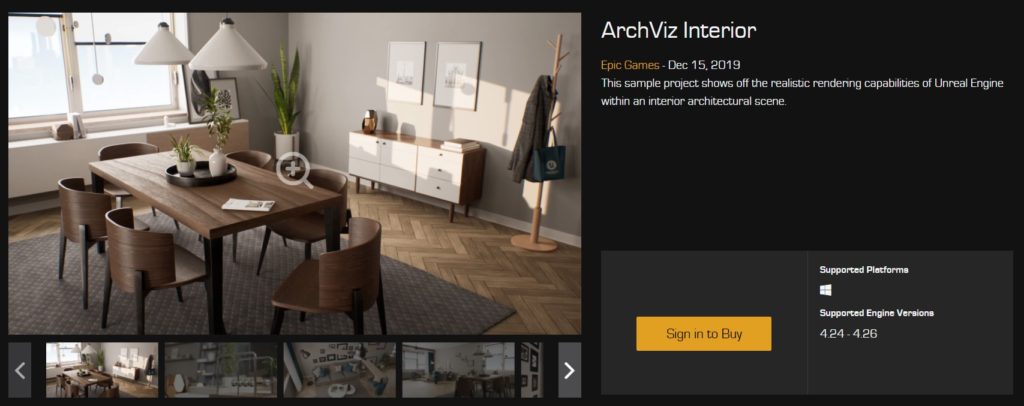
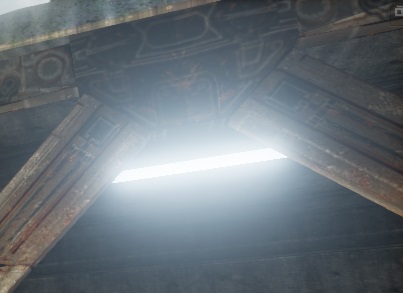
This post is a summary of the steps I do to optimize graphics for VR architectural visualization using Unreal Engine 5.7.3 and the standalone Meta Quest 3. I’ve encountered an issue with older versions such as UE 5.4 that has a VR shadow bug. I’ll be using the ArchViz Interior sample project by Epic Games. This scene was originally created in UE4 with ray tracing on desktop PC in mind. It has all the graphics bells and whistles we usually avoid in VR such as dynamic lighting, high triangle count, high texture resolution, etc. You can download the project yourself and follow along.
I listed the primary references I used at the end of this post. Hope you find them useful for further reading.
Fundamentals of Real-time Rendering
Before attempting to optimize, it’s important to understand the fundamentals of real-time rendering and familiarize yourself with all the terminology. This course by Sjoerd de Jong is a very good refresher on the subject. There’s also the Introducing the Principles of Real-time learning path. Some of the key takeaways are:
- It’s more important to know what to optimize than how to optimize.
- Optimization should be integrated into the pipeline, not a last minute job at the end of production.
- Profile your app on a standalone build, not in the editor. Running the profiler in the editor can skew your numbers. You’d end up scratching your head figuring out why draw calls are 2-3 times higher than expected.
- Perform your profiling on the target hardware, not on your high-end workstation.
- Triangle count isn’t as big of a deal as it used to be in the past.
Performance Targets for Meta Quest 3
Meta provided the following numbers as a general guideline for Unity Meta Quest 2 apps. I can say that these numbers are similar for Unreal apps:
- 72 FPS
- 400-600 draw calls per frame
- 1.300,000-1,800,000 triangles per frame.
From my experience, ArchViz scenes are mostly static which allows you to squeeze more performance and go a little beyond these numbers.
Ideally, ArchViz scenes to be ported to VR should be designed and created with VR in mind from the very beginning. In practice, however, this is seldom the case. Clients often create amazing looking renders first, and then decide to port to VR at the end. It’s important to manage the clients’ expectations in terms of the quality of the VR experience. Some rendering features need to be disabled to deliver a smooth performance.
Optimizing Project Settings for VR Development
Download and open the ArchViz Interior project. We need to change a bunch of settings and disable some rendering features for VR to work smoothly at 72 fps. We’ll be covering a lot of topics which I listed below:
- Target Hardware Settings
- Ray Tracing
- Virtual Texturing
- Forward Rendering
- Mobile HDR
- Volumetric Fog
- Screen-space Post-processing
- Dynamic Lights
The documentation has a guide on how to create a project for VR, but some details are lacking. We’ll go over these missing details.
Target Hardware Settings
The first step is to go to Project Settings > Project > Target Hardware, change the settings to Mobile and Scalable.
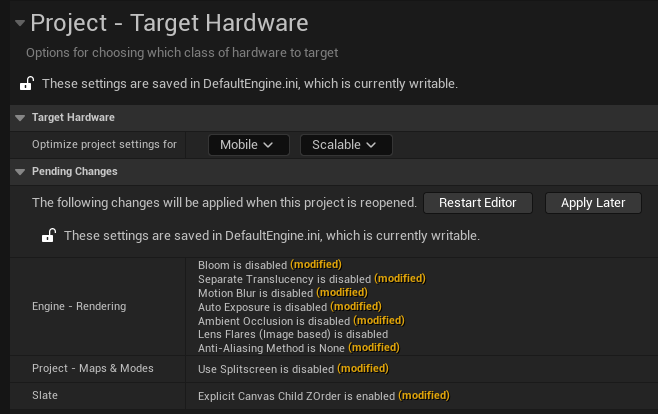
These settings automatically disable a couple of rendering features which you can find in the DefaultEngine.ini file in the Config folder of your project directory.
Distance Field
The default VRTemplate project has Distance Fields turned off when deploying on Quest. I found a quirk when toggling this setting in UE 5.7.3. When you uncheck/disable it in Project Settings > Engine > Rendering > Generate Mesh Distance Fields, there is a massive performance issue on the device. The solution is to add an extra line in DefaultEngine.ini:
r.GenerateMeshDistanceFields=False
r.DistanceFields=0              <---- insert this line
My guess here is disabling the setting in the editor does not completely disable Distance Fields. The extra line forces the project to not use it. Performance should go back to normal on the device.
Ray Tracing
Obviously Ray Tracing is a big no-no for VR. Let’s make sure the setting is disabled under Project Settings > Engine > Rendering > Hardware Ray Tracing > Support Hardware Raytracing.
Render Hardware Interface (RHI)
RHI is an abstraction layer over several platform-specific graphics APIs. Set Project Settings > Platforms > Windows > Default RHI to Default . To my understanding, this setting affects only PCVR, not mobile VR (standalone Quest). PCVR includes testing VR in the Editor. There are developers that have experienced issues when using the default DX12 for VR [1][2][3][4][5][6][7][8].
Virtual Texturing
Virtual Texturing allows you to use large textures while consuming lower memory footprint. The VR Template has this disabled. Let’s disable this feature by unchecking Enable virtual texture support on Mobile found in Project Settings > Engine > Rendering > Mobile. Additionally, uncheck Enable virtual texture support in Project Settings > Engine > Rendering > Virtual Textures. If you really want to use this feature, be aware that there can be packaging issues for Quest 2.
Forward Rendering
Unreal Engine uses deferred rendering by default because it provides access to more rendering features. However, you want to prioritize performance over visual quality in terms of VR apps. This is where forward rendering comes in. For example, in Robo Recall, the forward renderer is about 22% faster than the deferred renderer on an NVIDIA 970 GTX. Other than performance, the other feature we want with forward rendering is Multisample Anti-Aliasing (MSAA).
Enable forward shading in Project Settings > Engine > Rendering > Forward Shading.
There are limitations, however, as mentioned in the documentation. Here are some notable ones not supported:
- Screen Space Techniques (SSR, SSAO, Contact Shadows)
- Dynamically Shadowed Translucency
- Translucency receiving environment shadows from a Stationary Light
- MSAA on D-Buffer Decals and Motion Blur
Multisample Anti-Aliasing
According to the documentation,
“The forward renderer supports both MSAA and Temporal Anti-Aliasing (TAA) and in most cases, TAA is preferable because it removes both geometric aliasing and specular aliasing. In VR however, the constant sub-pixel movement introduced by head tracking generates unwanted blurriness, making MSAA a better choice. Projects that choose to use MSAA will want to build content to mitigate specular aliasing. Additionally, the Normal to Roughness feature can help reduce specular aliasing from detailed normal maps and automatic LOD generation for static meshes can flatten features on distant meshes to help reduce aliasing from small triangles.”
- Set
Anti-Aliasing MethodtoMSAAin Project Settings > Engine > Rendering > Default Settings > Anti-Aliasing. - Set
4x MSAAin Project Settings > Engine > Rendering > Mobile > Mobile MSAA.
Turning on Forward Shading should force anti-aliasing to use MSAA. There’s a small visual bug where it sometimes shows None instead of MSAA. Just check/uncheck the settings.
Instanced Stereo
With Instanced Stereo, the GPU performs a single render pass instead of instead of two. It is for PC/Console VR, not for the standalone Quest. I believe this also affects testing VR in the Editor. The documentation recommends turning this on. However, this setting can cause visual glitches to certain shaders and rendering features:
- Does Planer Reflection Not work in UE5 VR?
- Quest 3 one eye not showing complete scene
- Packaged Instance Stereo has low quality in left eye (May 2023)
- nanite objects turns black and flicker after updating from UE5.1 to 5.2 (May 2023)
Turn ON/OFF in Project Settings > Rendering > VR > Instanced Stereo.
Mobile HDR
Mobile HDR is required for some post-processing features to work. However, it causes severe performance issues on Oculus Quest. Moreover, according to VictorLerp, “Mobile HDR is a path that’s not supported by the Oculus Mobile Runtime. This is the official word from Meta.” Mobile HDR also causes issues with Quest 2. It’s best to disable this in Project Settings > Engine > Rendering > VR > Mobile HDR.
Mobile Multi-View
Mobile Multi-View is Instanced Stereo but for mobile VR. Just like what I mentioned previously, this will improve performance BUT can break certain rendering effects. We’ll turn this ON for now in Project Settings > Engine > Rendering > VR > Mobile Multi-View.
Auto Exposure
Auto Exposure is the automatic adjustment of scene exposure to simulate eye adaptation from changes in brightness. This can be annoying in the Editor. Because we will be relighting the level later, turn this OFF in Project Settings > Engine > Rendering > Default Settings > Auto Exposure.
Lumen
Lumen is Unreal Engine 5’s fully dynamic global illumination and reflections system. It works with PCVR with Forward Shading turned OFF. However, this is not supported in Mobile Forward w/ HDR Disabled (Head-mounted Mobile XR). You can turn it OFF (optional) by setting Project Settings > Engine > Rendering > Global Illumination > Dynamic Global Illumination Method to None. If you don’t turn this OFF, it’s still won’t work because it’s not supported.
Reflections
The default Reflection Method is also Lumen. Just like before, this is not supported in Mobile XR. We’ll use Reflection Captures instead, so set Project Settings > Engine > Rendering > Reflections > Reflection Method to None (optional).
Nanite
Nanite is Unreal Engine’s virtualized geometry system. Also not supported on Mobile XR. Turn this OFF (optional) in Project Settings > Engine > Rendering > Nanite > Nanite.
Other Settings
There’s a couple more settings that can be adjusted in the Visibility and Occlusion Culling and Scalability Reference sections. The default should be good enough for now.
Optimizing Level Actors and Settings
We’re done with the Project Settings. Next, let’s proceed with optimizing actors and settings within the level itself.
Volumetric Effects
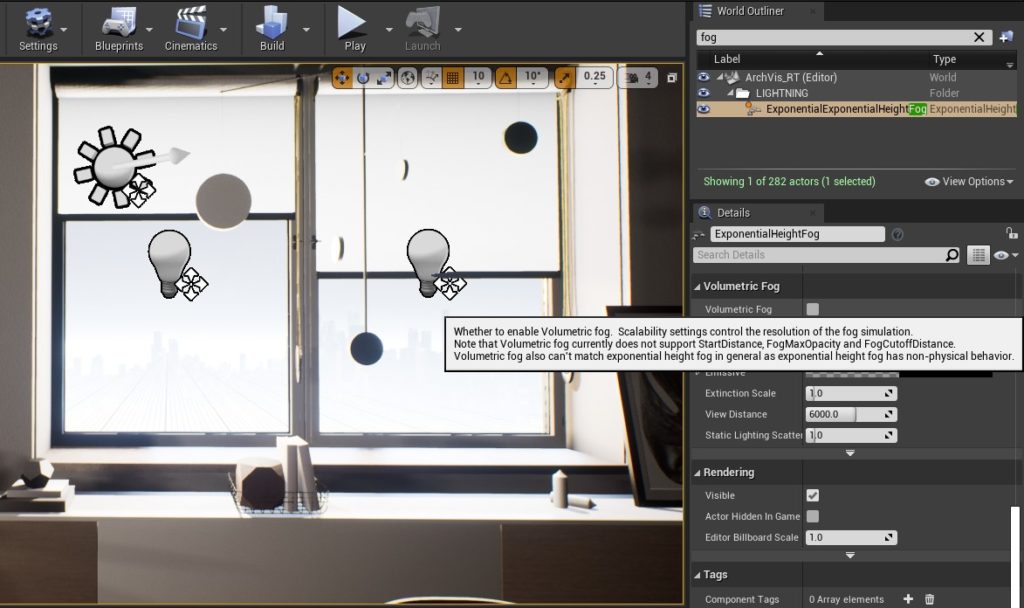
In the Exponential Height Fog settings, users sometimes accidentally leave the Volumetric Fog setting turned ON even if they don’t need it. Technically, this isn’t supported in for Head-mounted Mobile XR. However, leaving this ON will skew performance numbers when testing on desktop. Always check this setting and make sure it’s turned OFF.
To maximize performance, the best solution is to remove all volumetric effects such as clouds and fog. Instead, replace them with a static skybox. You can also try experimenting with localize fog such as EasyFog.
There is an option in Project Settings > Engine > Rendering > Forward Renderer > Vertex Fogging for Opaque. In forward shading, this gives a slight performance boost by causing opaque materials to use per-vertex fogging. The default setting is ON, and we’ll leave it that way.
- Non Dynamic Distance Fog on Quest2 / Android
- Quest2 via Oculus Link, “Vertex Fogging For Opaque” Right Eye Rendering Error (?)
- Volumetric fog rendering in one eye
NOTE: Decals not affected by Exponential Height Fog on ES3.1. Link.
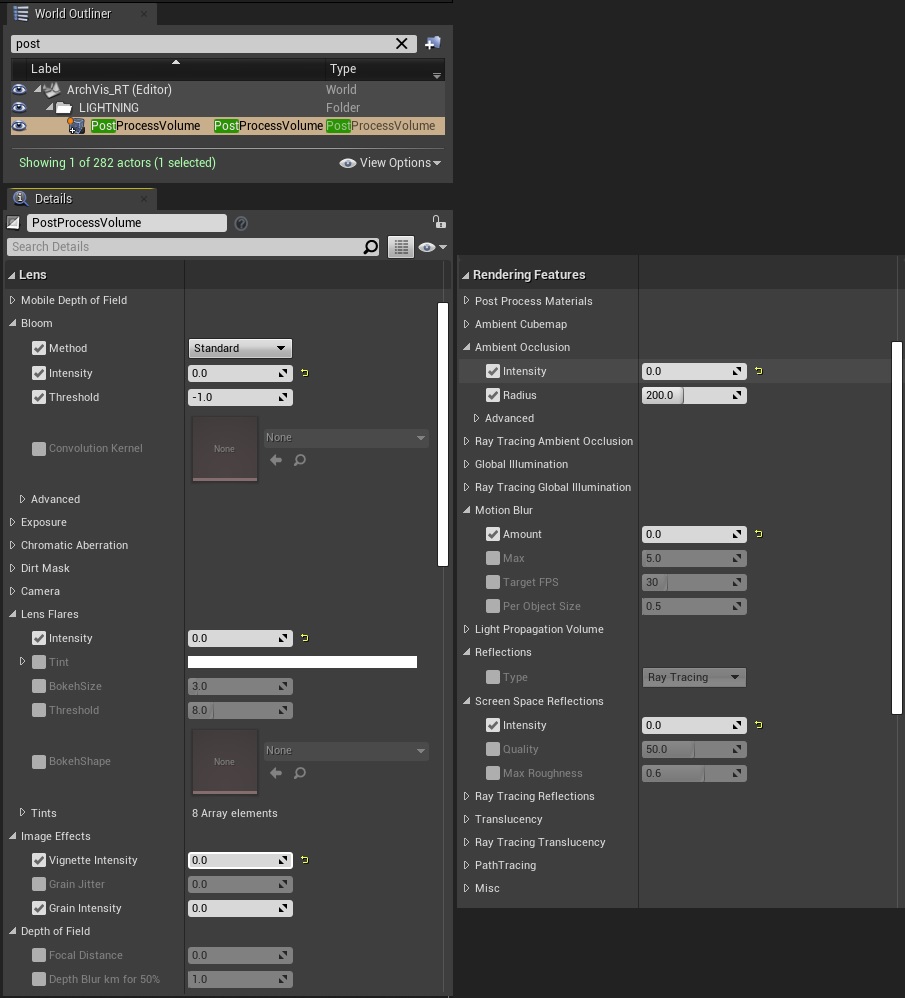
Post-Processing
Next, let’s disable features that are turned on by default on mobile platforms such as bloom, lens flares, vignette, depth of field, screen-space ambient occlusion (SSAO), motion blur, and screen-space reflections (SSR). Make sure you are using an Infinite Extent Post Process Volume, and set the Intensity of the effects to checked and to zero. Simply unchecking the setting will not turn it off. Since we’re using forward rendering, SSAO and SSR won’t work. I still set them to zero just to be sure.
Dynamic Lights
ArchViz heavily relies on lighting to achieve the best visual quality. Right now, the scene doesn’t look good due to all the changes we made earlier.
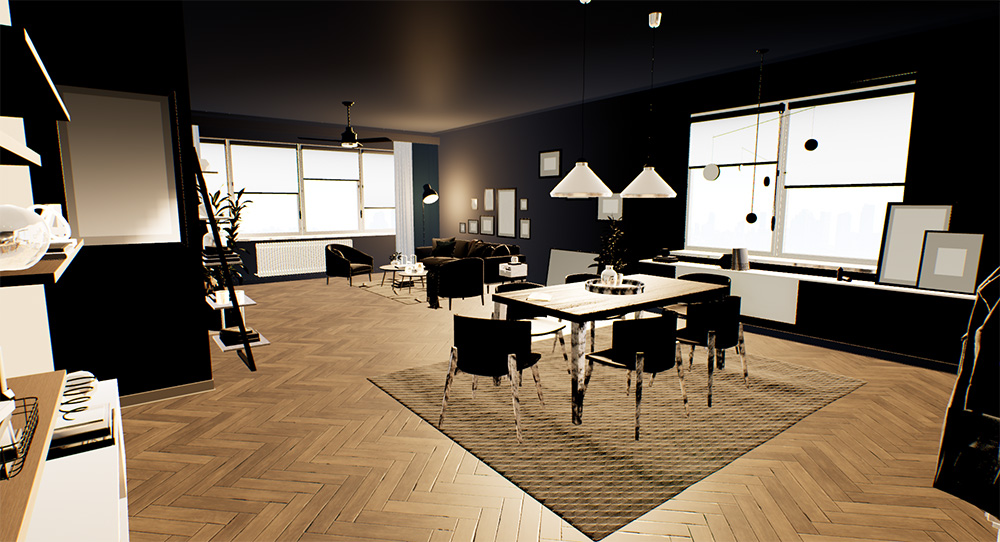
We need to strike the balance between quality and performance. The way forward is to convert all dynamic lights to static lights and make a build on the Quest 2 to check for performance. Once the frame rate is okay, slowly adjust the lights until an acceptable visual quality is achieved. Take note that forward rendering can only support 4 overlapping shadow casting movable lights. If you absolutely need multiple shadow casting lights movable, then consider this limitation.

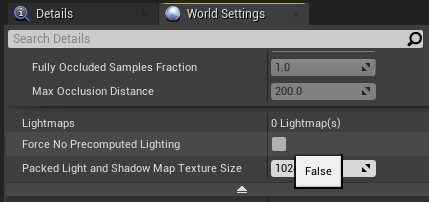
Also make sure that lightmass baking is actually enabled by unchecking Force No Precomputed Lighting.
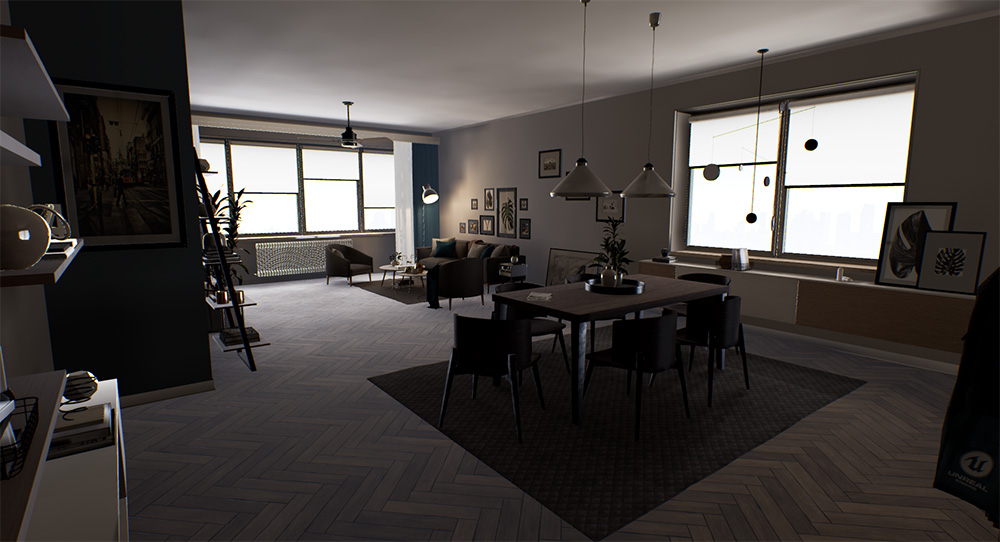
Now it’s time to build the lighting. Adjust the lighting parameters and rebuild lighting until you get a decent result. Don’t aim for quality yet, we only need to test the performance.
Optimizing Triangle Count Using Automatic LODs
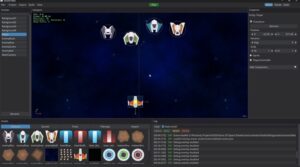
Now that we’ve disabled most of the performance-heavy rendering features, we can begin the actual optimization process. Use stat RHI to get a quick glance at the draw calls and triangle count. These numbers aren’t accurate because we’re using it while the editor is open, but we can clearly see that triangle count is the one we should address right now with 11 million tris. Another tip, disable the editor widgets by pressing “G” while on the viewport to prevent the widgets from skewing the numbers.
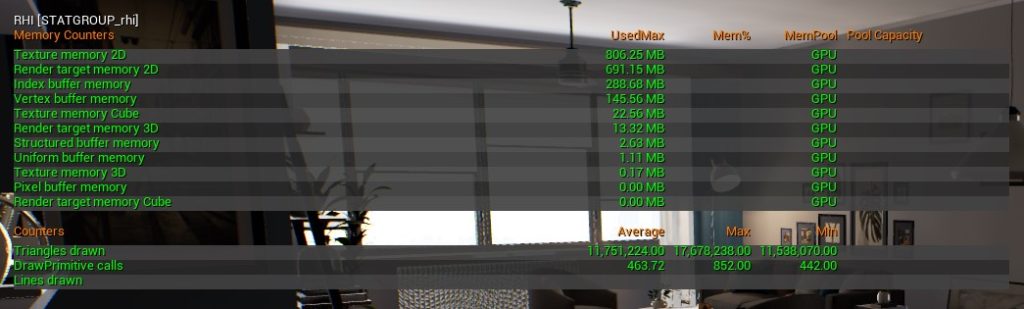
Ideally, we reduce the triangle count by opening the 3D model files in a 3D modeling app and create LODs from there. However, most of the time we don’t have access to these files and also have a tight deadline. Exporting these models out of Unreal results in triangulated meshes that are cumbersome to clean. Thus, auto-generating level-of-detail is the only viable option. Check out how to generate LODs in the documentation.
The Statistics table, found in Tools > Audit, is a handy tool we can use to identify which objects in the scene are contributing to the bottlenecks. Sorting based on triangle count, the following have high triangle density: blanket, curtains, fan blades, couch, hanging light, vases, and so on. With this information, we now know which specific assets to optimize.
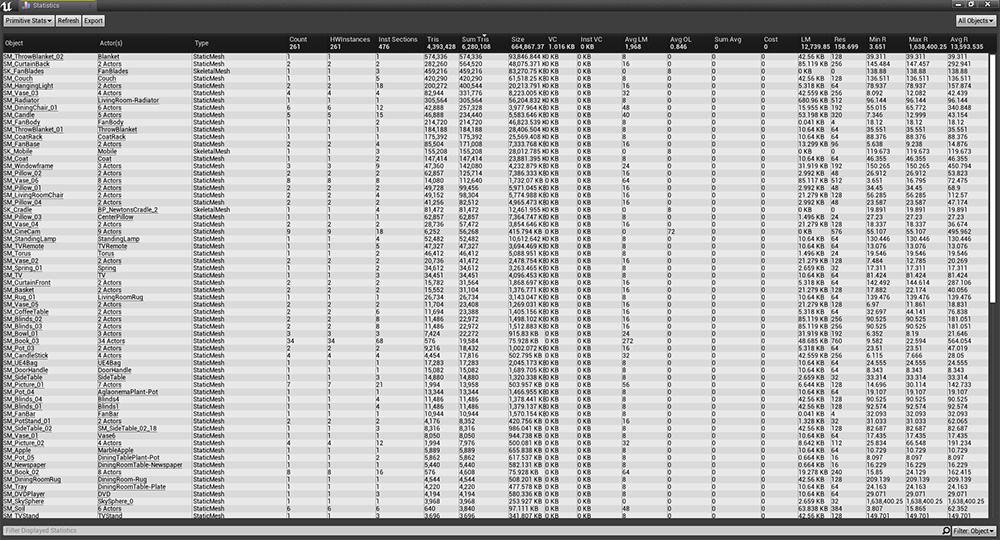
Using this information, go ahead and generate LODs for each mesh. In my case, I was able to reduce the triangle count from 11,000,000 to 300,000.
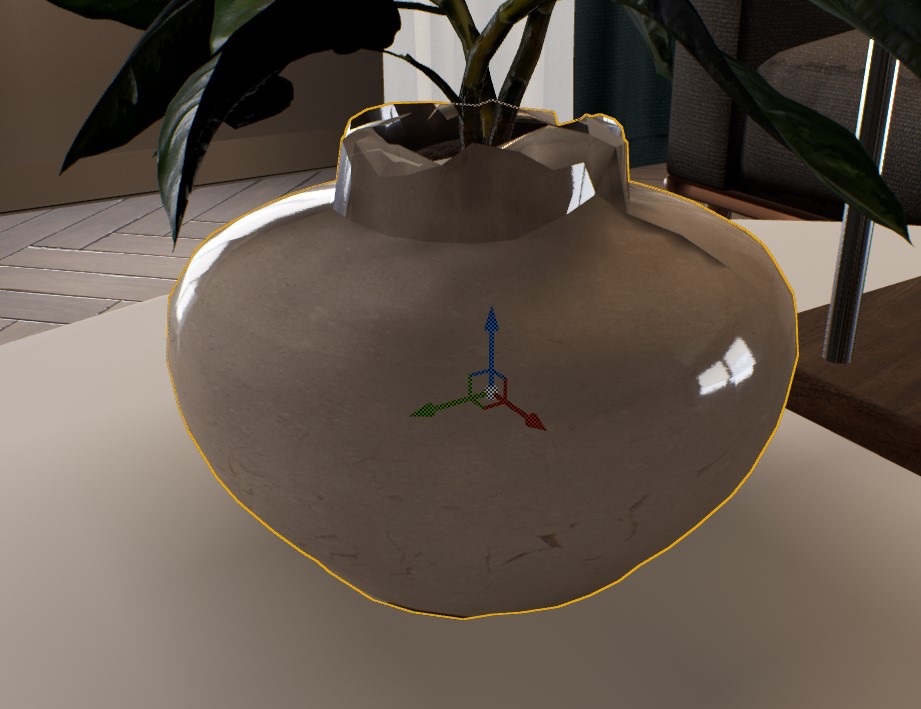
Take note that auto LODs can bust some shapes such as the top of this vase. This is a case that requires manual editing in your 3d modeling app.
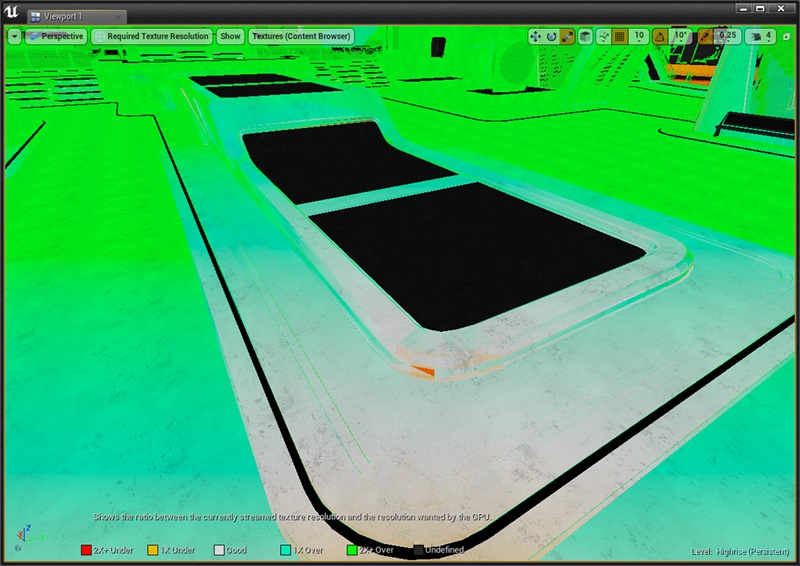
Texture Resolution
A common issue with importing 3D ArchViz assets is the large texture resolutions. Some use 4K, some use 8K, but only occupy a small area the level. The Statistics table and the Required Texture Resolution viewmode together can assist you spot these troublesome meshes and optimize them. Watch this tutorial for more details.
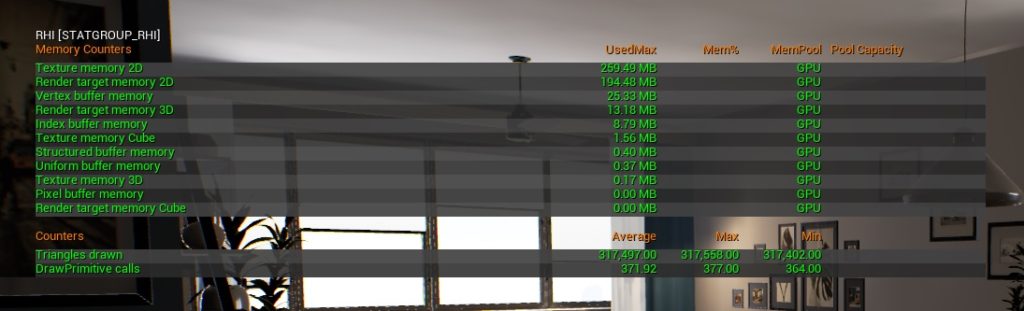
Draw Calls
The draw calls are at 370 right now. The documentation provides methods on how to reduce this number. In our case, the best way is to minimize the number of materials, create texture atlases, and merge actors. In other ArchViz levels with multiple rooms, proper visibility and occlusion culling (see Round Robin) is the way to go.
Unfortunately, I don’t have access to the original 3D asset files, I can combine these materials to reduce draw calls. I’ll leave them for now.
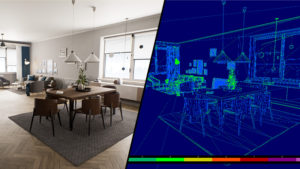
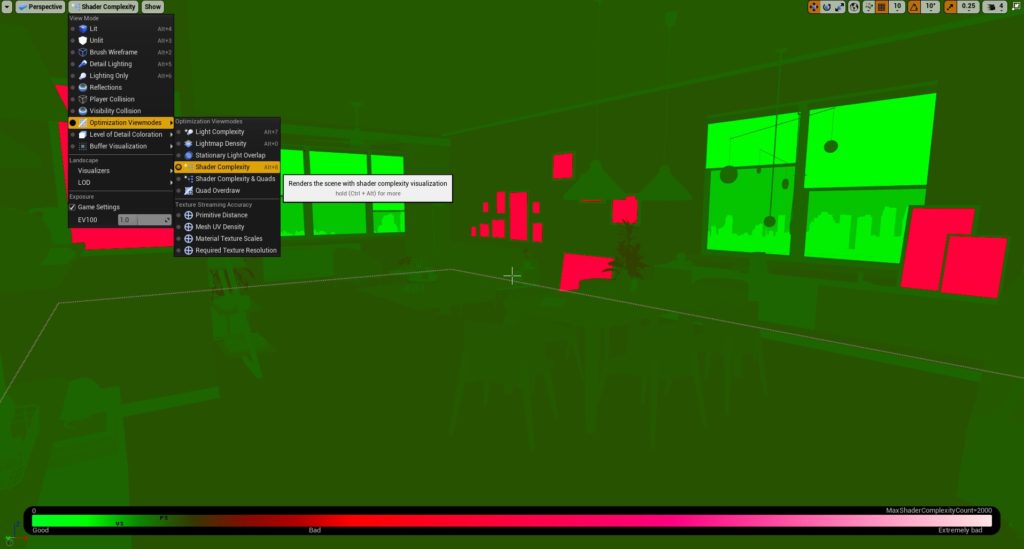
Shader Complexity
The shader complexity viewport mode allows you to quickly spot the performance impact of certain shaders. Below, you can see that the glass materials are the most expensive. It’s alright to leave these alone as long as they occupy a small area the user’s view. Difference in forward shading.
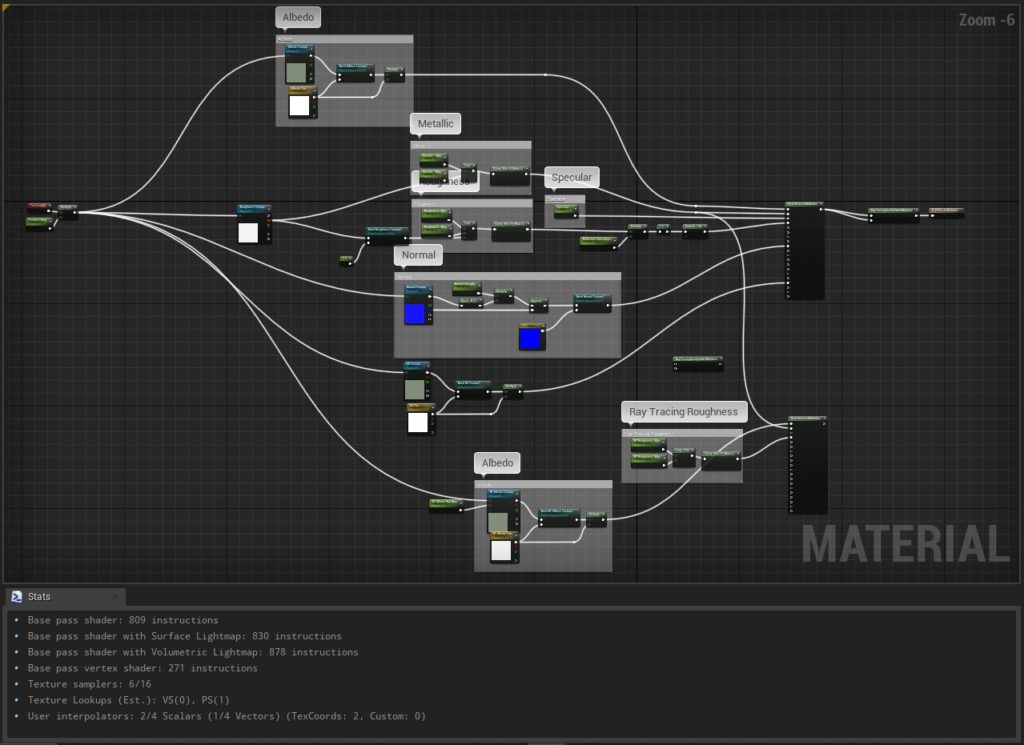
A quick look at the master material reveals room for optimization. We can remove all the nodes related to ray tracing. Additionally, we can do channel packing and combine the Rougness, Metallic, and Ambient Occlusion maps into a single RMA texture.
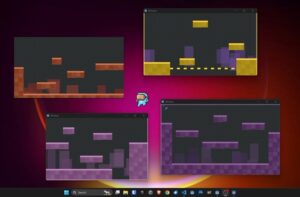
Lightmap Density
Lightmap artifacts are more visible in VR. Because of this, lightmapped actors in VR require higher lightmap density that usual. It is acceptable for some static meshes to reach the RED range in the Lightmap Density Viewmode. What we want is a balance between quality and density. Common lightmap issues include:
- Edge bleed
- Overlapping UVs
- Bad seams
- Low resolution

Most of these can be fixed by adjusting the lightmap UVs and density. Watch this video guide for some tips. If you still see blotchy lightmaps, check if you’re using Build > Lighting Quality > Production. Furthermore, try disabling World Settings > Lightmass > Compress Lightmaps. Be careful though. This increases the memory usage by 4 times. Lastly, use the Static Mesh Lighting Info to check if there are any actors that have abnormal texel densities.
Other Considerations
These are other items that are not in the example but are important to keep in mind:
Mirror
Lumen reflections are not supported in mobile XR. We are left with two options to create mirrors: Planar Reflections and Render Targets.
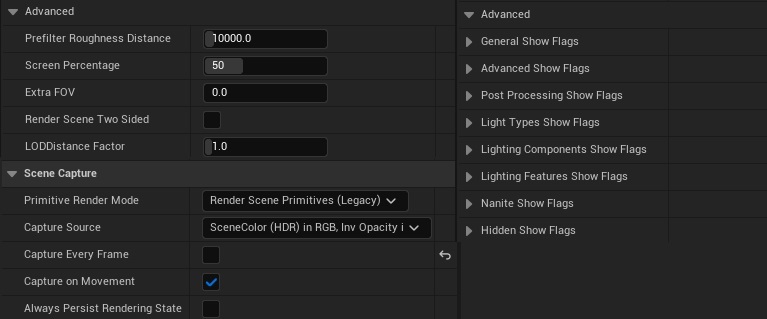
Planar Reflections work properly in PCVR. Use Forward Shading and don’t forget to enable Planar Reflections in the mirror material. However, there is an issue on a packaged build for Quest 3 where the planar reflection on the right eye is incorrect. Forum post here. I tested this on UE 5.7.3, and I could not fix it even after enabling/disabling settings. In case you do get it to work, be aware that planar reflections are very expensive in terms of performance. Adjust the settings settings to reduce the cost by as much as 70%.
- Reduce Screen Percentage
- Disable Capture Every Frame
- Disable Show Flags that do not contribute to the planar reflection.
More references to this issue:
- Planar Reflections as a mirror in 5.1 and VR bug?
- Does Planer Reflection Not work in UE5 VR?
- Is there a bug using Planar Reflections and VR in 5.1 preview 2?
- Creating a mirror in VR using Unreal 5
The second approach is to use a Render Target. However, using a Scene Capture Cube with a Cube Render Target has an issue on mobile XR where the material turns green. There is an open-source alternative here that uses Scene Capture Component 2D. It works, but its default setup only reaches 60 FPS based on my testing. Needs some tweaks.
Also, don’t forget to deactivate the Mirror material when the user does not see it. Just use custom occlusion volumes.
Transparent Glass
This is the type of glass that lets light pass through it but still have a certain degree of reflection.
Achieving this in Quest 2 has the same issues as the Mirror: the reflections are expensive and are busted. Large glass walls require planar reflections to make them look believable. However, I already mentioned that planar reflections in Quest 2 standalone are mismatching between the left and right eye. You might be able to use custom cube maps as a cheap alternative. Use this high-performance VR glass material by GDXR. It has less shader complexity than the default glass material in the Starter Content.
Bloom
Bloom is a tricky situation. You need to enable Mobile HDR for it to work, but Mobile HDR is not recommended in standalone Quest 3. I recommend using a different technique such as adding transparent planes.
- Quest 2 Mobile HDR – left eye black / not rendering
- Quest 2 mobile build + HDR only renders half the camera view.
- Emissive materials in VR
If you really want to use bloom on Quest, use the mobile Deferred Renderer as demonstrated by this user. It works, but the performance is not very good:
- Disable Forward shading
- Enable Deferred renderer in the mobile section (UE 5.1+)
- Ensure moveable lights are supported in the shader mobile section
- Enable Mobile HDR
- Disable MSAA
- Enable FXAA (or nothing, as you want)
Water
Water shaders generally work in VR with some limitations such as planar reflections as mentioned previously. When dealing with underwater, this asset works great for PCVR water BUT might have issues with mobile Quest 2. You would want that nice transition from overwater to underwater.
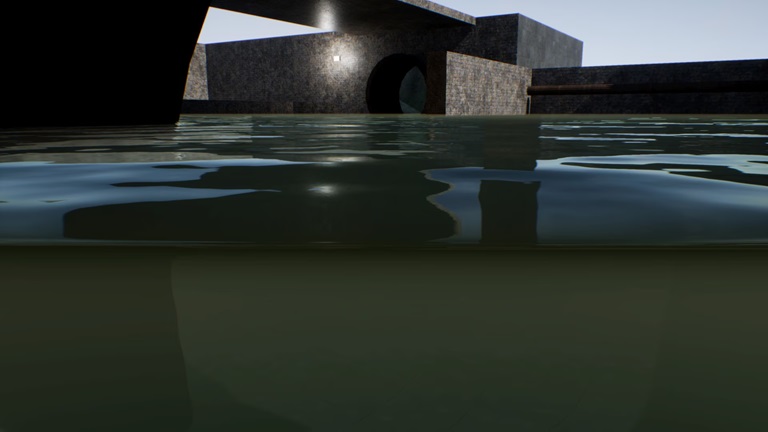
Note: the included Water System in UE has some issues with VR.
- Water Plugin crashes the Engine 5.4.1
- VR Instanced Stereo with Water plugin crashes the project with 5.4.1.
- Single Layer Water broken in VR with stereo instancing
- Unreal Water Invisible after Packaging to Quest 2
- Water in VR, only on left eye
- Weird Bug on Water Body using VR headset
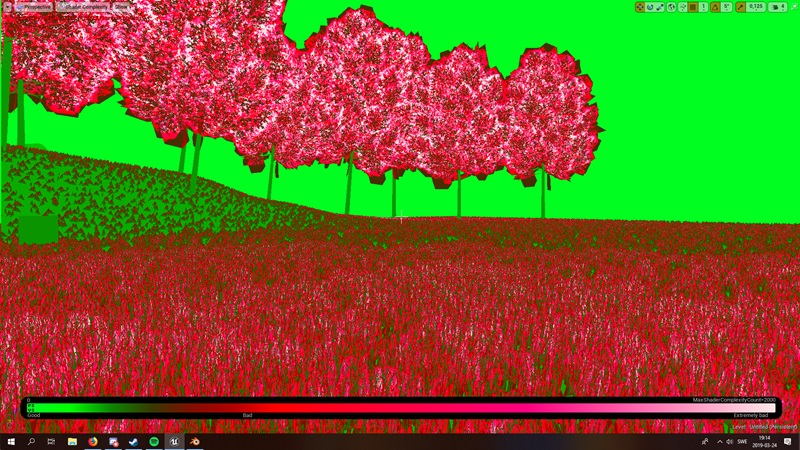
Foliage
Foliage meshes generally use flat planes with transparency maps containing grass or leaves. These overlapping planes cause huge performance issues. Moreover, these planes look painfully obvious up close in VR. Thus, these meshes must be created differently.
Tips to optimize foliage for VR:
- Add more triangles to the foliage mesh. This makes the mesh feel 3D while also reducing transparent pixels and overdraw.
- Use aggressive LODs and billboards.
- Adjust cull distances
- Increase the size of the foliage while reducing density. Sometimes, this trick can retain the appearance of the mesh while reducing triangle count and overdraw.
- Disable dynamic shadows (or adjust shadow culling distance).
- Disable World Position Offset in foliage material. This removes the movement animation. We want this only when the actors are far away. In PCG, this is the
<strong>World Position Offset Disable Distance</strong>parameter. - In the project settings, try setting
Early Z-passtoOpaque and masked meshes, and enableMask material only in early Z-pass. This can improve performance, but introduces other issues related to 2D sprites and jagged shadows as explained here.
Fabric, Fur, Hair
Some 3D assets like carpets and fur coats have complex shaders that might be too expensive or look bad in VR. Keep that in mind.

Deploying on Oculus Quest 2
We’ve done the first pass of optimization. Let’s now configure the project for Quest development and make a test build on Meta Quest 3. Note that Meta XR Plugin is not required unless you need certain key features. I recommend following this guide by GDXR. A word of advice. A lot of developers have experienced issues when setting up Android SDK and NDK because the environment variables are not set properly. Because of this, you’ll encounter an error when running SetupAndroid.bat.
Here are some settings to keep in mind under Project Settings > Platforms > Android:
- APK Packaging > Package game data inside .apk? to ON
- APK Packaging > Disable verify OBB on first start/update to ON
- Advanced APK Packaging > Package for Meta Quest devices to ON
- Advanced APK Packaging > Remove Oculus Signature Files from Distribution APK to ON
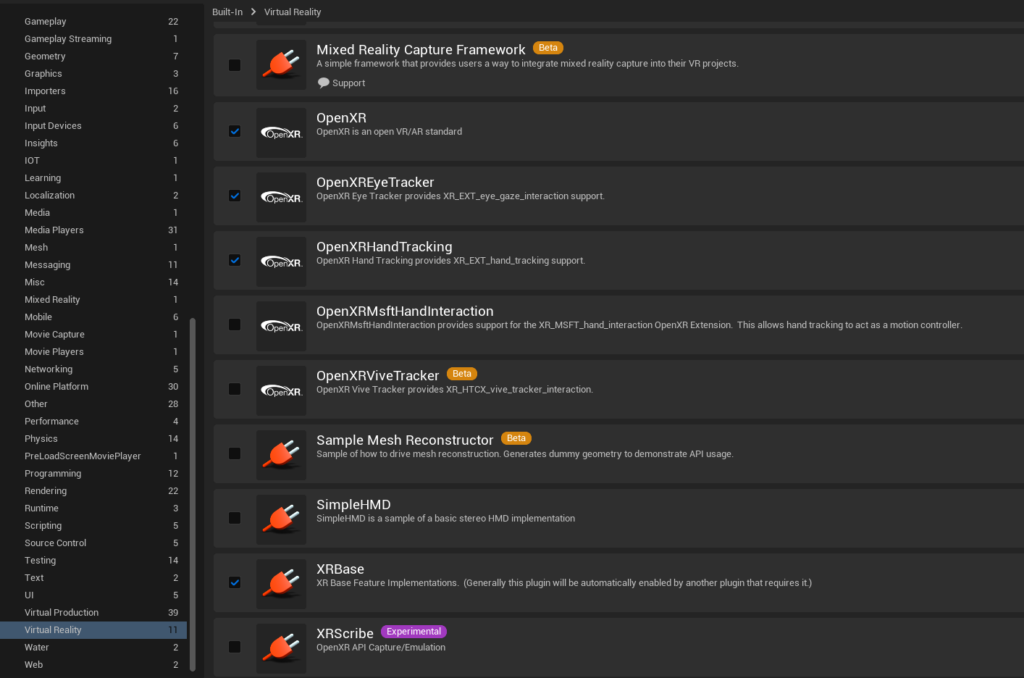
Lastly, make sure the OpenXR plugin is enabled and check Project Settings > Project > Description > Start in VR. Otherwise, the .apk will install correctly, but the app won’t run in VR mode or will get stuck in the 3 dot loading screen. You can also install via wireless ADB.
OVR Metrics Tool is very useful for obtaining an app’s performance data on the Oculus Quest. Once our ArchViz app is running, we can use this tool to answer basic questions:
- Do we have a consistent 72 fps?
- Are we GPU or CPU bound?
- What are the GPU/CPU utilization percentage?
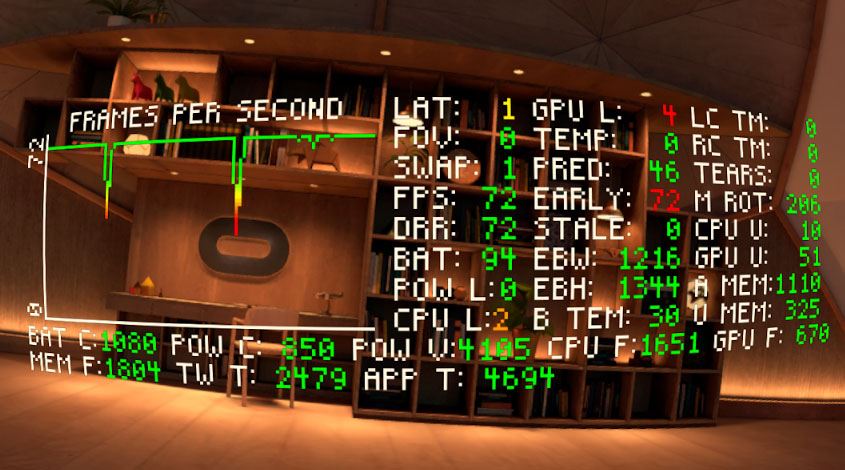
In ArchViz, we are GPU bound most of the time. The documentation provides an easy way to know if we’re GPU/CPU bound by looking at APP T:
- If App T > 13800 & FPS < 72, then 100% GPU bottleneck (CPU could also be going over budget but is masked by GPU)
- If App T < 13800 & FPS < 72, then 100% CPU bottleneck.
Other useful indicators are CPU U, GPU U, CPU L, and GPU L (“U” stands for utilization while “L” stands for level). These numbers indicate how much load the CPU and GPU are doing. High numbers signal room for optimization.
Unfortunately, the OVR Metrics Tool overlay does not show up on screenshots. I can’t show you the graph I see inside the Quest. So, I’ll summarize the the numbers I see below:
- There is 100% GPU usage but only 50% CPU usage
- There are no dropped frames
- Opening the Oculus menu causes frame drops.
Other references you can use:
- Optimizing Unreal Engine VR Projects by Mamadou Babaei
Troubleshooting
No Google Play Store Key
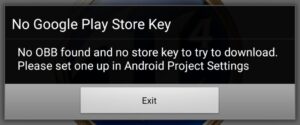
Happens when testing a build on Android device. Solution in this link.