I’ve been exploring ideas on how we can use augmented reality to display real-time information on trending cryptocurrency prices and social media discussion. For this project, I used Unity 2020.3.11 with Universal Render Pipeline (URP) and the Basic Image Tracking scene from AR Foundation Samples 4.1 as a base. Furthermore, I used Twitter API v2 endpoints to access tweets, CoinDesk public API to get the current Bitcoin price, and DOTween for the UI movement and fade animations.
Below is a breakdown of how I achieved the effect as well as the things I learned along the way. If you’re reading this post at a future date, be aware that there may have been changes with Unity URP, Twitter API v2, and CoinDesk public API. Some of the information here might become outdated.
Universal Render Pipeline
I prefer using URP mostly because of Shader Graph. If, however, you decide to skip URP and use the built-in renderer, you can always use Amplify Shader Editor as an alternative to Shader Graph. Take a look at a comparison between the two here. Additionally, follow the documentation here to configure URP to work with AR Foundation.
Here are some notable limitations with URP at the time of this writing:
- Point light shadows do not work in Unity 2020.3. It is only available in 2021.1 and if I understand correctly, requires deferred rendering.
- Post-processing with multiple cameras is problematic. In terms of AR, this is an issue because using bloom on emissive AR objects would affect the real-world background. This results in a blown-out background.
Take a look at URP’s public roadmap to see what features are currently work-in-progress.
Portal Shader
We use the stencil buffer to mask out pixels on a rendered image which allow us to create special effects such as portals. In Unity URP, we control the rendering process by creating a Scriptable Render Pipeline Asset. Check out this video tutorial by Dilmer Valecillos to learn the step-by-step process.
Shader "Unlit/PortalMask"
{
Properties
{
}
SubShader
{
Tags { "RenderType"="Transparent" }
Pass
{
ZWrite Off
}
}
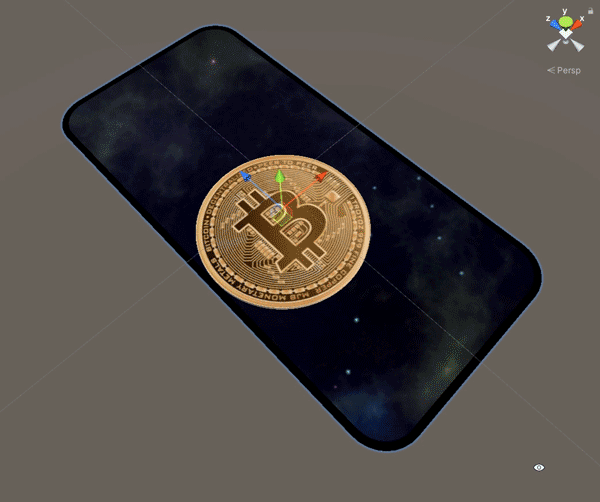
}I then used image tracking to anchor the portal to my smartphone. The background inside the portal is an inverted sphere with a cubemap material.
CoinDesk Bitcoin Price API
CoinDesk’s public API makes it possible for us to access the the current price of Bitcoin in USD. We can obtain this JSON data by using UnityWebRequest.Get to send a request to this endpoint. Afterwards, we parse the JSON data into C# objects by using JsonUtility.FromJson. Parsing JSON files can be confusing at first especially those with multiple hierarchical layers. Take a look at this video by Destined To Learn which might help you.
Below is a sample response from CoinDesk’s public API:
{
  "time": {
    "updated": "Jul 27, 2021 02:16:00 UTC",
    "updatedISO": "2021-07-27T02:16:00+00:00",
    "updateduk": "Jul 27, 2021 at 03:16 BST"
  },
  "disclaimer": "This data was produced from the CoinDesk Bitcoin Price Index (USD). Non-USD currency data converted using hourly conversion rate from openexchangerates.org",
  "chartName": "Bitcoin",
  "bpi": {
    "USD": {
      "code": "USD",
      "symbol": "$",
      "rate": "37,130.7100",
      "description": "United States Dollar",
      "rate_float": 37130.71
    },
    "GBP": {
      "code": "GBP",
      "symbol": "£",
      "rate": "26,861.4324",
      "description": "British Pound Sterling",
      "rate_float": 26861.4324
    },
    "EUR": {
      "code": "EUR",
      "symbol": "€",
      "rate": "31,458.1772",
      "description": "Euro",
      "rate_float": 31458.1772
    }
  }
}
And here is a sample Unity script to send a GET request and parse the response to C# objects:
using UnityEngine;
using UnityEngine.Networking;
using System.Collections;

public class BitcoinPriceQuery : MonoBehaviour
{
    public BitcoinResponse _bitcoinResponse;

    void Start()
    {
        StartCoroutine(GetRequest("https://api.coindesk.com/v1/bpi/currentprice.json"));
    }

    IEnumerator GetRequest(string uri)
    {
        using (UnityWebRequest webRequest = UnityWebRequest.Get(uri))
        {
            yield return webRequest.SendWebRequest();

            string[] pages = uri.Split('/');
            int page = pages.Length - 1;

            switch (webRequest.result)
            {
                case UnityWebRequest.Result.ConnectionError:
                case UnityWebRequest.Result.DataProcessingError:
                    Debug.LogError(pages[page] + ": Error: " + webRequest.error);
                    break;
                case UnityWebRequest.Result.ProtocolError:
                    Debug.LogError(pages[page] + ": HTTP Error: " + webRequest.error);
                    break;
                case UnityWebRequest.Result.Success:
                    _bitcoinResponse = JsonUtility.FromJson<BitcoinResponse>(webRequest.downloadHandler.text);
                    break;
            }
        }
    }
}

[System.Serializable]
public class BitcoinResponse
{
    public BitcoinCurrency bpi;
}

[System.Serializable]
public class BitcoinCurrency
{
    public BitcoinPrice USD;
}

[System.Serializable]
public class BitcoinPrice
{
    public string rate;
}
The price can be accessed by:
_bitcoinResponse.bpi.USD.rateLastly, I used this tutorial by Llam Academy to animate the number.

Twitter API
Most Unity Twitter API tutorials are using API v1.1. For this project, I used API v2 which is currently in Early Access. Before you can send GET requests to Twitter API endpoints, you need a Bearer Token. Get it by signing up for a developer account, creating a project, and connecting an App. Once done, you’ll receive an API Key, an API Secret Key, and a Bearer Token. Follow the step-by-step guide here.
Search Tweets and Filter Results
You can start choosing which data you want to receive through these different endpoints. You can do things such as look up tweets by ID, search most recent tweets, get a list of accounts that have retweeted a tweet, get a list of users who liked a tweet, etc. In my case, I’m trying to retrieve the most recent tweets that have #Bitcoin in it, so I used the Search Tweets endpoint. There’s also the Filtered Stream endpoint which gives access to a real-time stream of public tweets.
Now let’s take look at the following limitations for Twitter API v2. These might change in a future date:
- For a Standard Project at the Basic access level, the query limit is 512 characters long.
- For the search recent Tweets endpoint, the rate limit is 450 requests per 15 minutes per App.
- At the Basic access level, the tweet cap limit per project is 500,000 per month.
- You can’t search for top tweets. If you really want to, you need to retrieve tweets using the
public_metricsexpansion and formulate an algorithm to filter your own definition of top tweets. - You can’t search for tweets based on number of retweets and likes. On the other hand, this is possible in API v1.1.
Building the Query
After setting up a developer account, we now start building a query step-by-step by adding operators. The initial request below, with # converted to %23 in URL encoding, will give ten tweets by default.
https://api.twitter.com/2/tweets/search/recent?query=%23bitcoinNext, we need to improve the quality of the results by excluding retweets, replies, and spam bot Tweets. The first two are easy to implement. On the other hand, I couldn’t find a way to remove spam bot Tweets. As a compromise, I added a filter to accept only tweets from verified users. Moreover, I included only English tweets.
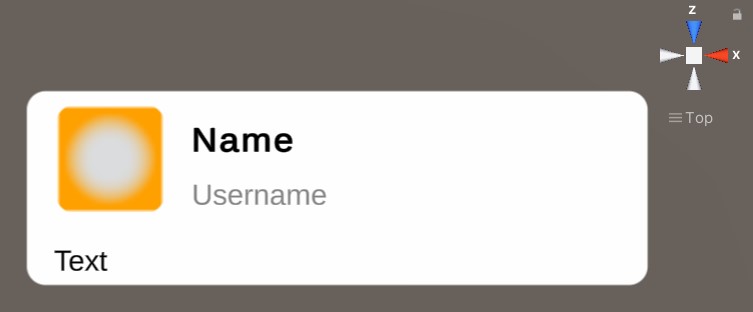
https://api.twitter.com/2/tweets/search/recent?query=%23bitcoin%20-is:retweet%20-is:reply%20is:verified%20lang:enLastly, I want access to the following data: name, username, text, and profile_image_url. These are obtained by expanding on author_id and using the fields parameter user.field. Take a look at the Search Recent Tweets API.
https://api.twitter.com/2/tweets/search/recent?query=%23bitcoin%20-is:retweet%20-is:reply%20is:verified%20lang:en&expansions=author_id&user.fields=profile_image_urlYou’ll get a response similar to the one bellow. I removed some of the values for privacy reasons. Also, I truncated it to only three tweets to make it shorter and more readable.
{
  "data": [
    {
      "author_id": "17351167",
      "id": "1420001447228411924",
      "text": ""
    },
    {
      "author_id": "543483223",
      "id": "1420000106401566721",
      "text": ""
    },
    {
      "author_id": "1125319374599012352",
      "id": "1419999510500151335",
      "text": ""
    }
  ],
  "includes": {
    "users": [
      {
        "username": "",
        "id": "17351167",
        "profile_image_url": "",
        "name": ""
      },
      {
        "username": "",
        "id": "543483223",
        "profile_image_url": "",
        "name": ""
      },
      {
        "username": "",
        "id": "",
        "profile_image_url": "",
        "name": ""
      }
    ]
  },
  "meta": {
    "newest_id": "1420001447228411924",
    "oldest_id": "1419991058889510941",
    "result_count": 10,
    "next_token": ""
  }
}
Attached Link Previews and Images
I could’ve added more fields for attached link previews and images; however, I discovered that this required a lot of workarounds which prompted me to do exclude them for this project for now. If you really want to implement these, I listed below some of the steps you need to do.
As mentioned by user IgorBrigadir in the Twitter Dev forums, there is no API to get the preview image of a twitter card that appears for links. A workaround is to do the following:
- Extract the URL from the tweet
- Use
UnityWebRequest.Getto retrieve the HTML of the page - Use an HTML parser such as HTML Agility Pack or AngleSharp to access the values of image meta tags usually defined by
og:imageortwitter:image
Note: I encountered a DLL error while using AngleSharp in Unity.
ArgumentException: The Assembly System.Buffers is referenced by AngleSharp ('Assets/Plugins/netstandard2.0/AngleSharp.dll'). But the dll is not allowed to be included or could not be found.I wasn’t able to fix this unfortunately, so I used HTML Agility Pack instead. Below is a sample I made on how to access og:image which I derived from this example:
using HtmlAgilityPack;

// This is the HTML we retrieved from the previous UnityWebRequest.Get
public string _html;

private void GetPreviewImageLink()
{
    var htmlDoc = new HtmlDocument();
    htmlDoc.LoadHtml(_html);

    Debug.Log(htmlDoc.DocumentNode.SelectSingleNode("//meta[@property='og:image']")?.GetAttributeValue("content", null));
}
For further reading, check out Andrej Gajdos’ guide on how to create a link preview.
Another challenge is to display attached images. You need to consider different aspect ratios, multiple images, tiling formation, etc.
Twitter Query Unity Script
Taking everything into consideration, below is a sample script which uses the query we built earlier to retrieve the name, username, text, and profile_image_url of the ten most recent tweets containing #Bitcoin. Don’t forget to use SetRequestHeader to add the Authorization header with your Bearer Token. Otherwise, you’ll get an HTTP/1.1 401 Unauthorized response.
using UnityEngine;
using UnityEngine.Networking;
using System.Collections;

public class TwitterQuery : MonoBehaviour
{
    public string _bearerToken;
    public TwitterResponse _twitterResponse = new TwitterResponse();

    void Start()
    {
        StartCoroutine(GetRequest("https://api.twitter.com/2/tweets/search/recent?query=%23bitcoin%20-is:retweet%20-is:reply%20is:verified%20lang:en&expansions=author_id&user.fields=profile_image_url"));
    }

    IEnumerator GetRequest(string uri)
    {
        using (UnityWebRequest webRequest = UnityWebRequest.Get(uri))
        {
            // We add this Authorization Header that includes your Bearer Token
            webRequest.SetRequestHeader("Authorization", "Bearer " + _bearerToken);

            yield return webRequest.SendWebRequest();

            string[] pages = uri.Split('/');
            int page = pages.Length - 1;

            switch (webRequest.result)
            {
                case UnityWebRequest.Result.ConnectionError:
                case UnityWebRequest.Result.DataProcessingError:
                    Debug.LogError(pages[page] + ": Error: " + webRequest.error);
                    break;
                case UnityWebRequest.Result.ProtocolError:
                    Debug.LogError(pages[page] + ": HTTP Error: " + webRequest.error);
                    break;
                case UnityWebRequest.Result.Success:
                    _twitterResponse = JsonUtility.FromJson<TwitterResponse>(webRequest.downloadHandler.text);
                    break;
            }
        }
    }
}


[System.Serializable]
public class TwitterResponse
{
    public TweetData[] data;
    public TweetIncludes includes;
}

[System.Serializable]
public class TweetData
{
    public string author_id;
    public string text;
}

[System.Serializable]
public class TweetIncludes
{
    public TweetUsers[] users;
}

[System.Serializable]
public class TweetUsers
{
    public string username;
    public string name;
    public string id;
    public string profile_image_url;
}
We can now access the tweets using the following statements:
_twitterResponse.data[i].text
_twitterResponse.includes.users[i].name
_twitterResponse.includes.users[i].username
_twitterResponse.includes.users[i].profile_image_url
Displaying the Tweets
We use UnityWebRequestTexture.GetTexture to download the image from each profile_image_url and assign these images to the appropriate sprites:
IEnumerator GetTexture(string imageURL)
    {
        using (UnityWebRequest uwr = UnityWebRequestTexture.GetTexture(imageURL))
        {
            yield return uwr.SendWebRequest();

            if (uwr.result != UnityWebRequest.Result.Success)
            {
                Debug.Log(uwr.error);
            }
            else
            {
                // Get downloaded asset bundle
                var texture = DownloadHandlerTexture.GetContent(uwr);

                // Add your own code here to assign the textures to each tweet's profile image

            }
        }
    }
As for the the UI, I used Procedural UI Image to get the rounded corners.

We also want to find and highlight expressions containing @ and # in a tweet’s contents . We can use the Regex.Replace method for this:
using System.Text.RegularExpressions;

private string HighlightText(string tweetText)
{
    var regex = new Regex(@"#\w+|@\w+");
    var result = regex.Replace(tweetText, "<color=#00acee>$&</color>");
    return result;
}
Additionally, I used Soft Mask to get the gradient masking effect. For custom UI shaders such as Procedural UI Image, you need to add Soft Mask support to them by following this tutorial.