This is a reference guide for Photon Cloud, Voice and Chat – Multiplayer plugin by xixgames. Traditionally, UE requires developers to build a dedicated server when creating a multiplayer experience. However, sometimes you need to create a super quick multiplayer app perhaps for a game jam or a client presentation. By using Photon Cloud, you avoid going through the hassle of hosting a server.
From the Marketplace description, this plugin offers the following:
- Create multiplayer apps without building a dedicated server.
- Instead of using Unreal’s built-in networking where you need to run UE4 game server instances that UE4 game client instances connect to and players host game, you avoid all this problematic having a cloud server online.
- It offers matchmaking and scalability, but is not a replacement of UE4 Networking, nor uses it.
Check out the documentation and the sample projects in GitHub.
As mentioned by the developer, this plugin is just a wrapper for the Photon Realtime SDKs. You may want to ask about the cloud limits in the photon forum. Most of the references are catered to Unity C# developers, but you can easily interpret the functions to the corresponding UE blueprint nodes.
Set up basic FPS multiplayer
There is a tutorial by the plugin developer that goes through how to set up Photon multiplayer using the UE5 FPS template. However, I believe the tutorial can be made easier to understand if we break it down further, one feature at a time.
To make it simple, let’s start with the UE 4.27 FPS template and figure out how to spawn two players in the same map. When one player moves, the other player should see the movement. Let’s avoid talking about lag compensation and player data management for now.
1. Enable the Photon Cloud plugin
Easy enough. Create a Photon Cloud account and add your App ID in the Project Settings. Make sure that Project Settings > Plugins > Photon Cloud > Photon Cloud API > Blueprints > Photon Cloud APIObject Class is set to None. We won’t be using this in this example.
2. Create BP_GameMode
Create a Game Mode blueprint, BP_GameMode. We will place our Photon cloud logic here. Set the GameMode Override to BP_GameMode in the World Settings.
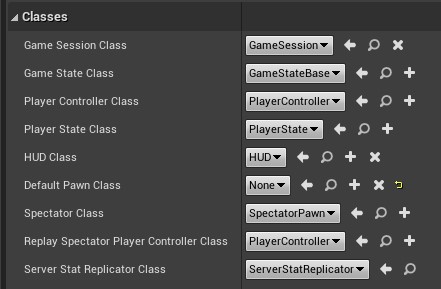
I prefer setting the Default Pawn Class to None to give the user an option to switch pawns. The reason is because I often work with asymmetrical multiplayer (VR and non-VR users).
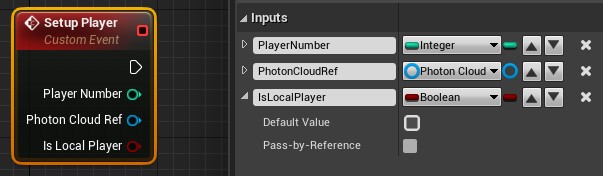
3. Create BP_FPSCharacter
You can duplicate the FirstPersonCharacter blueprint and name it BP_FPSCharacter. Inside this blueprint, create a Setup Player custom event with the inputs below. We’ll use this information later for replicating users.
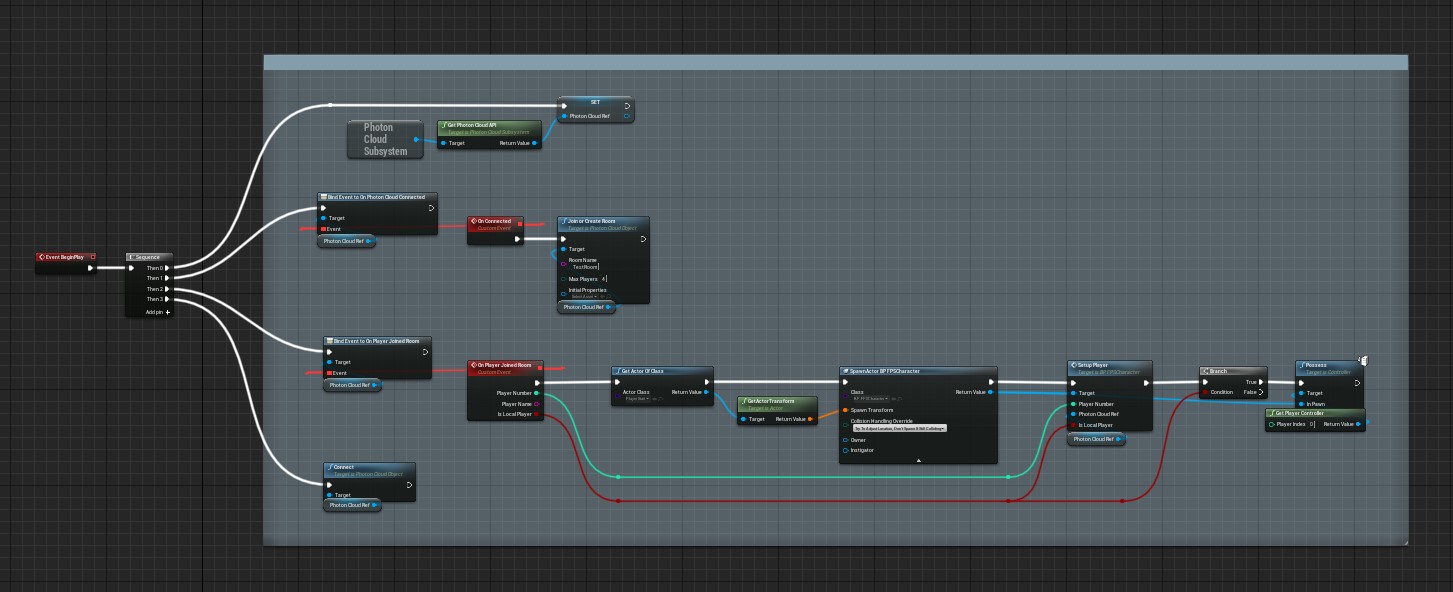
4. Set up BP_GameMode
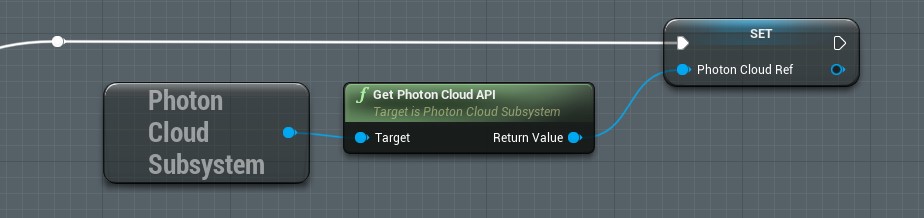
We go back to BP_GameMode. On BeginPlay, we first get a reference to the Photon Cloud API.
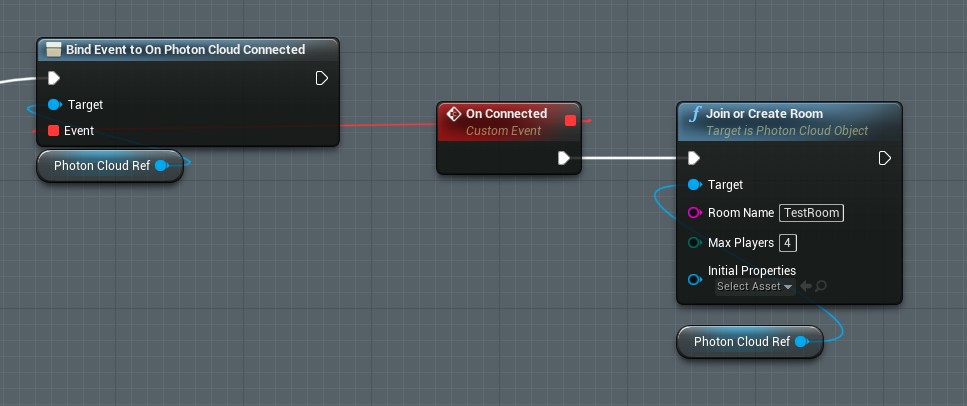
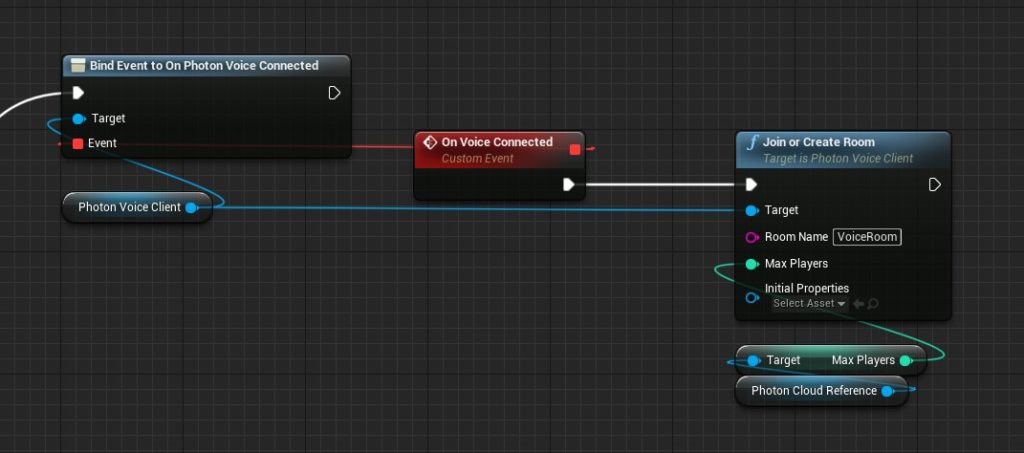
Next, we Join or Create a Room once the player connects to Photon cloud.
Afterwards, we add logic to handle our response when a player joins a room. It goes like this:
- Trigger event when a local or remote player joins the room.
- Look for the Player Start in the map and spawn a BP_FPSCharacter.
- Call the Setup Player event from the BP_FPSCharacter. This function handles the location and rotation syncing which we will implement at a later setup.
- Check whether the player who joined is a local or a remote player. If it’s local, we possess it. If it’s remote, we don’t do anything.

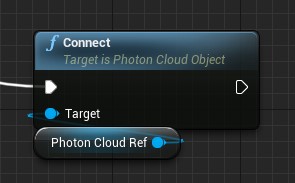
The last step is to connect to Photon Cloud.
Using a Sequence node, your complete blueprint should look something like this:
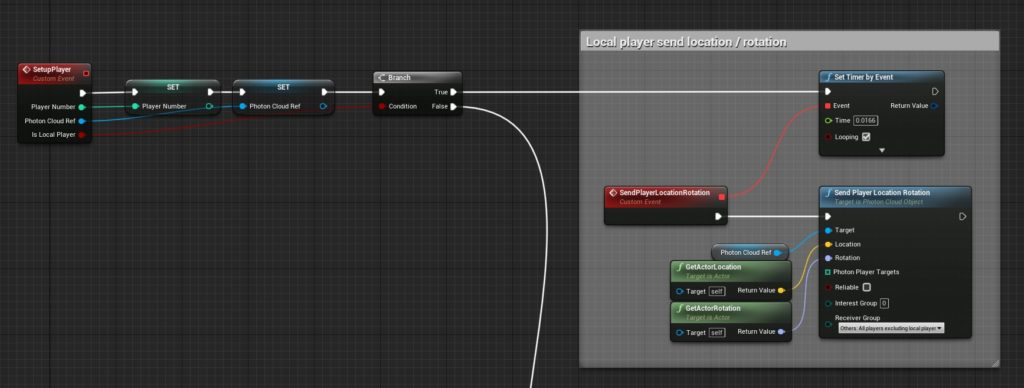
5. Sync location and rotation between players
Go back to BP_FPSCharacter. Let’s now define SetupPlayer. First, we store the references. Next, we add behavior for a local and a remote player. If the character is a local player, we send the location and rotation information to Photon Cloud.
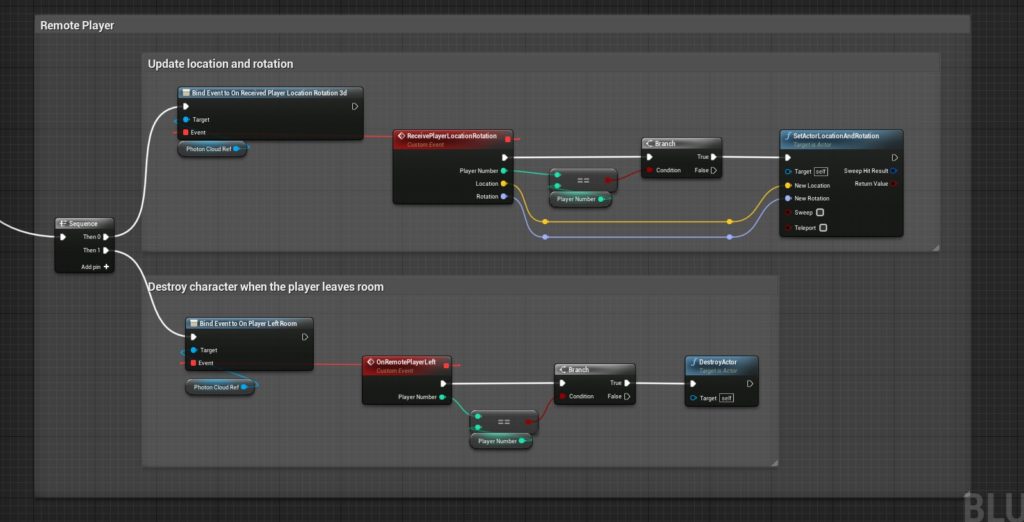
If the character is a remote player, we bind the events OnReceivedPlayerLocationRotation3d and set the location / rotation every time we receive data from Photon Cloud. We also bind the event OnPlayerLeftRoom so that characters are destroyed when the owning player leaves the room.
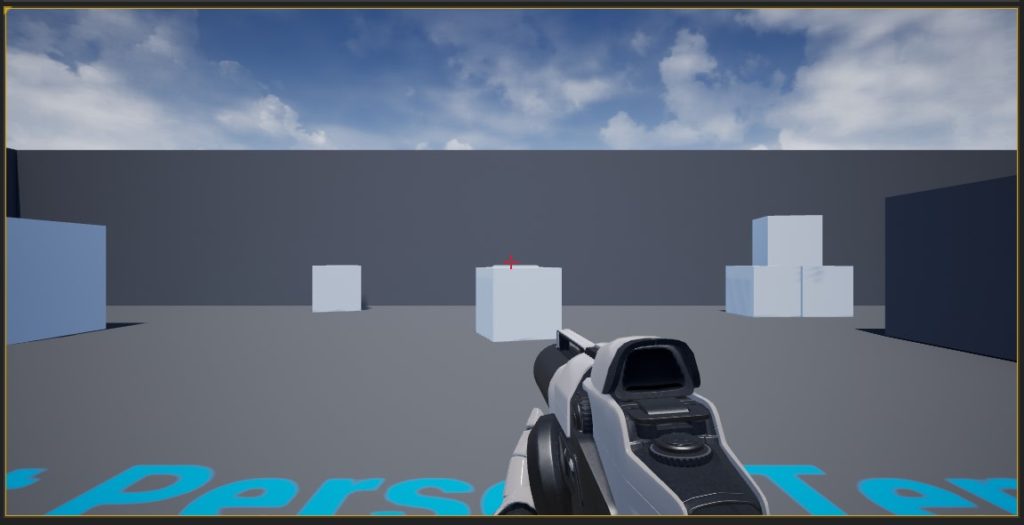
6. Testing multiplayer
Let’s now test multiplayer. In the Multiplayer Options under the Play Mode drop down menu, set the Number of Players to 2 and Net Mode to Play Standalone. Also, make sure that the Player Start actor is slightly above ground to prevent collision issues when spawning.
Hit Play. The two players should now sync and see each other.

Limitations
While the setup above works, you’ll notice the problems it has:
- Multiple players spawning at the same location at the same time which cause them to collide with each other.
- Only the guns are visible, not the hands.
- There is a noticeable amount of latency and rubber banding in the movement.
- The animations, shooting and looking up / down, don’t sync.
- The bullet projectile and the environment cubes are not replicated.
- We haven’t added a way to show which user is the Master or Client.
You can now proceed to this tutorial by the plugin developer and study how he solves these issues.
Adding Photon Voice
To add voice chat, I recommend grabbing the sample project for Photon Voice in Unreal and integrating it to your project. However, the project’s documentation is slightly lacking. I will show snippets of the blueprint nodes and explain those that look perplexing.
You can find the Photon Voice blueprint logic in ConnectWidget_BP.
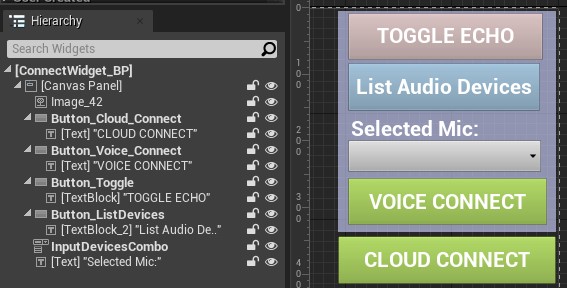
Let’s take a look at ConnectWidget_BP and analyze how it works. Photon Voice, like Photon Cloud, has the concept of rooms. Moreover, Photon Voice Rooms are separate from Photon Cloud Rooms. You don’t need to connect to Photon Cloud to use Photon Voice.
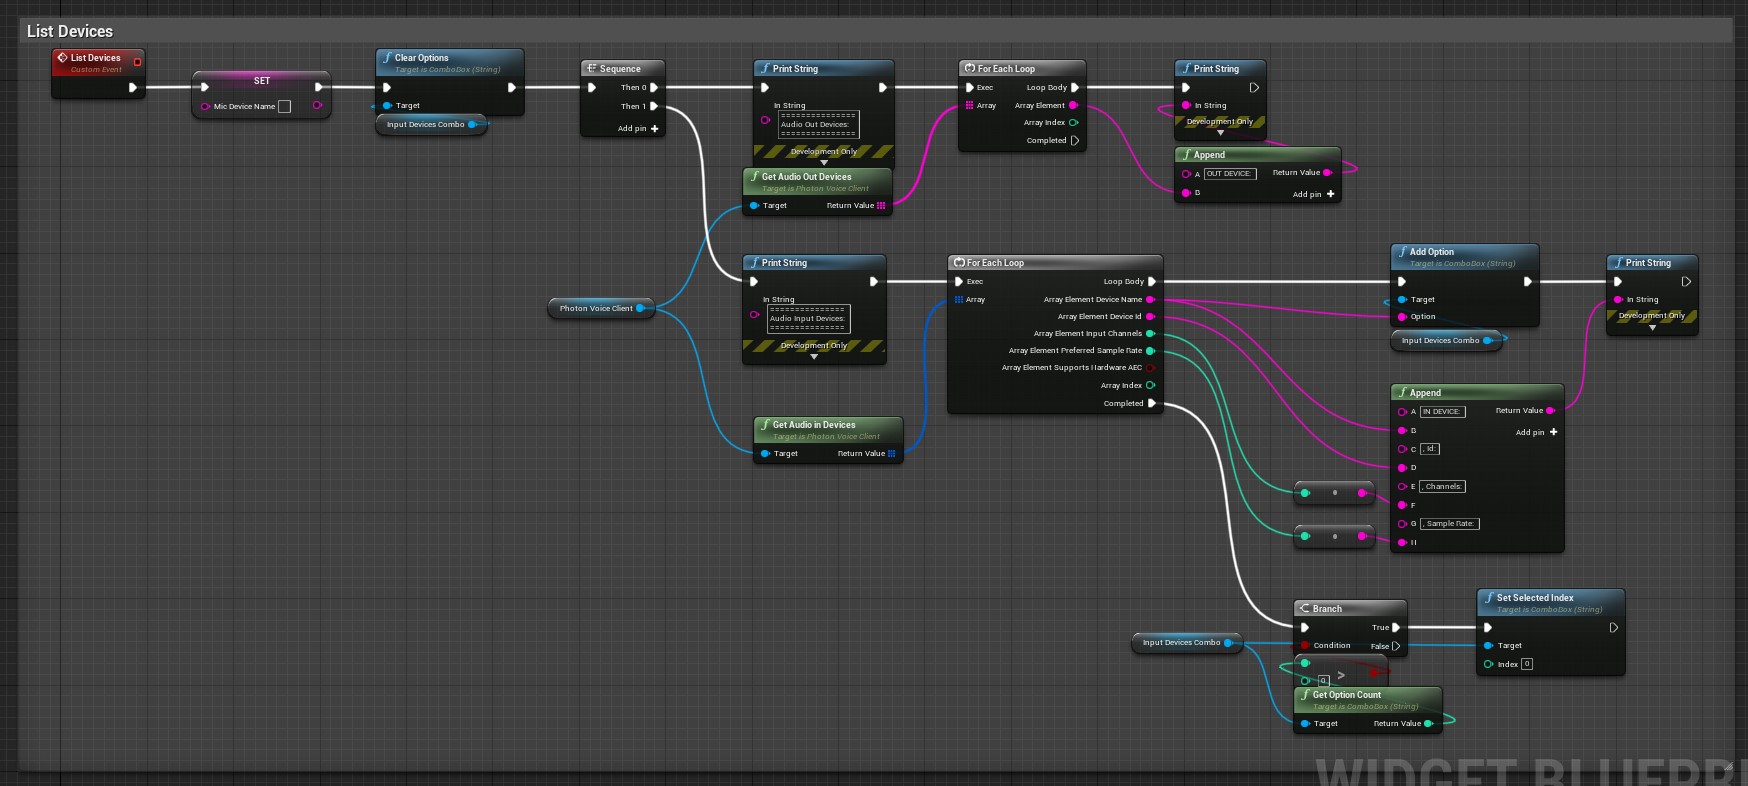
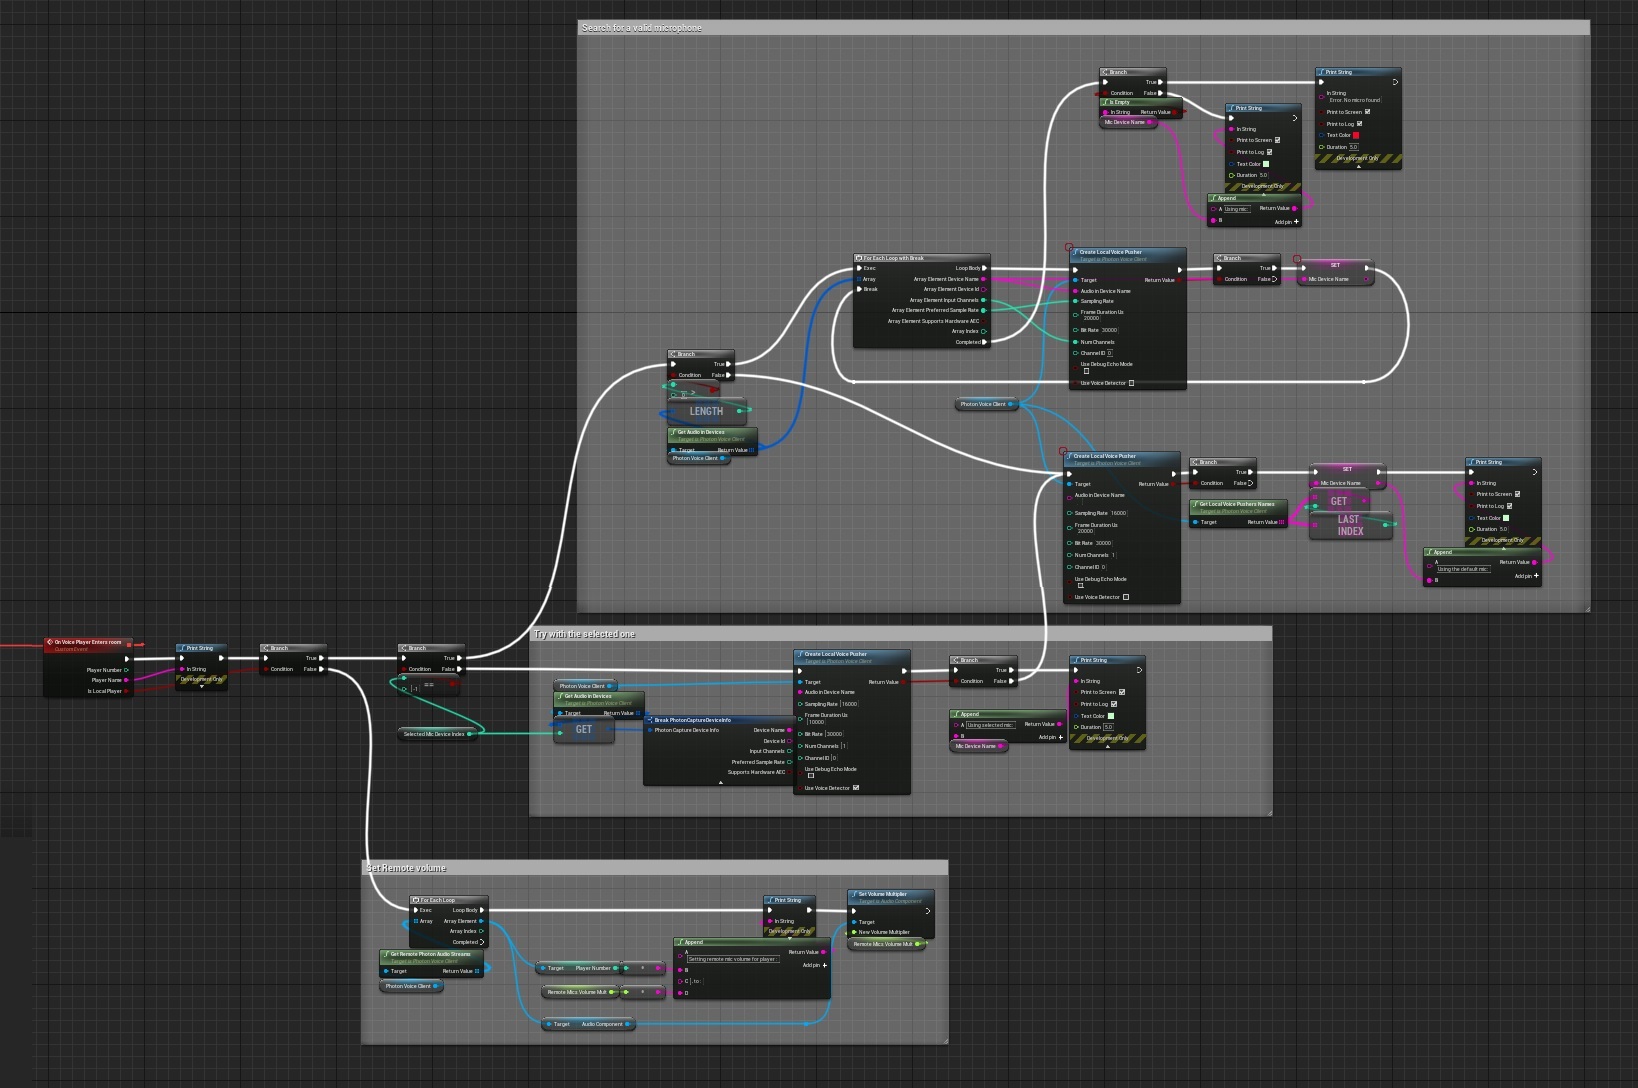
List all the audio input and output devices
Based on my testing, the console commands below make your voice sound clearer. Photon Voice will still work if you omit these nodes, but your voice will sound worse. The plugin developer must have chosen these values to produce the best results by default.
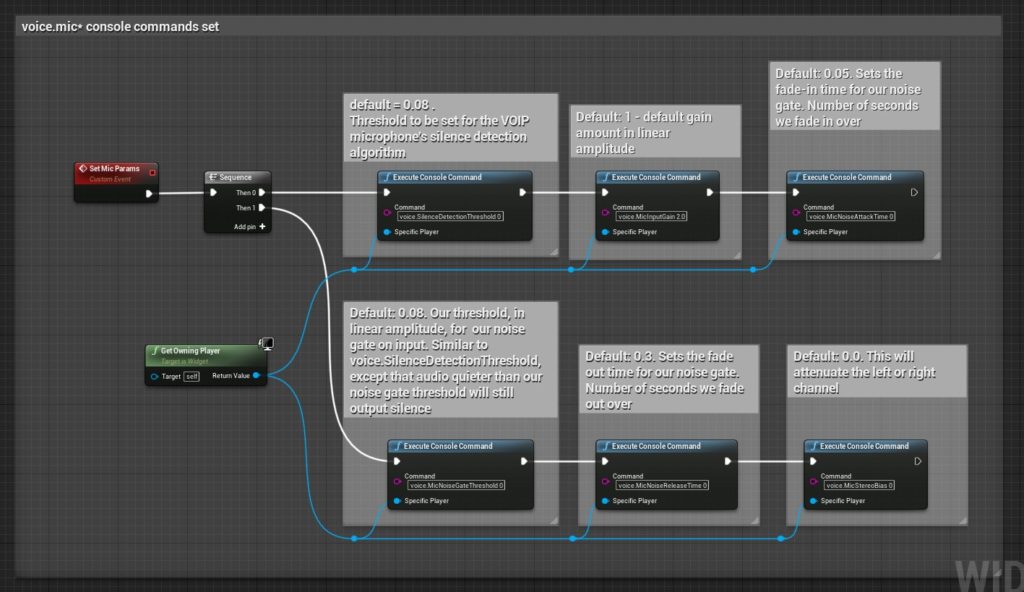
voice.SilenceDetectionThreshold 0
voice.MicInputGain 2.0
voice.MicNoiseAttackTime 0
voice.MicNoiseGateThreshold 0
voice.MicNoiseReleaseTime 0
voice.MicStereoBias 0
Make sure that the Selected Mic Device Index correctly corresponds to the device index assigned by the Photon Voice Client. This is because the order of the devices in the Combo Box does not match the order in Photon Voice.
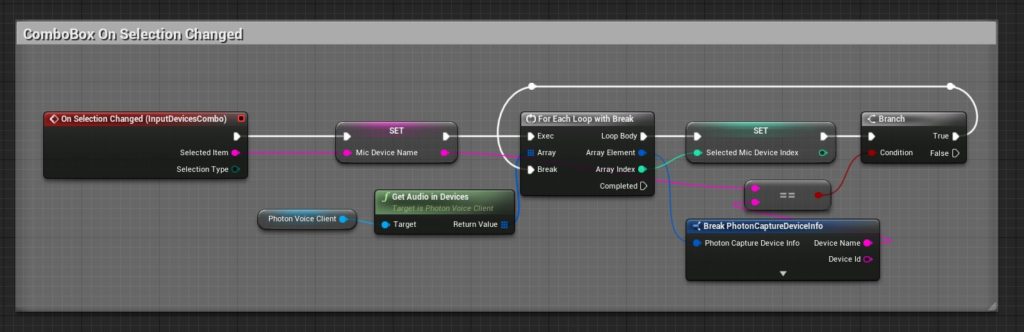
Check whether the user has selected a connected microphone. After that, use that microphone and initialize parameters for Photon Voice,
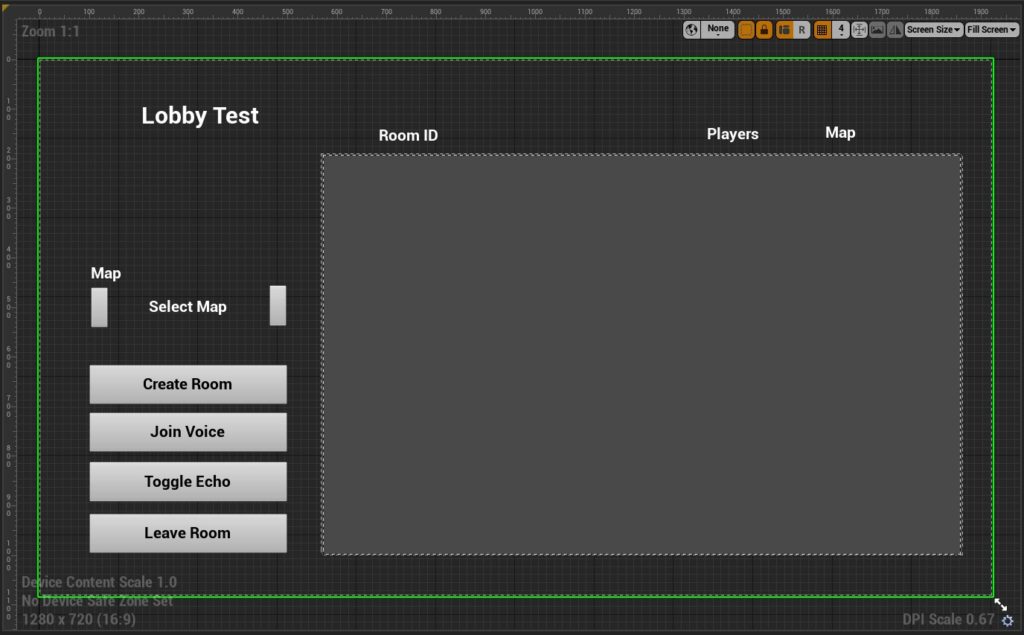
Set up Lobby with Map Selection
This section is based on this UE4 Tutorial – Online Sessions tutorial and the sample ThirdPerson_Photon project from GitHub. We will create a simple lobby room where users can choose maps and create and join sessions. here is the sequence of events:
- User enters the lobby menu and connects to Photon Cloud.
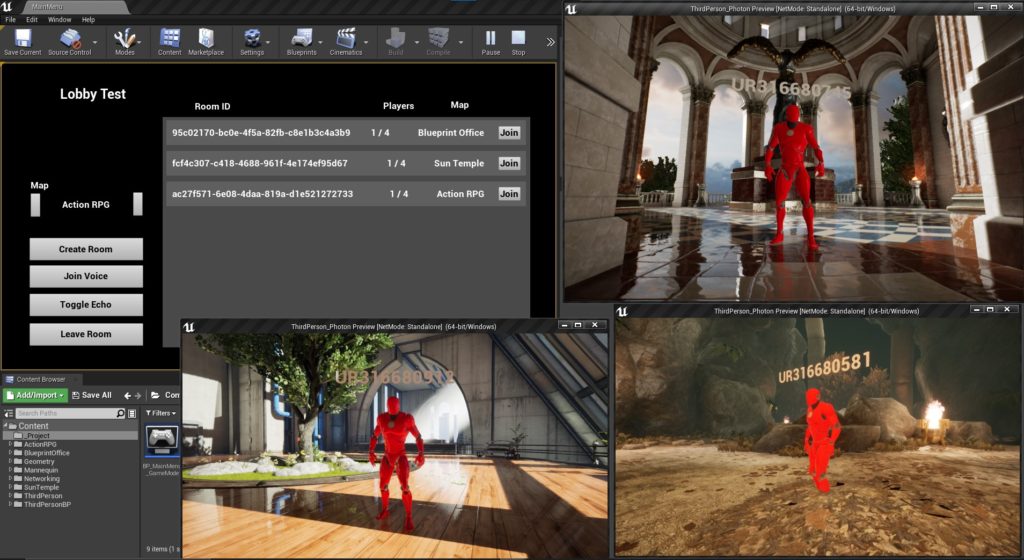
- Lobby menu displays all existing rooms which displays Room ID, number of players, and map name. User has the option to create a room and choose a map.
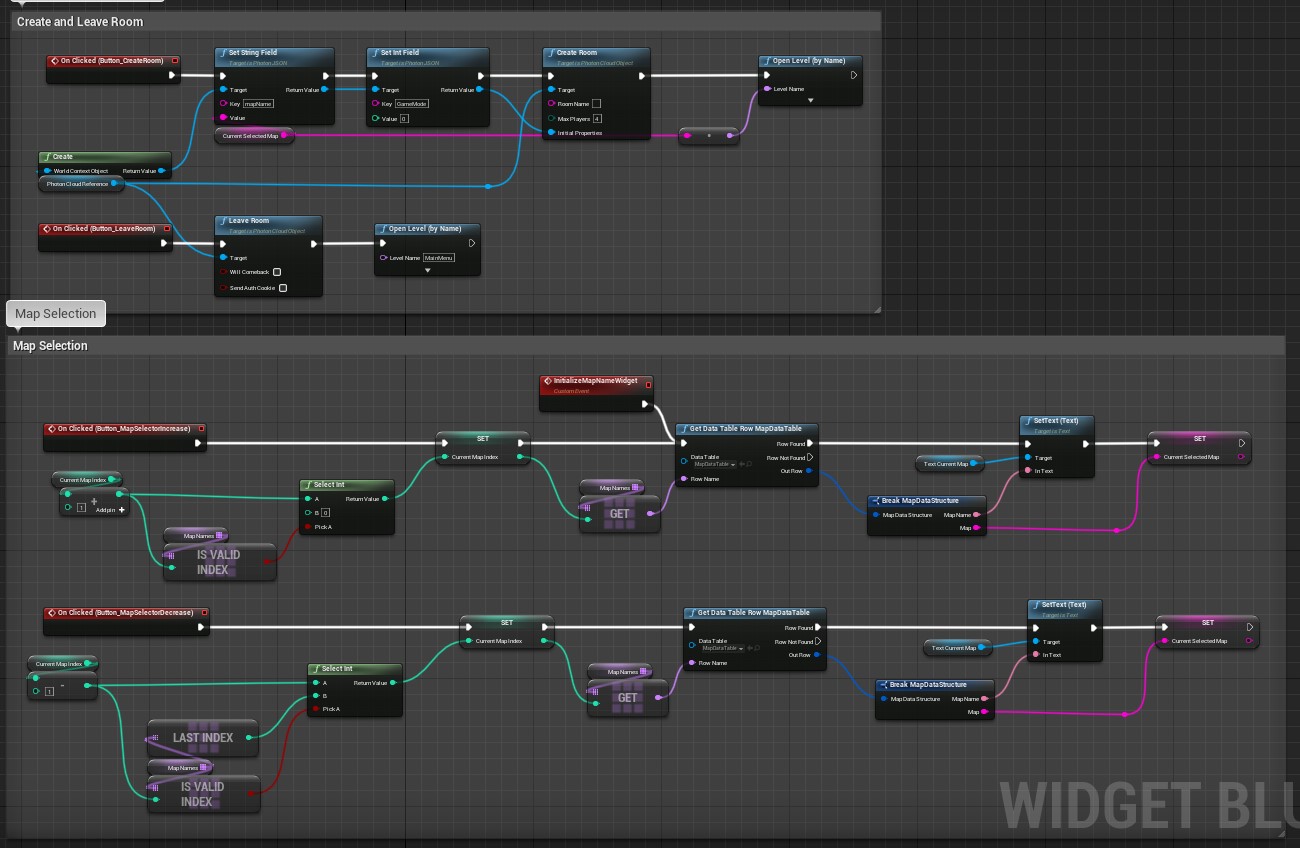
- User joins room and is teleported to the corresponding map.
Our lobby relies on the following:
- BP_PhotonCloud – inherits from Photon Cloud Object. Don’t forget to assign this in the blueprint config in Project Settings > Plugins > Photon Cloud.
- WB_MainMenu – our lobby menu where users can view, create, and join sessions.
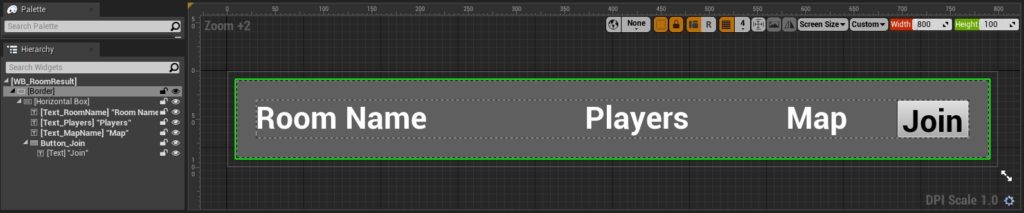
- WB_RoomResult – a widget that displays the Room ID, Player Count, and Map Name
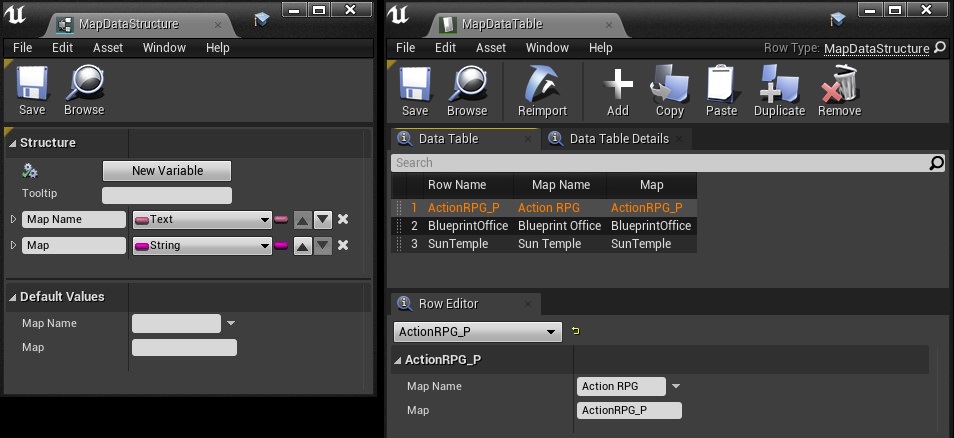
- MapDataTable – a Data Table containing our map names.
Note: A player joining the Default Lobby Room does not fire the OnPlayerJoinedLobbyRoom event.
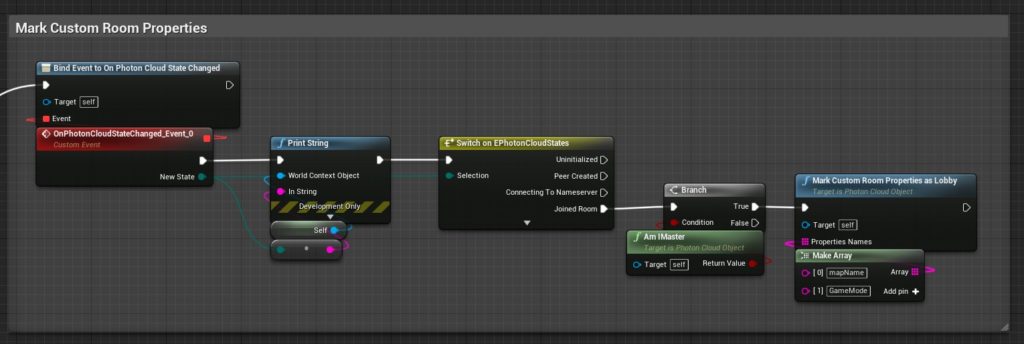
BP_PhotonCloud
This is a slightly modified version of PhotonCloud_BP from the ThirdPerson_Photon project. Once the Master player joins a room, we add custom room properties mapName and GameMode.
Map Data
Create a structure called MapDataStructure that has a text and a string variable. Use this to create a data table called MapDataTable. In this example, I downloaded and added the Action RPG, Blueprint Office, and Sun Temple projects from the Marketplace. We have 3 maps in total.
WB_RoomResult
Create a widget blueprint WB_RoomResult. This widget contains relevant information such as the Room ID, number of players, and map name. The specific formatting can be found in this video.
The blueprint below shows how this works. The variables RoomDetails of type Room List Result and CustomRoomProperties of type Photon JSON are public and exposed on spawn. We use these variable to populate the Texts with the relevant information.

WB_MainMenu
This widget is our lobby menu where users can view, create, and join sessions. Use this video as reference.
During initialization, we use OnUpdateRoomsListExtended to get a list of existing room in Photon Cloud. We use this information to spawn WB_RoomResult widgets which display the relevant room information.
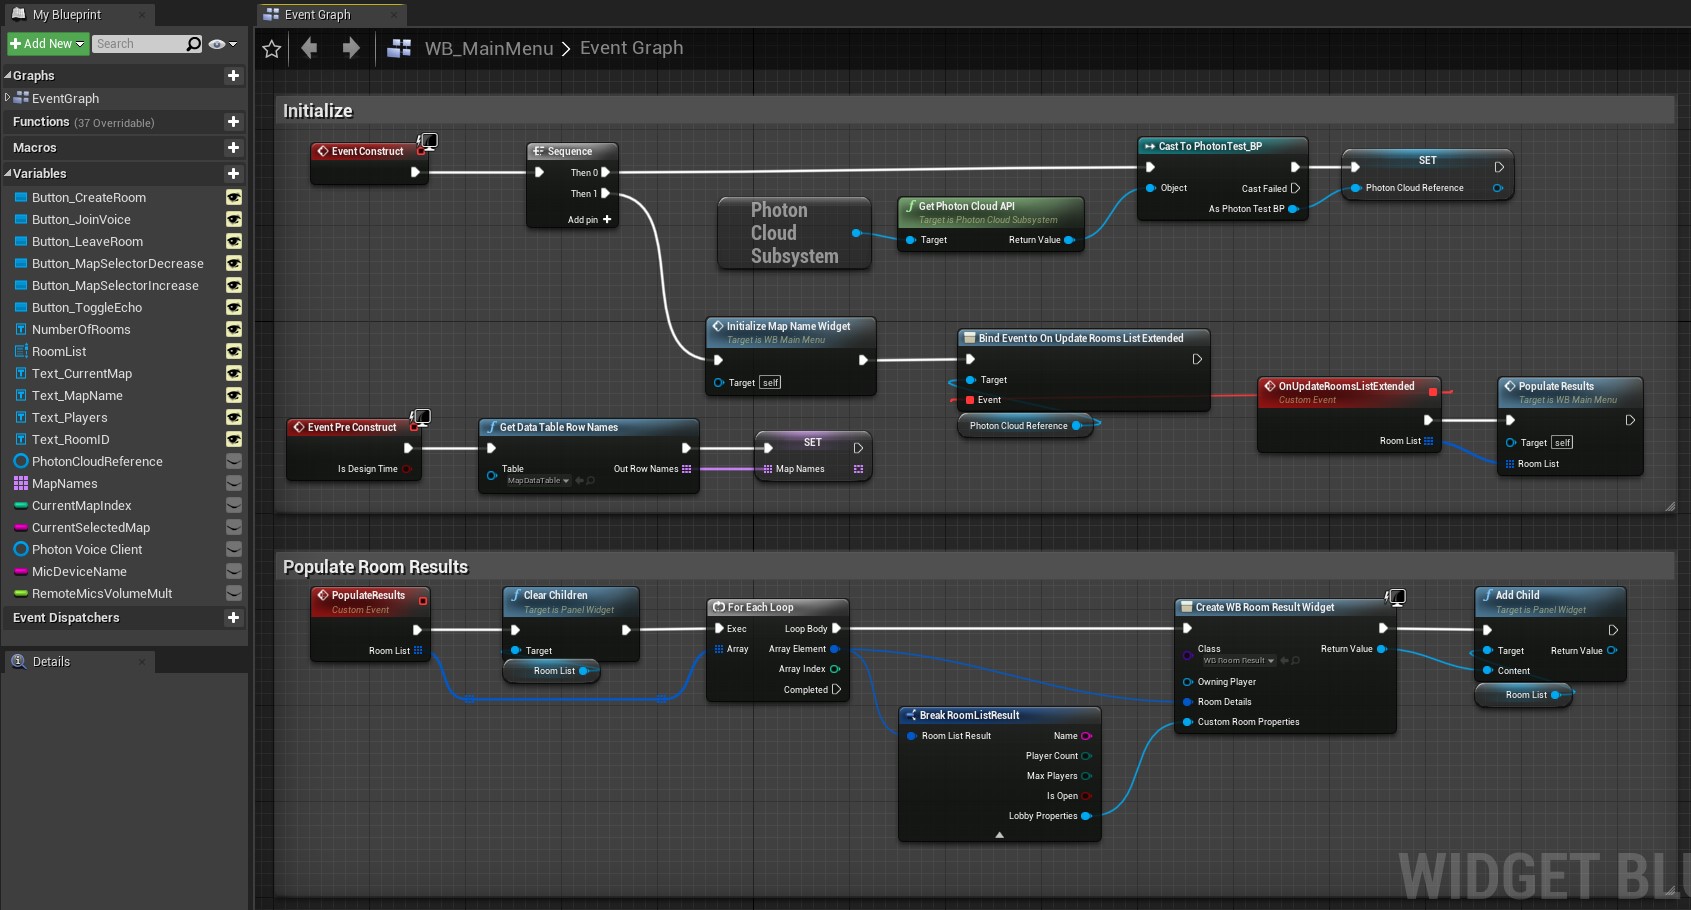
Our map selection logic uses the Get Data Table Row node to cycle through the maps we listed earlier in MapData. derived from this video.
Putting it all together
You should now have a working lobby that displays room information when a user creates a room. As mentioned previously, use the series UE4 Tutorial – Online Sessions as reference.
Now that you understand the basics, the next step is to examine the AmongClouds sample project which adds more features such as PlayFab login and authentication tokens.