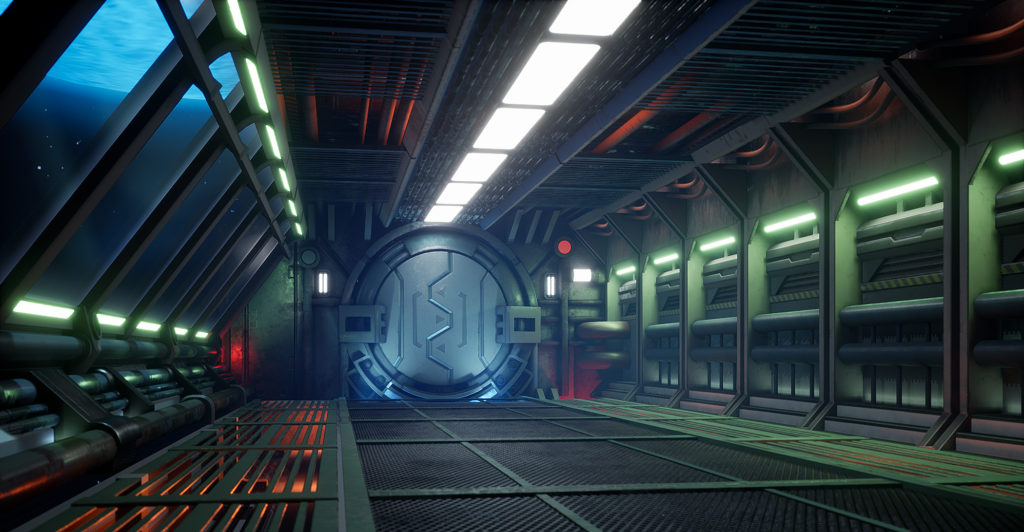
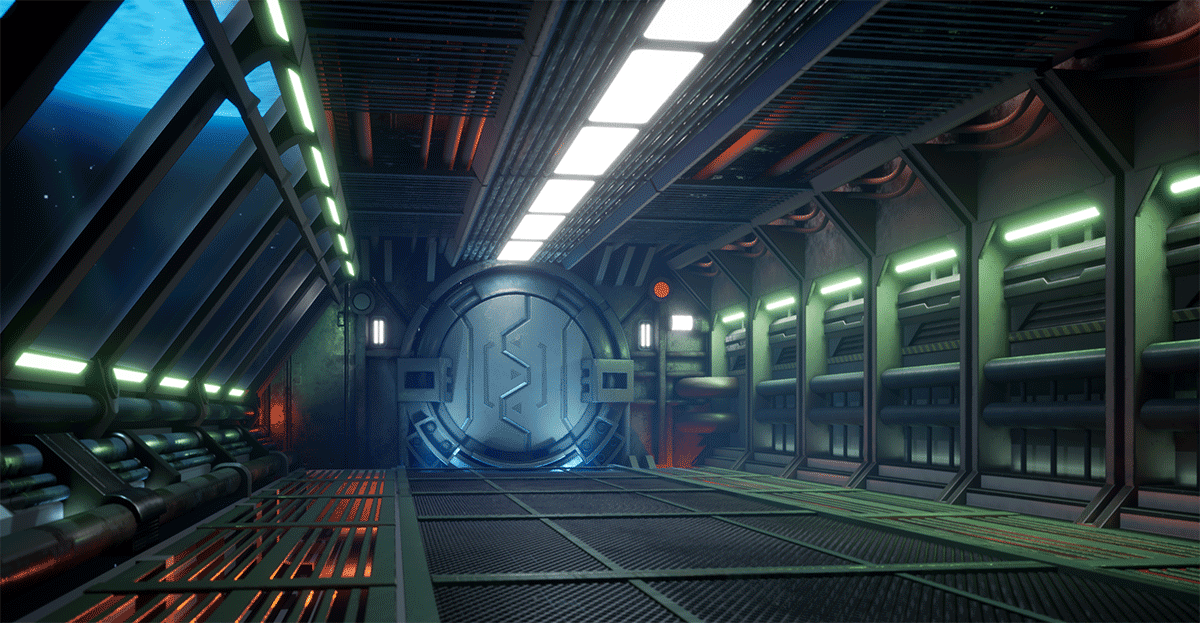
In today’s blog, I’ll share with you how I created Sector 1, a sci-fi passage in Unreal Engine. This scene is based on a concept by Pene Menn which captured my attention when I first saw it. I really like the way the colors the artist uses in the original concept art. Creating this scene was a great opportunity to learn how to assemble sci-fi objects.
Creating the Scene in Unreal Engine
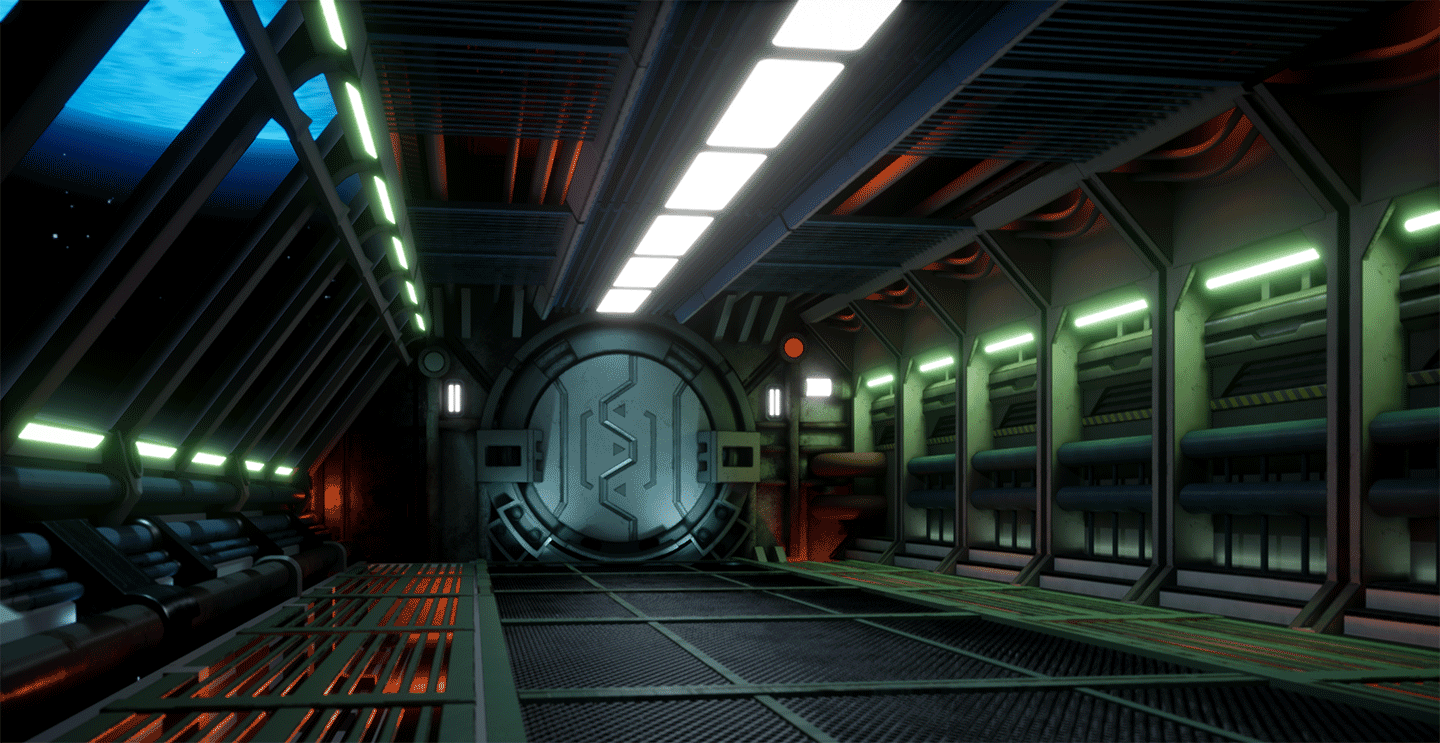
Here is a GIF showing a quick overview of how the scene was assembled:
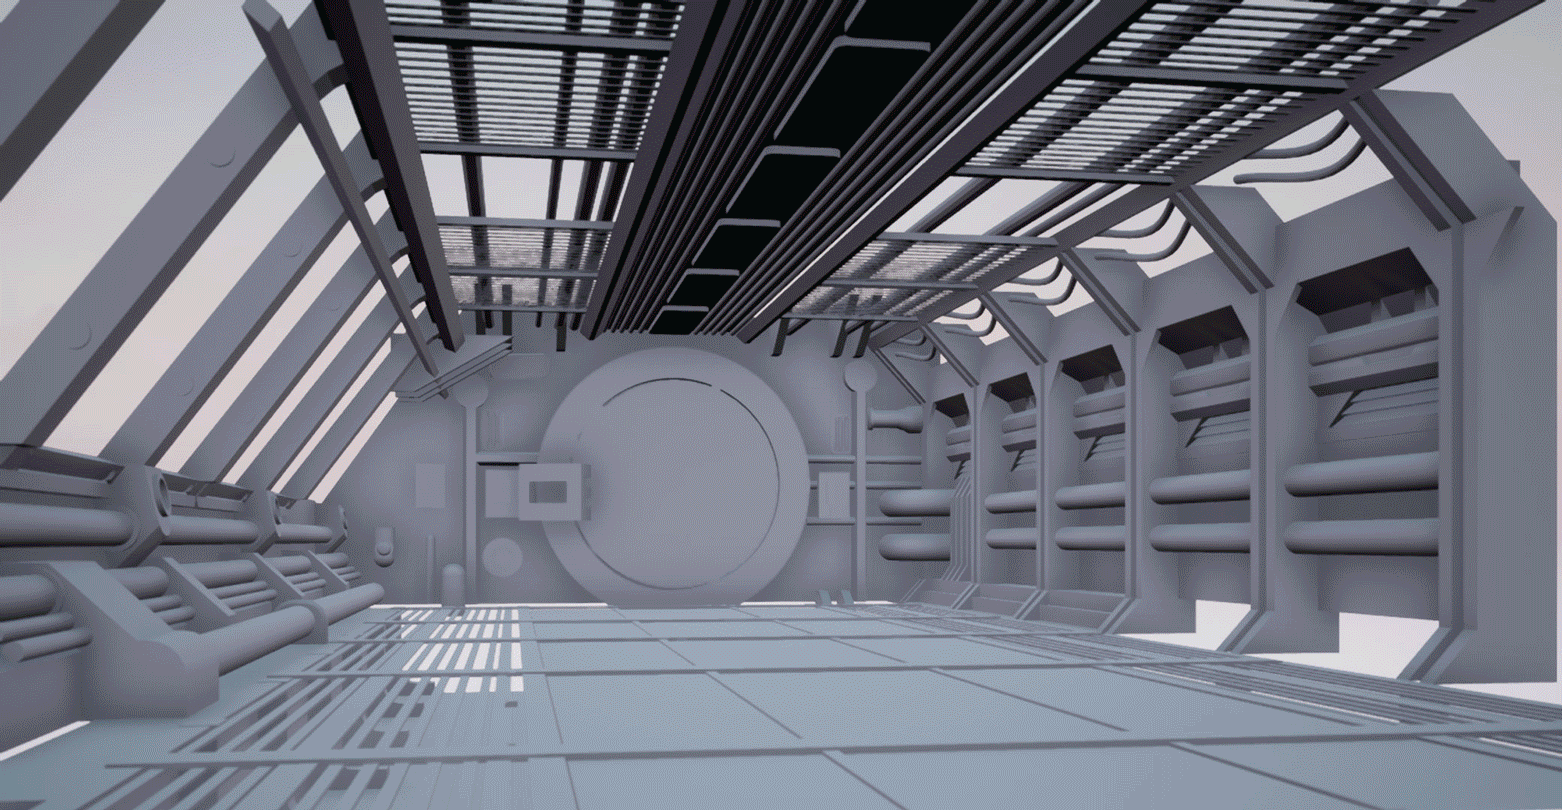
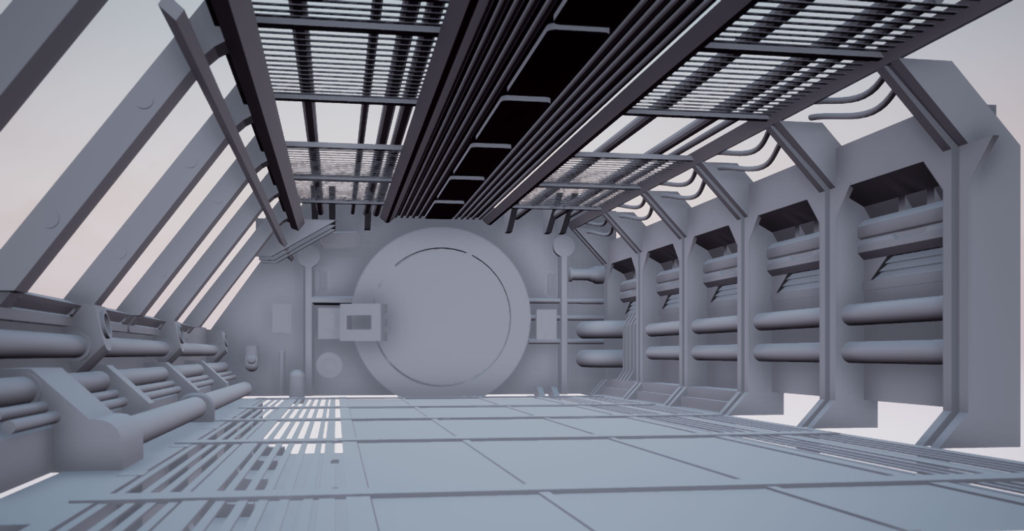
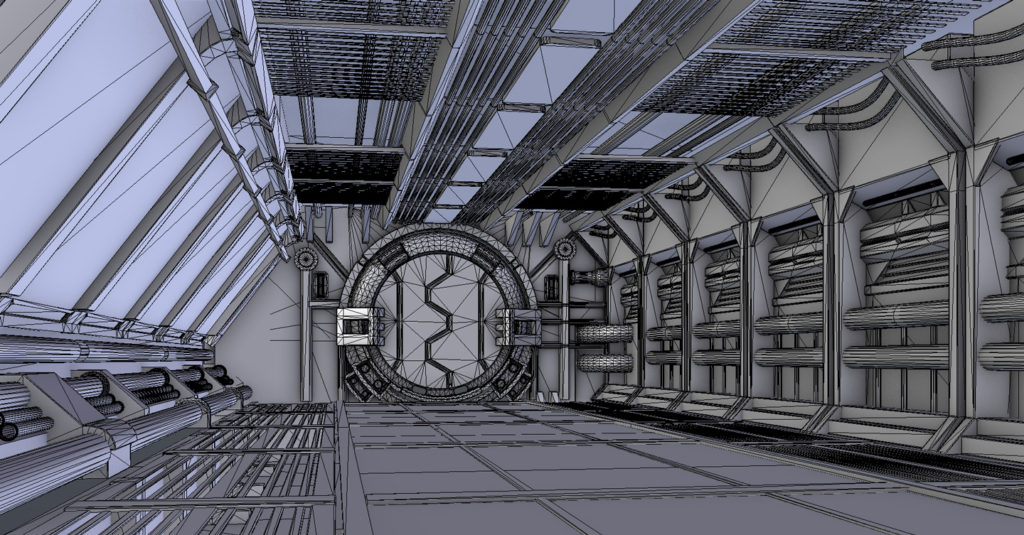
1. Grayboxing
First step is to create a blockout of the scene using primitive shapes. In this project, I used a combination of Maya and Blender. No need to add details at this point. My goal was primarily to capture the placement of the objects as well as the primary camera and try to match the setup of the reference. Afterwards, I exported the scene into Unreal Engine.
2. Master Material
I used 2 simple master materials for this scene: one for a typical prop object and another one for objects with tiling materials. My setup is pretty much identical to the standard shader in Unity with adjustable parameters. I also added StaticSwitchParameters to turn off texture maps that are not needed in certain objects. Furthermore, I’m using a MRA packed texture setup: Metalness in the Red channel, Roughness in the Green channel, and AO in the Blue channel.
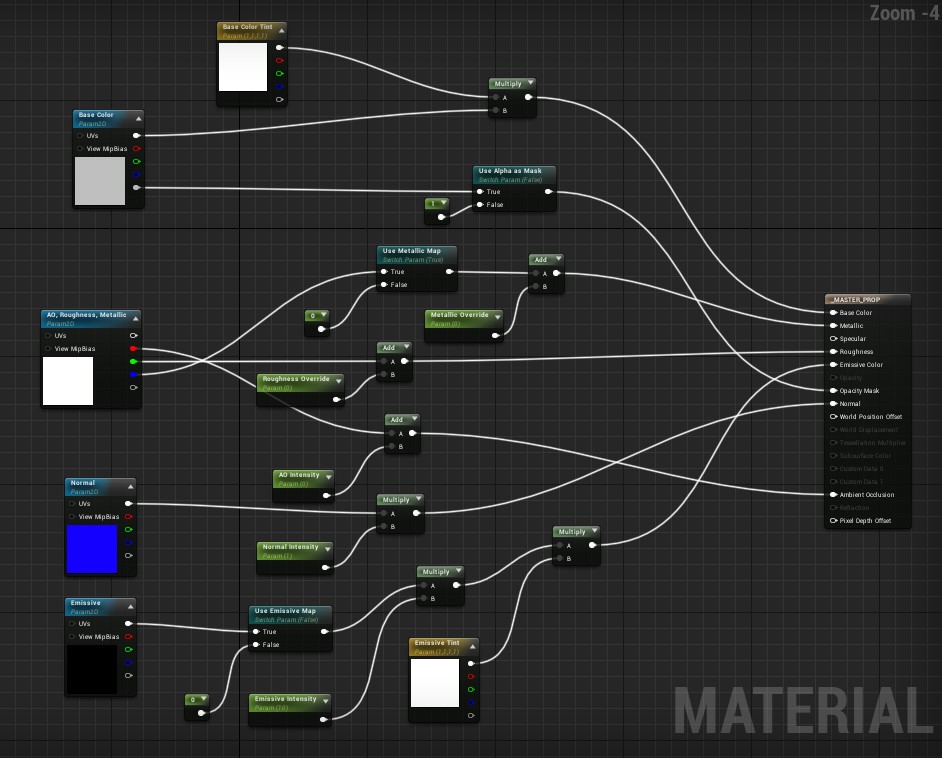
I also created a few other materials for specific cases which I will discuss later.
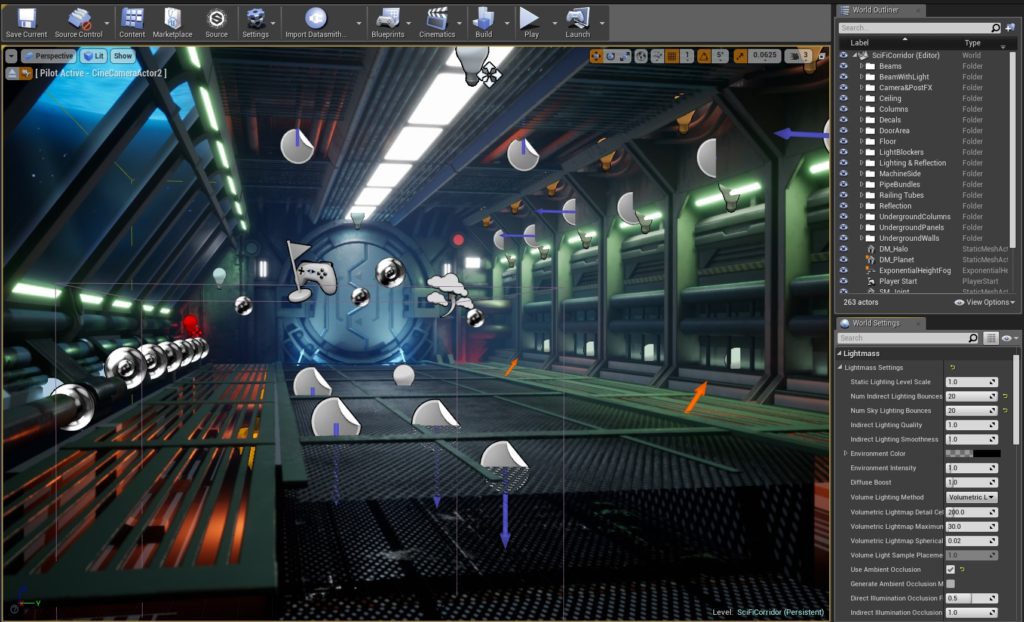
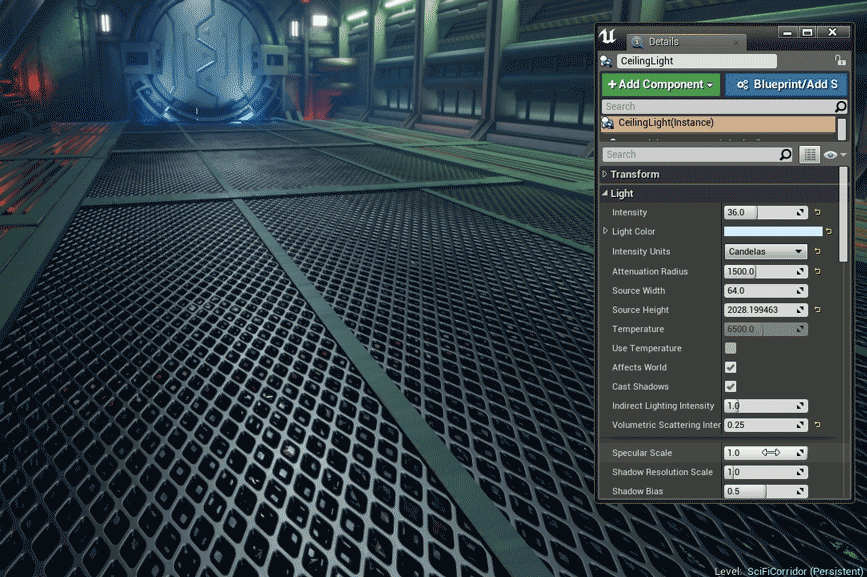
3. First Lighting Pass
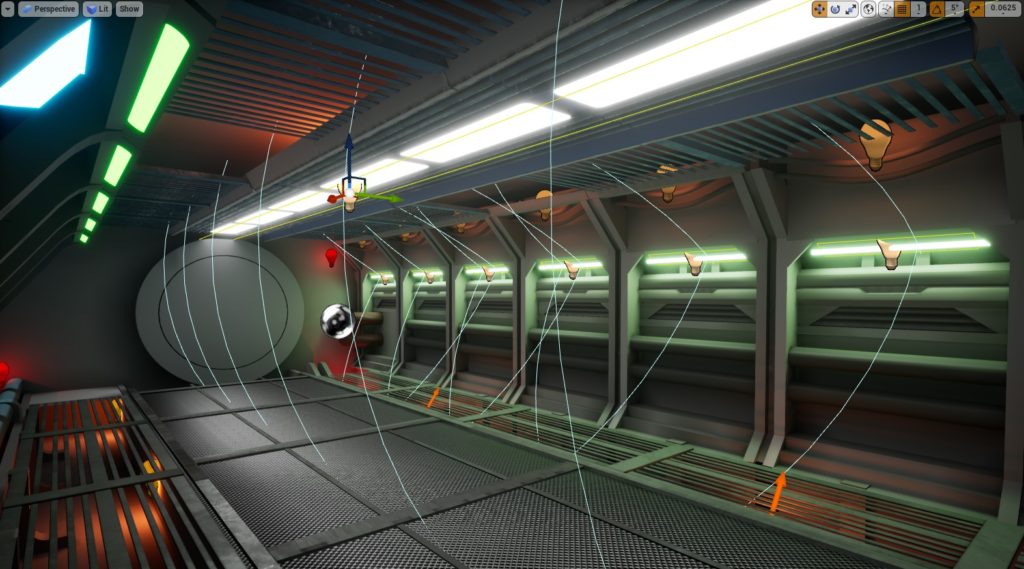
I like to setup the lights early and edit them along the way as the project progress. My goal here is to determine where lights should be placed, which ones are static / stationary, where shadows would occur, which sections are too dark, what exposure settings I should use, and what values I should use for my albedo later for texturing.
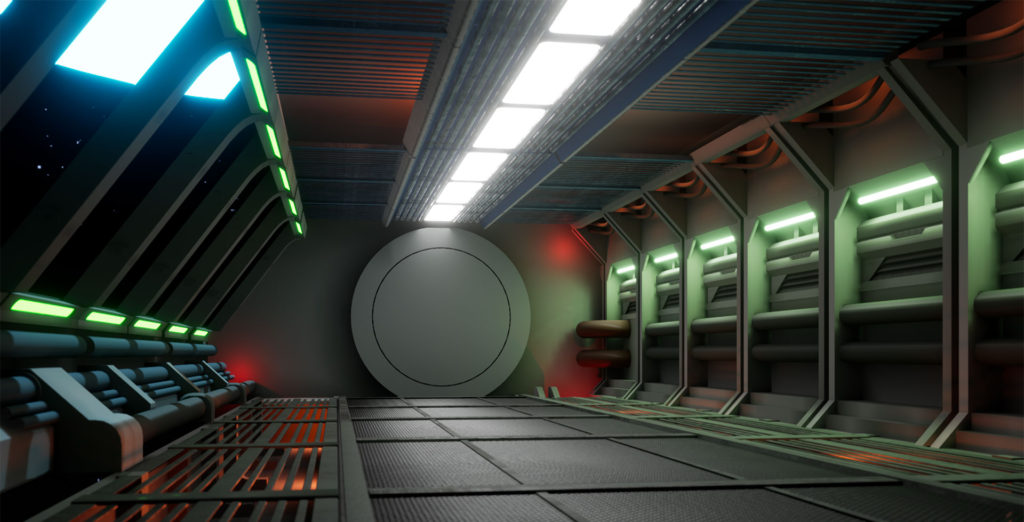
In the screenshot below, you can see that the lights are the primary pushers of the colors in the scene. Just by playing around with lights and placing some diffuse materials you can already produce somethin visually pleasing. At this point, the only texture I’m using is the wire mesh on the floor.
Some of the emissive objects are set to Use Emissive for Static Lighting with Emissive Boost carefully adjusted. You can learn more about these settings in this link. Furthermore, almost all are set to Static except for a single Stationary Directional Light to simulate the light coming from the bluish star (which was actually a planet).
Emissive Objects
Another thing I learned is that you should be careful with objects that are set to Use Emissive for Static Lighting. In some cases, such as the scene I’ve created, the lighting from these objects will have a large radius of effect which caused certain sections of my scene to receive unwanted lighting. This type of lighting has far less controls to adjust when compared to actual lights, so I ended up using a different approach. I reduced the Emissive Boost of these objects to a very small value, and then placed Rect Lights set to Static on top of them as substitutes. This type of setup might be unrealistic, but it gave me a lot of artistic control with the Intensity and the Attenuation Radius.
Lightmass and Post-Processing Settings
For interior scenes, I recommend increasing Num Indirect Lighting Bounces to something like 10-20 because the default value of 3 makes unlit sections of your scene receive too little bounced lighting. Additionally, I recommend turning off Screen Space Ambient Occlusion since this can mislead your lighting setup sometimes. In my case, I opted for baked Ambient Occlusion instead. You can always turn on SSAO later if you want. With these in mind, I adjusted my Exposure settings accordingly.
Lastly, Bloom is something I kept adjusting throughout the project. Careful not to go overboard with it.

If you’re having trouble understanding lighting, I highly recommend Unreal Engine Lighting Academy which is a goldmine of information.
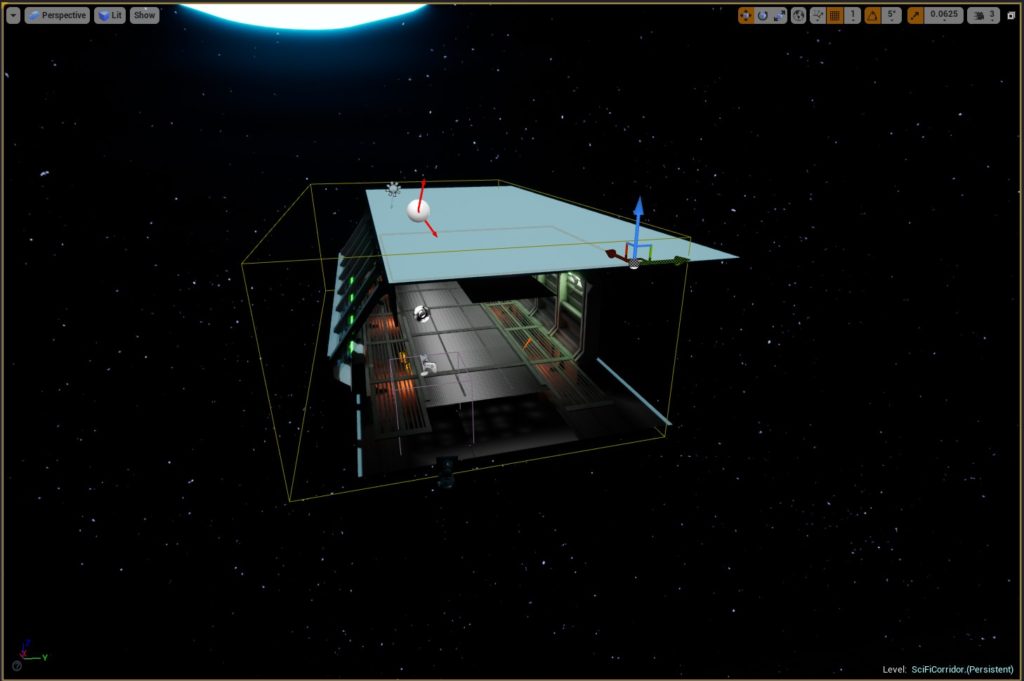
4. Adding the Background Elements
Sky Sphere
For the sky sphere, I used a simple one which I recycled from a previous project. Just some stars scattered around a sphere.
If you’re interested in creating your own space sky sphere, there’s this tool called Spacespace, a free tool for creating space skyboxes with stars and nebulae. I didn’t use it for this project though. Maybe sometime in the future when I need to create a more complex skybox.
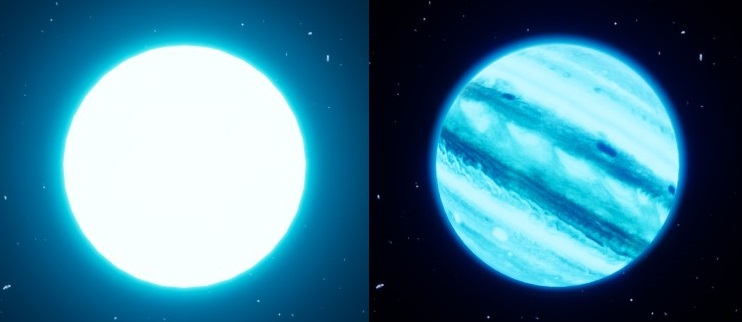
Planet
At first I thought that the sphere in the background was a star and not a planet. This led me to some interesting discoveries. One issue I learned was that having a high emissive value turns an object’s color to white, which is pretty realistic but limits your creative control over the colors. This caused a mismatch from the original reference as shown below:
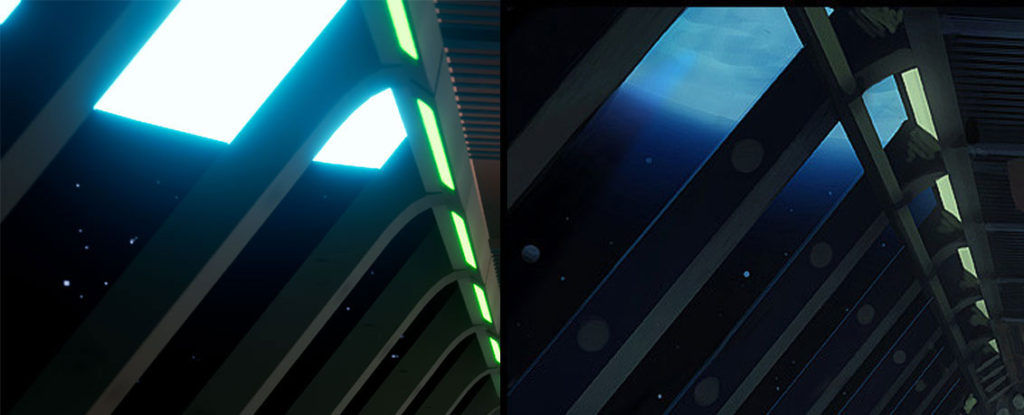
Based on my initial research in the Unreal forums, this has something to do with the default tonemapper. If you’ve encountered this issue before and would like to find a workaround, below are links to forum threads that might help you:
Emissive colors turning white?
4.15 tonemapper – is it possible to simulate old effects?
As of 4.15, Bloom has ZERO artistic control
To mitigate this, I replaced the bright star on the upper left with a gaseous planet. I simply took a texture of Jupiter and tweaked the colors in UE4. Also, I added a ring around the planet and slapped a gradient texture on it for a simple glow effect:
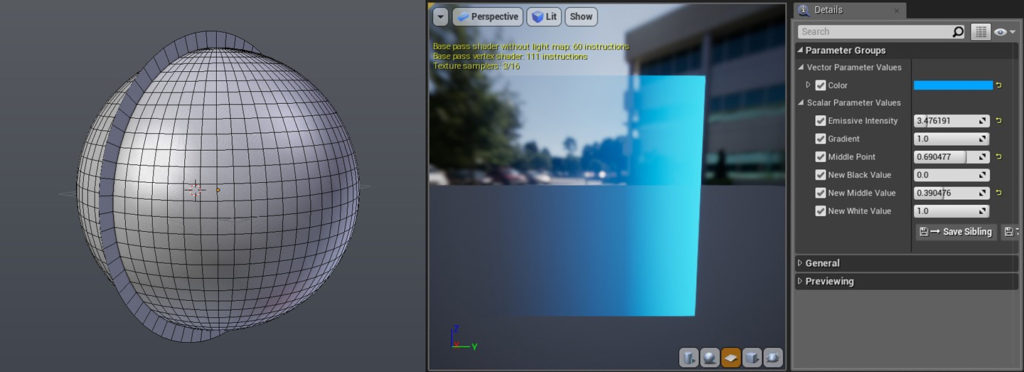
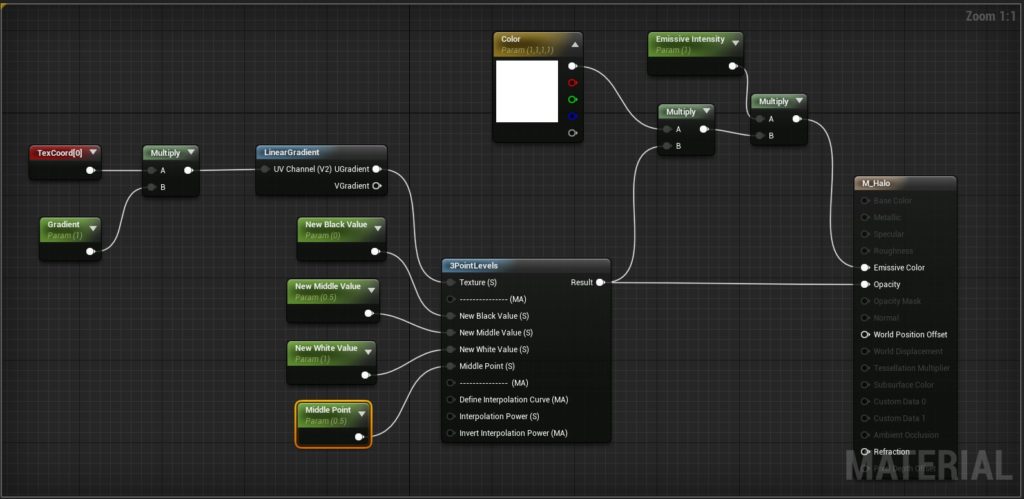
Here is the material setup for the glow effect. For materials such as this which uses a simple gradient, it’s better to create it within the material editor using Linear Gradient and 3PointLevels with adjustable parameters for faster iteration:
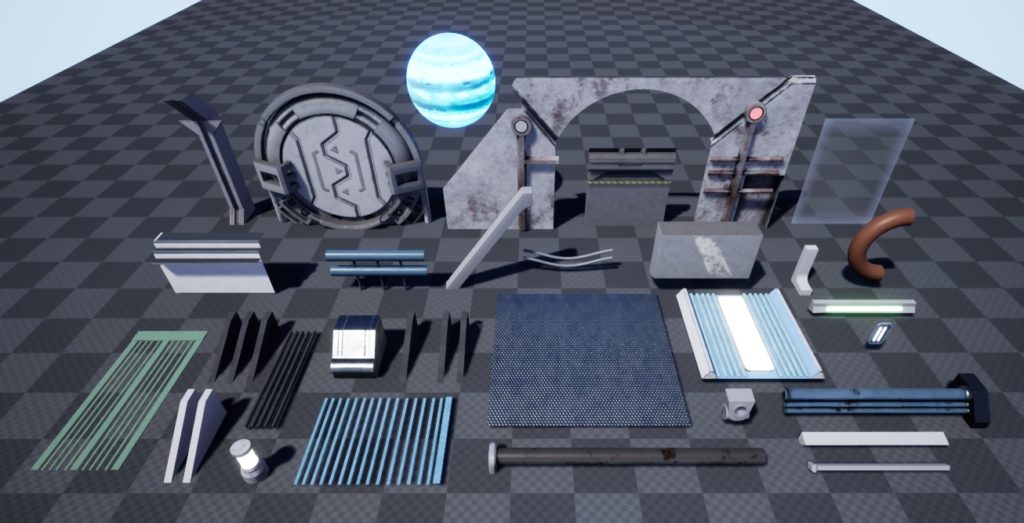
5. Modeling and Texturing the Assets
For the detailed meshes, I used the Face-Weighted-Normals approach with a few manually painted height and normal information. FWN is great for hard-surface environment props. For the textures, they were all created using Substance Painter and Designer. I tried to go for a modular approach and reuse as much objects as I can. Using decals later assisted in creating variation in certain sections.
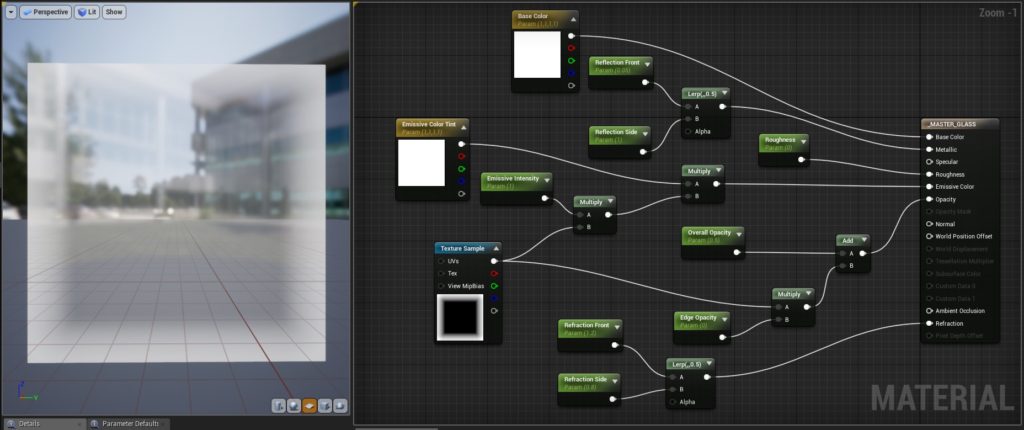
Here’s my material setup for the window glass. Fairly simple:
Wireframe view of the assembled scene just in case you’re interested:
6. Reflection Capture Actors
Reflections are very important in sci-fi scenes. A lot of times you’ll be using shiny and metallic materials. Comparison below shows how big of a difference reflection probes can make especially with the windows on the left. I also placed more lights around the scene to highlight some sections that were too dark. Anyway, check out UE’s documentation on reflections here and here if you want to take a deep dive into the nitty gritty and learn how to make a proper setup for your reflection capture actors.
Sometimes you’ll encounter lights that are causing too much specular highlights. If you do, you can adjust Specular Scale in the culprit light’s settings. Take note that any value besides 1 is not physically accurate.
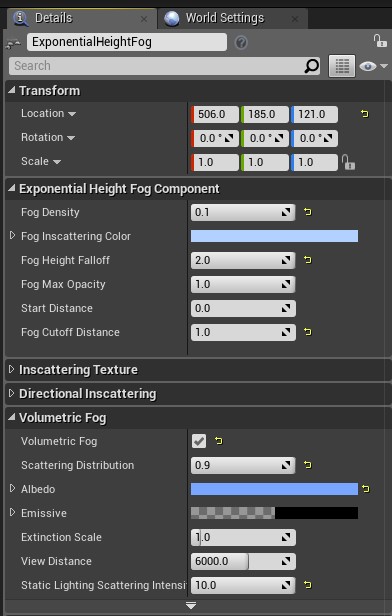
7. Exponential Height Fog
I was studying sci-fi corridors from Doom 2016 when I learned that some of the scenes from the game had amazing implementation of fog which added a lot to the mood and atmosphere. I decided to try it out and spent a significant amount of time playing around with fog settings until I got something that made the scene look great. The fog is a deviation from the original reference. After consultation with multiple artists, majority advised that the scene looked better with it.
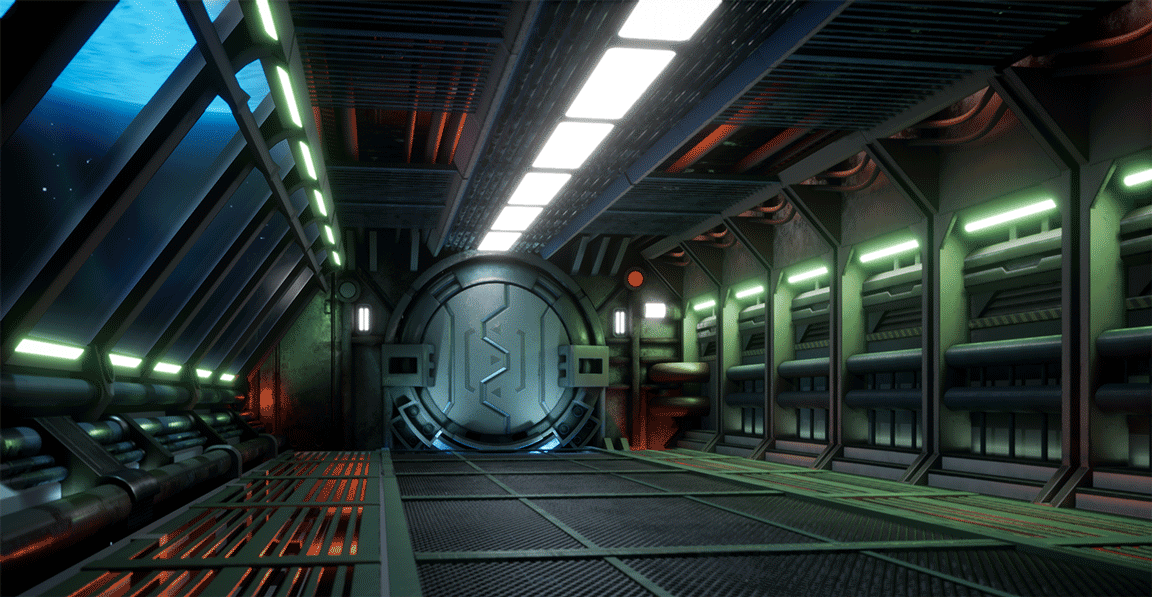
Here are my settings just in case you’re interested. The rest of the settings not shown are set to their default. Be careful when using a colored fog. It pretty much multiplies its color to all light sources with volumetric scattering enabled. This might cause you some trouble later.
If you want to learn more, here’s two videos by Epic Games where they talk about how to properly use Volumetric Fog:
Volumetric Fog | Feature Highlight
Volumetric Fog and Lighting in Unreal Engine 4 | GDC 2018
8. Using Decals to Create Variation
The last step is to add decals to break obvious repetition. I placed just a few on this scene, a few on the floor and a few on the walls on the right. Decals have a performance cost which you can learn more about here and here.
And that’s a wrap!
Conclusion
Overall, this was an amazing learning experience. I was able to streamline my workflow and reduce the friction from creating the model in Maya, texturing in Substance, and assembling the assets in UE4. I discovered that I was spending too much time in texturing because I didn’t gather enough reference material. Lesson learned.
Comparing the scene to the original reference, there are details that did not make it due to time constraints. There were supposed to be more details on the door, a control panel beside the door, holes on the floor, busted pipes on the side, and more grunges scattered throughout the scene. Maybe sometime in the future I’ll come back to add them.
Useful Tips
1. Avoid putting too much dark saturated colors in your albedo textures. It’s a common mistake by beginners who are new to PBR texturing.
2. Sometimes when taking high-resolution screenshots, you’ll encounter jagged shadows from direct lighting even though you’ve set Shadow Quality to Epic or even Cinematic. To fix this, check the light source and play around with its Shadow Resolution Scale and Shadow Filter Sharpen.
3. Too much overlapping stationary lights will cause performance issues. This is indicated by a red X.
4. If you’re wondering why your UE4 project size is unreasonably large, you might want to check your Autosave folder. My project ballooned from 600Mb to 5Gb because of this, so I decided to disable autosave.
5. There’s a strange bug when taking high resolution screenshots in Unreal Engine 4.20.3 where some specular highlights would sometimes disappear. Try changing Screen Size Multiplier and then revert it to the original. It worked for me.
6. Use a color calibrated monitor. For obvious reasons. Otherwise, the brightness and colors you see on your monitor will mislead you during production.
7. Avoid getting stuck in tutorial land. Take the minimum that you need from tutorials and start working on your scene.